
DevOps
Ansible Architecture, Inventory, Playbooks, and Ad Hoc Commands: A Complete Beginner's Guide
Learn Ansible architecture, inventory files, ad hoc commands, and playbooks. Control nodes, host patterns, and safe first commands — verified for ansible-core 2.21.3.
Ansible uses a simple two-part architecture: a control node, the machine where you run the Ansible command-line tools, and managed nodes, the servers it configures. There is no agent to install on the managed nodes. Ansible reads an inventory listing those nodes, connects over SSH, then copies and executes small programs called modules on each one.
That single paragraph is the whole model. The rest of this guide makes each piece concrete: how to write the inventory, how to run your first command safely, and how a playbook differs from a one-off command.
Versions used throughout: ansible-core 2.21.3 (released 2026-08-10) and the Ansible community package 14.3.1 (released 2026-08-14), both confirmed against the Python Package Index on 2026-08-25. Those are two different packages with two different version numbers — a distinction that confuses almost every beginner, and one this guide resolves in its own section.
What you need to follow along: a Linux or macOS machine with Ansible installed, and SSH access to at least one other machine you are allowed to break. A virtual machine or a container is ideal. This guide does not cover installation.
Each of the four main sections stands alone. If you only came for inventory syntax or the ad hoc command table, jump straight there.
Ansible architecture: how Ansible works
The Ansible architecture has two kinds of machine and one list that connects them. You run Ansible on a control node. The control node reads an inventory file to learn which managed nodes exist. For each task, it copies a small program called a module to each managed node over SSH, executes it, collects the result, and removes it.
Nothing is installed permanently on the managed nodes. That is the entire basis of the “agentless” description, and it is worth understanding precisely, because “agentless” does not mean “requires nothing.”
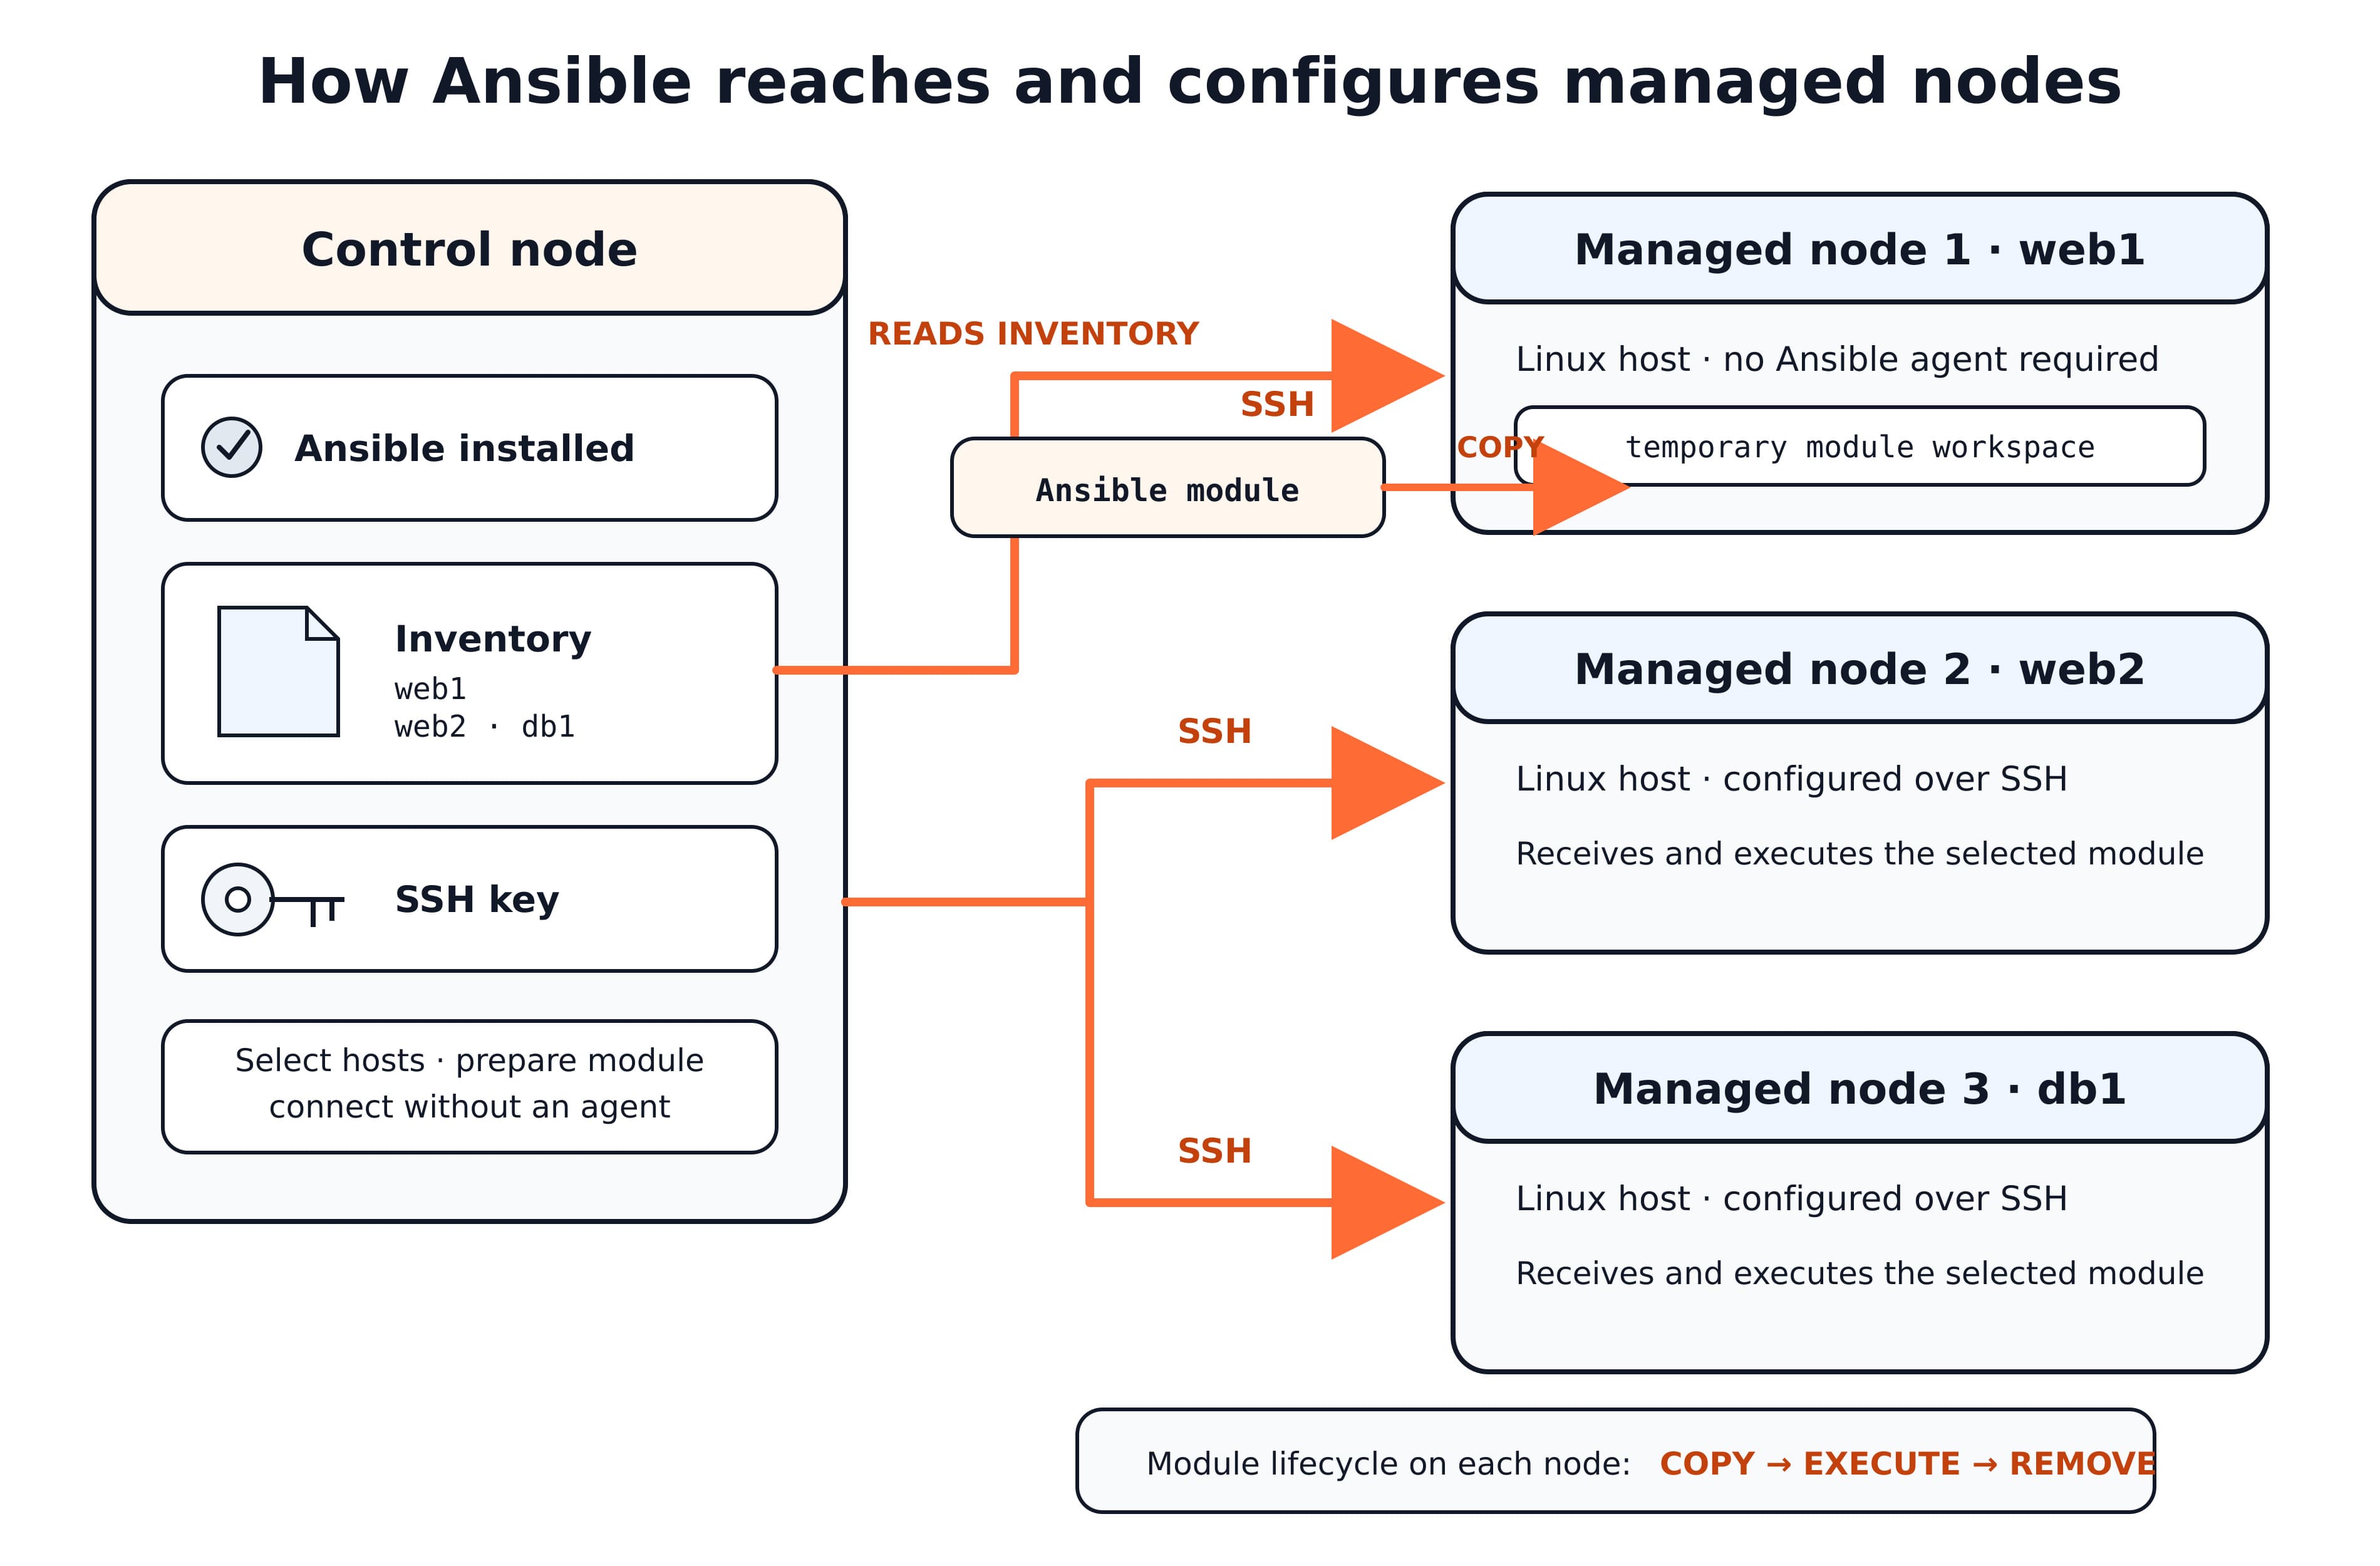
Control node vs managed node
The control node is the machine from which you run the Ansible CLI tools — ansible-playbook, ansible, ansible-vault and others, per the official definition in the Ansible documentation. It is where Ansible is installed, where your inventory and playbooks live, and where the SSH private key sits. On a laptop learning setup, the control node is your laptop.
Managed nodes, also referred to as “hosts”, are the target devices — servers, network appliances, or any computer — that you aim to manage with Ansible. Ansible is not installed on them.
The practical consequence trips up nearly everyone at least once: when a command fails, the error may come from either machine, and the two failure types look different. An SSH authentication failure is a control-node-to-managed-node connection problem. A “module failed” error means Ansible reached the managed node successfully and something went wrong once it got there. Reading which one you have saves a great deal of time.
| Control node | Managed node | |
|---|---|---|
| Ansible installed | Yes | No |
| What lives here | Inventory, playbooks, SSH private key, ansible.cfg | The services you are configuring |
| Requirement | Python 3.12–3.14 for ansible-core 2.21 | Python 3.9–3.14, an SSH-capable account with an interactive POSIX shell |
| Operating system | UNIX-like: Red Hat, Debian, Ubuntu, macOS, BSDs; Windows only under WSL | Linux, UNIX, Windows, and network devices |
| How many | Usually one | As many as you like |
On Windows as a control node: the installation guide states plainly that “Windows without WSL is not natively supported as a control node.” Windows machines are fully supported as managed nodes. If you are on Windows and want to follow this guide, install Windows Subsystem for Linux and work inside it.
What “agentless” actually means
Ansible is called agentless because it installs no permanent software on your managed nodes — but the managed nodes still need Python and an SSH-accessible account. Modules are copied across, run once, and removed. Nothing is left behind and nothing runs in the background between Ansible runs.
The mechanism is stated directly in the Ansible documentation’s definition of a module: modules are “the code or binaries that Ansible copies to and executes on each managed node (when needed) to accomplish the action defined in each Task.” That one sentence is the most useful thing a beginner can memorize about how Ansible works.
Compare that with an agent-based tool, where a daemon is installed on every managed machine, runs permanently, and periodically pulls its configuration from a central server. Ansible pushes instead: it connects when you tell it to, does the work, and disconnects.
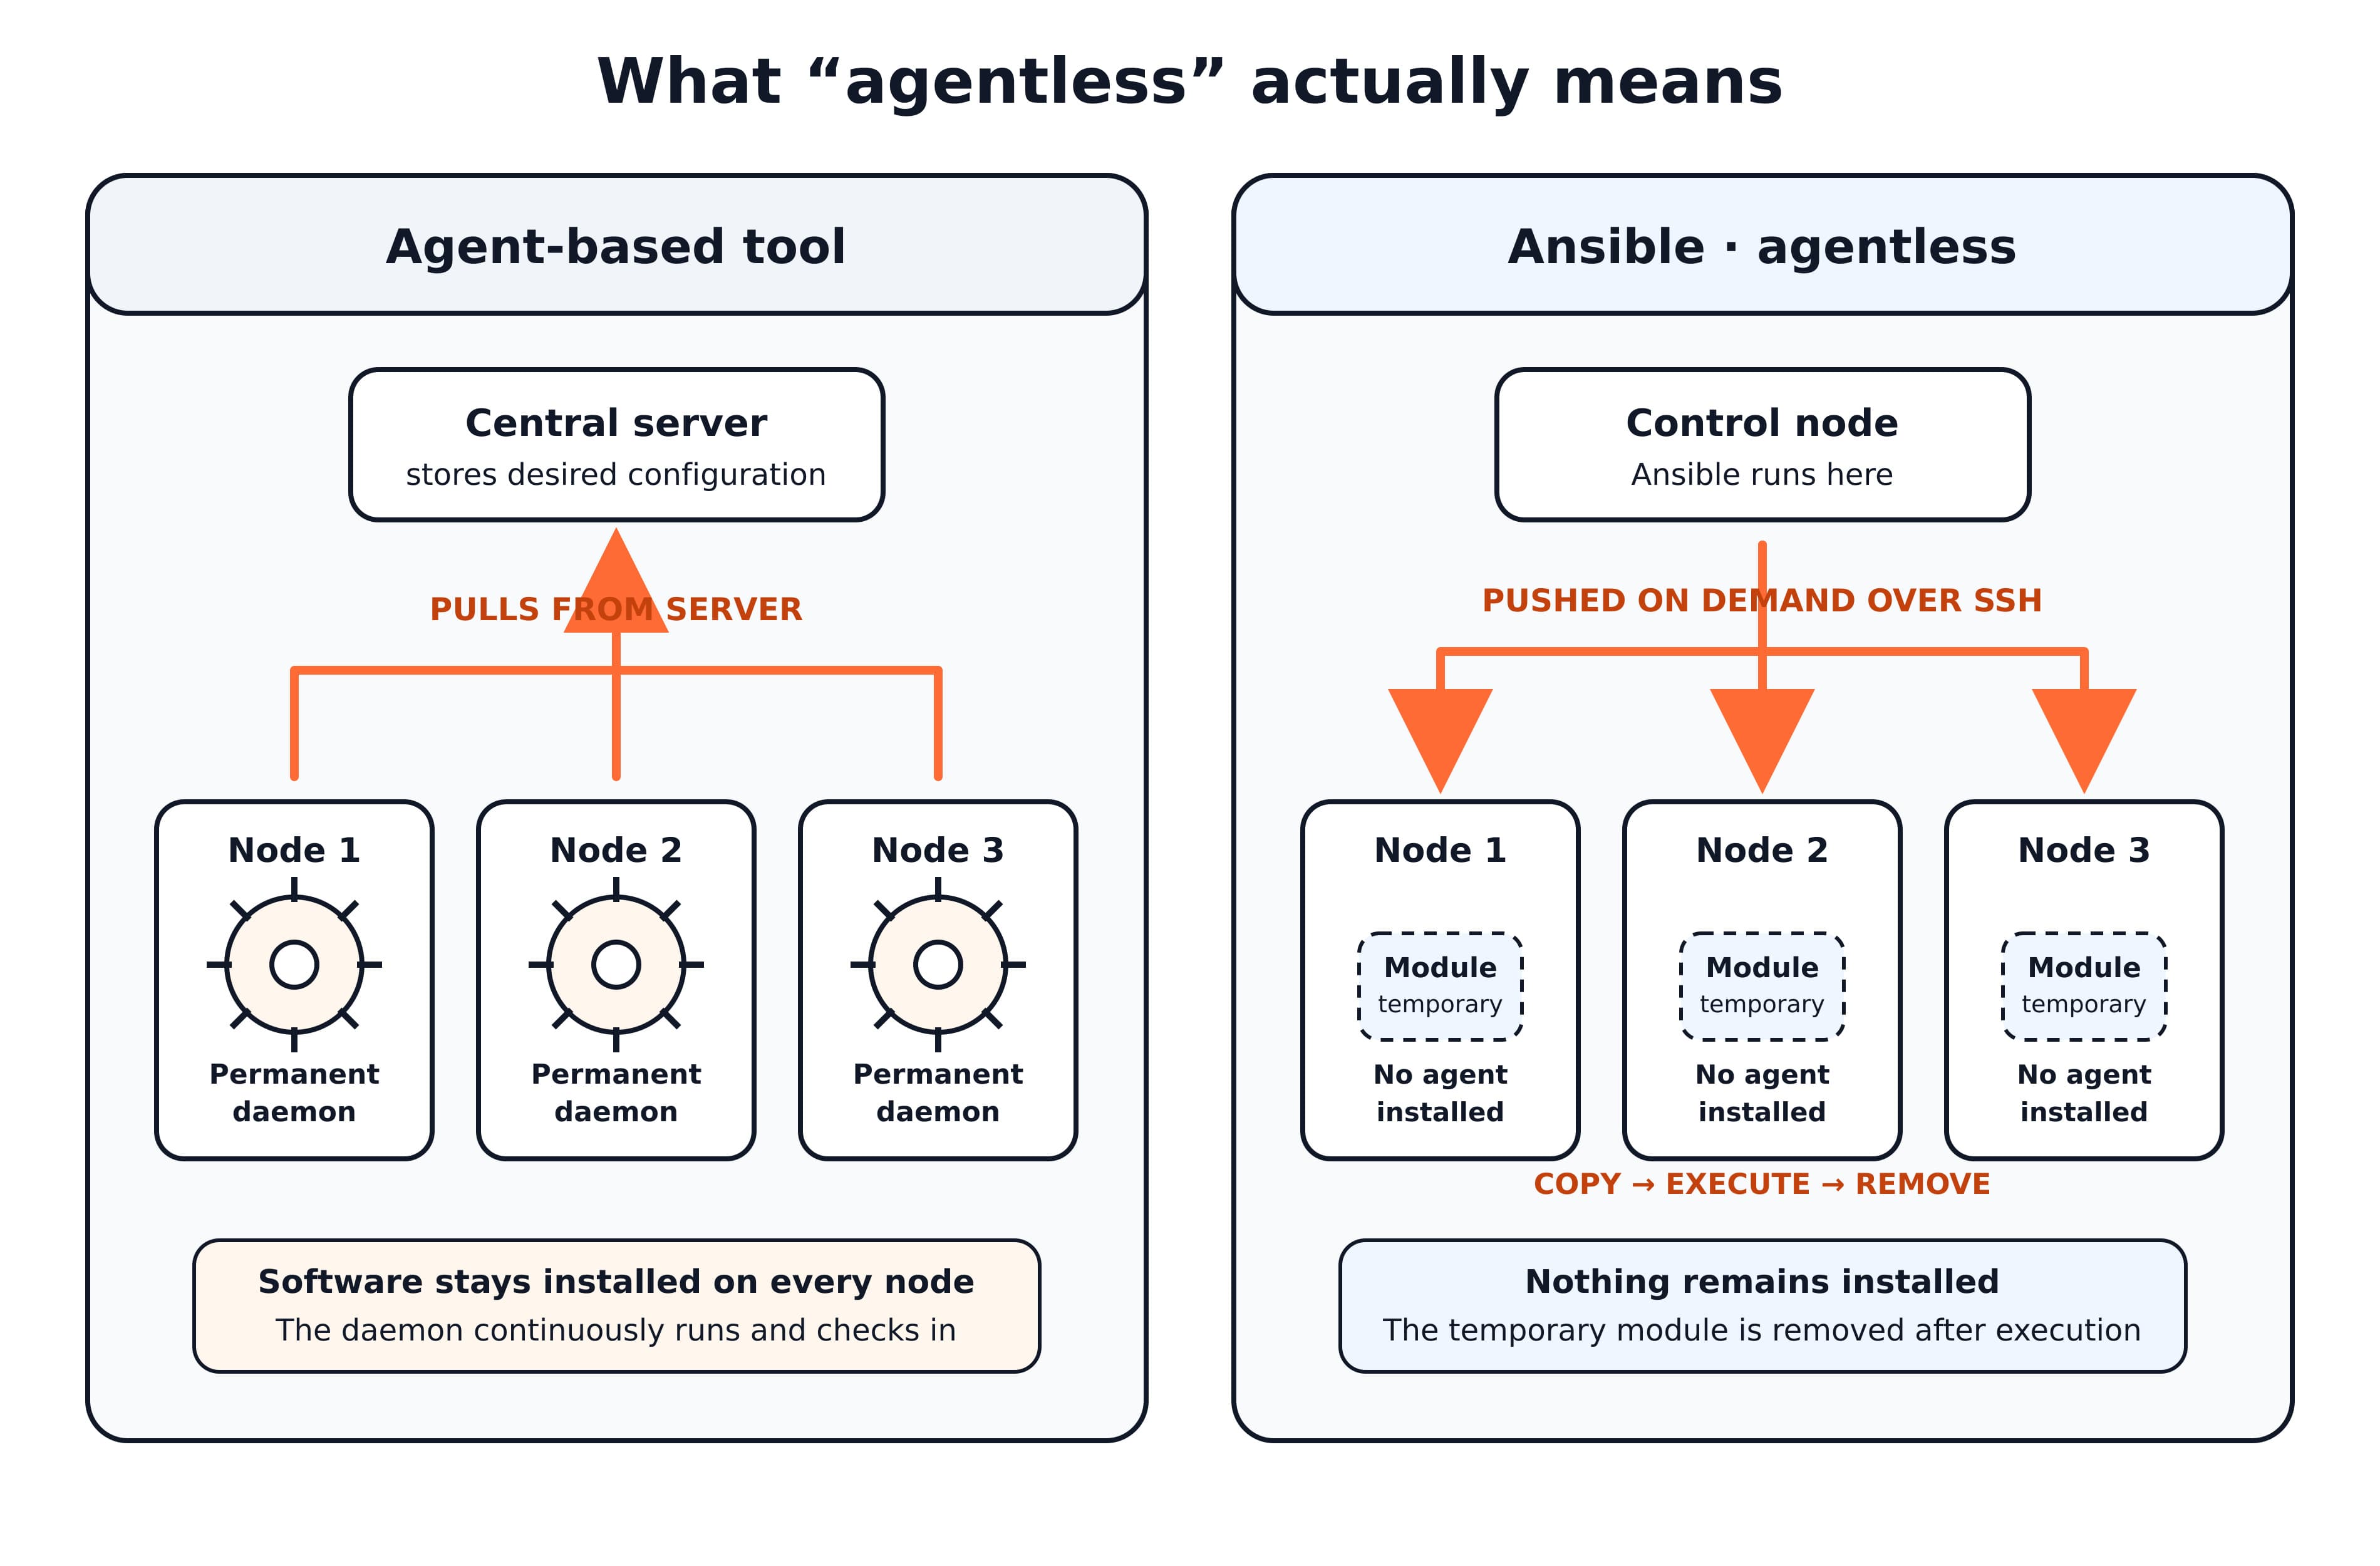
What managed nodes actually require, per the installation guide:
- Python, to run the code Ansible generates and copies over.
- A user account that can connect over SSH and has an interactive POSIX shell.
The documented exception: “network modules do not require Python on the managed device.” Network appliances are handled differently — the module runs on the control node and talks to the device over its own API or CLI. If you are automating switches and routers rather than servers, the Python requirement does not apply to the device.
Why this matters more than it sounds like it should. The single most common first-run failure for beginners is a Python-related error on a minimal container image or a stripped-down cloud image that ships without Python. The tool is agentless, so the reader reasonably assumes the target needs nothing at all, and then spends an hour confused. Confirming Python exists on your managed nodes before your first real run costs one command and prevents that hour. The ping module described later in this guide is precisely that check.
The pieces: inventory, modules, plugins, and collections
Four terms account for most of what you will read in Ansible documentation. Each definition below is quoted from the official Ansible documentation’s basic concepts page.
- Inventory — “A list of managed nodes provided by one or more ‘inventory sources’.” Your list of servers.
- Modules — “The code or binaries that Ansible copies to and executes on each managed node (when needed) to accomplish the action defined in each Task.” The units of work: install a package, copy a file, restart a service.
- Plugins — “Pieces of code that expand Ansible’s core capabilities.” They run on the control node and extend Ansible itself — how it connects, how it caches facts, how it formats output. Plugins extend Ansible; modules do work on managed nodes.
- Collections — “A format in which Ansible content is distributed that can contain playbooks, roles, modules, and plugins.” Collections are how modules are packaged and shipped.
Two more terms appear as soon as you open a playbook. A play is “the main context for Ansible execution, this playbook object maps managed nodes (hosts) to tasks.” A task is “the definition of an ‘action’ to be applied to the managed host.” A playbook contains plays; a play contains tasks; each task calls a module.
Why module names in this guide look like ansible.builtin.ping rather than ping. That three-part name is a fully qualified collection name (FQCN): namespace, collection, module. Modules live in collections, and the fully qualified form says exactly which collection you mean. Short names such as ping or copy still work for modules in ansible.builtin, but they are ambiguous once you install collections that define a module of the same name. Every example in this guide uses the fully qualified form, which is what current Ansible documentation does. The sibling guide linked at the end of this article covers the collision-avoidance argument in full.
ansible vs ansible-core: which one do you have?
ansible-core and ansible are two different packages with two different version numbers. The installation guide describes ansible-core as “a minimalist language and runtime package containing a set of built-in modules and plugins,” and ansible as “a much larger ‘batteries included’ package, which adds a community-curated selection of Ansible Collections for automating a wide variety of devices.”
This is the most common version confusion in Ansible, and it produces the recurring question “why does my colleague say 2.21 when mine says 14?” Both are right. They are reporting different packages.
ansible-core | ansible (community package) | |
|---|---|---|
| What it is | The language, runtime, and the ansible.builtin collection | ansible-core plus a large curated set of community collections |
| Latest version | 2.21.3, released 2026-08-10 | 14.3.1, released 2026-08-14 |
| Version scheme | 2.x.y | A single integer that increments each major release |
| Install with | pip install ansible-core | pip install ansible |
| Choose it when | You want a minimal install and will add collections deliberately | You want a wide range of modules available immediately |
Both version numbers were confirmed against the Python Package Index JSON API on 2026-08-25. The ansible-core figure is corroborated by the v2.21.3 release tag published on the ansible/ansible GitHub repository on 2026-08-10, marked stable and not a prerelease. Maintained older branches received releases on the same day: 2.20.8, 2.19.12, and 2.18.19.
A note on the documentation’s own support-matrix table. At the time of writing (2026-08-25), the release-and-maintenance summary table in the Ansible documentation still lists ansible-core 2.21 as upcoming and the 14.x community package as in development. The released artifacts on the Python Package Index and the GitHub release tags contradict that table. Where a summary table and a published release artifact disagree, the artifact is the source of truth. This guide follows the artifacts. If you check the version yourself, check the package registry rather than a summary page.
To find out which you have installed, run:
ansible --versionThe first line reports the ansible-core version — so a 2.21.x figure there is the core version, not the community package version. To see the community package version, if you installed it, query the package directly:
python3 -m pip show ansiblePython requirements for ansible-core 2.21: Python 3.12 to 3.14 on the control node, and Python 3.9 to 3.14 on managed nodes. The control-node floor is corroborated independently by the requires_python field on the ansible-core 2.21.3 package on the Python Package Index, which is >=3.12. This is version-specific: older ansible-core branches support older Python versions, so check the matrix for the branch you actually run.
The inventory: telling Ansible what to manage
The Ansible inventory is the list of managed nodes Ansible can operate on, along with the groups they belong to and the variables attached to them. Without an inventory, Ansible has no targets — it is the answer to “where does the list of servers come from,” which is the question most tutorials skip.
An inventory can be a static file you write by hand, in INI or YAML format, or it can be generated dynamically from a cloud provider or another system of record. This section covers static inventories, which is what you should learn first.
Where the inventory file lives
The default inventory location is /etc/ansible/hosts. That is the documented default, but do not assume the file exists on your machine — on installations made with pip into a virtual environment, /etc/ansible/ frequently does not exist at all, and creating system-wide files is often not what you want anyway.
The reliable approach is to keep an inventory file in your project directory and pass it explicitly with -i:
ansible -i inventory.ini all -m ansible.builtin.pingThis is a recommendation, not a requirement. It is worth adopting as a habit for three reasons: your inventory is version-controlled with the project it describes, different projects can target different hosts without interfering, and you always know which host list a command used. The alternative — relying on a machine-wide default — makes commands ambiguous the moment you work on a second project.
Your first inventory (INI)
The smallest useful inventory is a list of hostnames. Create a file named inventory.ini:
web1.example.com
web2.example.com
db1.example.com
That works, but it gives you no way to address the web servers separately from the database. Groups solve that. Square brackets declare a group, and the hosts beneath belong to it:
[webservers]
web1.example.com
web2.example.com

[dbservers]
db1.example.com
You can now target webservers, dbservers, or all. Per the inventory documentation, “You can put a host in more than one group” — a host listed under both [webservers] and [staging] belongs to both, and is targeted by either name.
Connection details go on the host line as variables. This is useful when the inventory hostname is not resolvable, or the SSH port and user differ:
[webservers]
web1.example.com ansible_host=192.0.2.11 ansible_user=deploy
web2.example.com ansible_host=192.0.2.12 ansible_user=deploy ansible_port=2222
ansible_host sets the address Ansible actually connects to, so the inventory name becomes a label you choose. ansible_user sets the SSH username and ansible_port the SSH port. The addresses above are from the 192.0.2.0/24 documentation range, reserved for examples.
The same inventory in YAML
The same inventory in YAML format is more verbose but nests more clearly, which pays off as the file grows. Create inventory.yml:
webservers:
  hosts:
    web1.example.com:
      ansible_host: 192.0.2.11
      ansible_user: deploy
    web2.example.com:
      ansible_host: 192.0.2.12
      ansible_user: deploy
      ansible_port: 2222
dbservers:
  hosts:
    db1.example.com:
Note the trailing colons after hostnames. In YAML inventories, each host is a mapping key, so db1.example.com: with nothing under it is correct and complete.
INI or YAML — which should you use? Both are fully supported and neither is deprecated. Choose INI for small, flat inventories where its brevity is an advantage. Choose YAML when you have nested groups or a significant number of variables, where the indentation makes structure visible, and when you want one format across your whole project. The practical argument for YAML is consistency: your playbooks are already YAML.
The reason to learn both is not aesthetic. You will meet both in real repositories, and being unable to read the one you did not choose is a genuine obstacle.
Groups, nested groups, and host ranges
Host ranges save you from listing fifty near-identical servers. The documented syntax www[01:50].example.com expands to www01.example.com through www50.example.com. It works in both formats:
[webservers]
www[01:50].example.comwebservers:
hosts:
www[01:50].example.com:The leading zero in 01 is significant — it sets the padding, so [01:50] produces www01 and [1:50] produces www1.
Nested groups let one group contain other groups. In INI format, use the :children suffix:
[atlanta]
host1.example.com

[raleigh]
host2.example.com

[usa:children]
atlanta
raleigh
Targeting usa now reaches every host in both atlanta and raleigh. In YAML, the same relationship uses a children: entry:
usa:
  children:
    atlanta:
      hosts:
        host1.example.com:
    raleigh:
      hosts:
        host2.example.com:
Group naming rules that cause real failures: group names are case sensitive, so webservers and Webservers are two different groups. Avoid spaces, hyphens, and leading numbers in group names. A hyphenated group name is the kind of mistake that produces a confusing error much later, when a pattern silently matches nothing.
The two groups you never create: all and ungrouped
Ansible creates two groups automatically in every inventory. The documentation states it directly: “Even if you do not define any groups in your inventory, Ansible creates two default groups: all and ungrouped. The all group contains every host. The ungrouped group contains all hosts that do not belong to any other group.”
This is why ansible all -m ansible.builtin.ping works against an inventory in which you never defined a single group. It is also a useful diagnostic: if a host appears in ungrouped when you expected it in a group you defined, your group declaration is not doing what you think — usually a typo or an indentation error.
Variables in the inventory: group_vars and host_vars
Variables can be set directly in the inventory file. In INI format, a [groupname:vars] section applies to every host in that group:
[webservers:vars]
http_port=80
In YAML, use a vars: entry under the group:
webservers:
  hosts:
    web1.example.com:
  vars:
    http_port: 80
For anything beyond a couple of values, the standard layout is separate directories next to your inventory file. Ansible picks these up automatically based on filename:
inventory.ini
group_vars/
  webservers.yml      # applies to all hosts in the webservers group
  all.yml             # applies to every host
host_vars/
  web1.example.com.yml   # applies to that one host
The filename is the mechanism: group_vars/webservers.yml is loaded for the webservers group because of its name, with no configuration required.
Where this guide stops. Which value wins when the same variable is defined in several places is governed by Ansible’s variable precedence rules, and defining variables inside playbooks and roles is a separate topic. Both are covered in Ansible playbook tutorial: variables, loops, handlers, and roles. This section is about where inventory variables live, not how they resolve.
Verifying your inventory before you trust it
Check what Ansible actually parsed before running anything against it. The ansible-inventory command reads your inventory exactly as Ansible would and prints the result, which catches typos, indentation errors, and misplaced hosts without touching a single managed node.
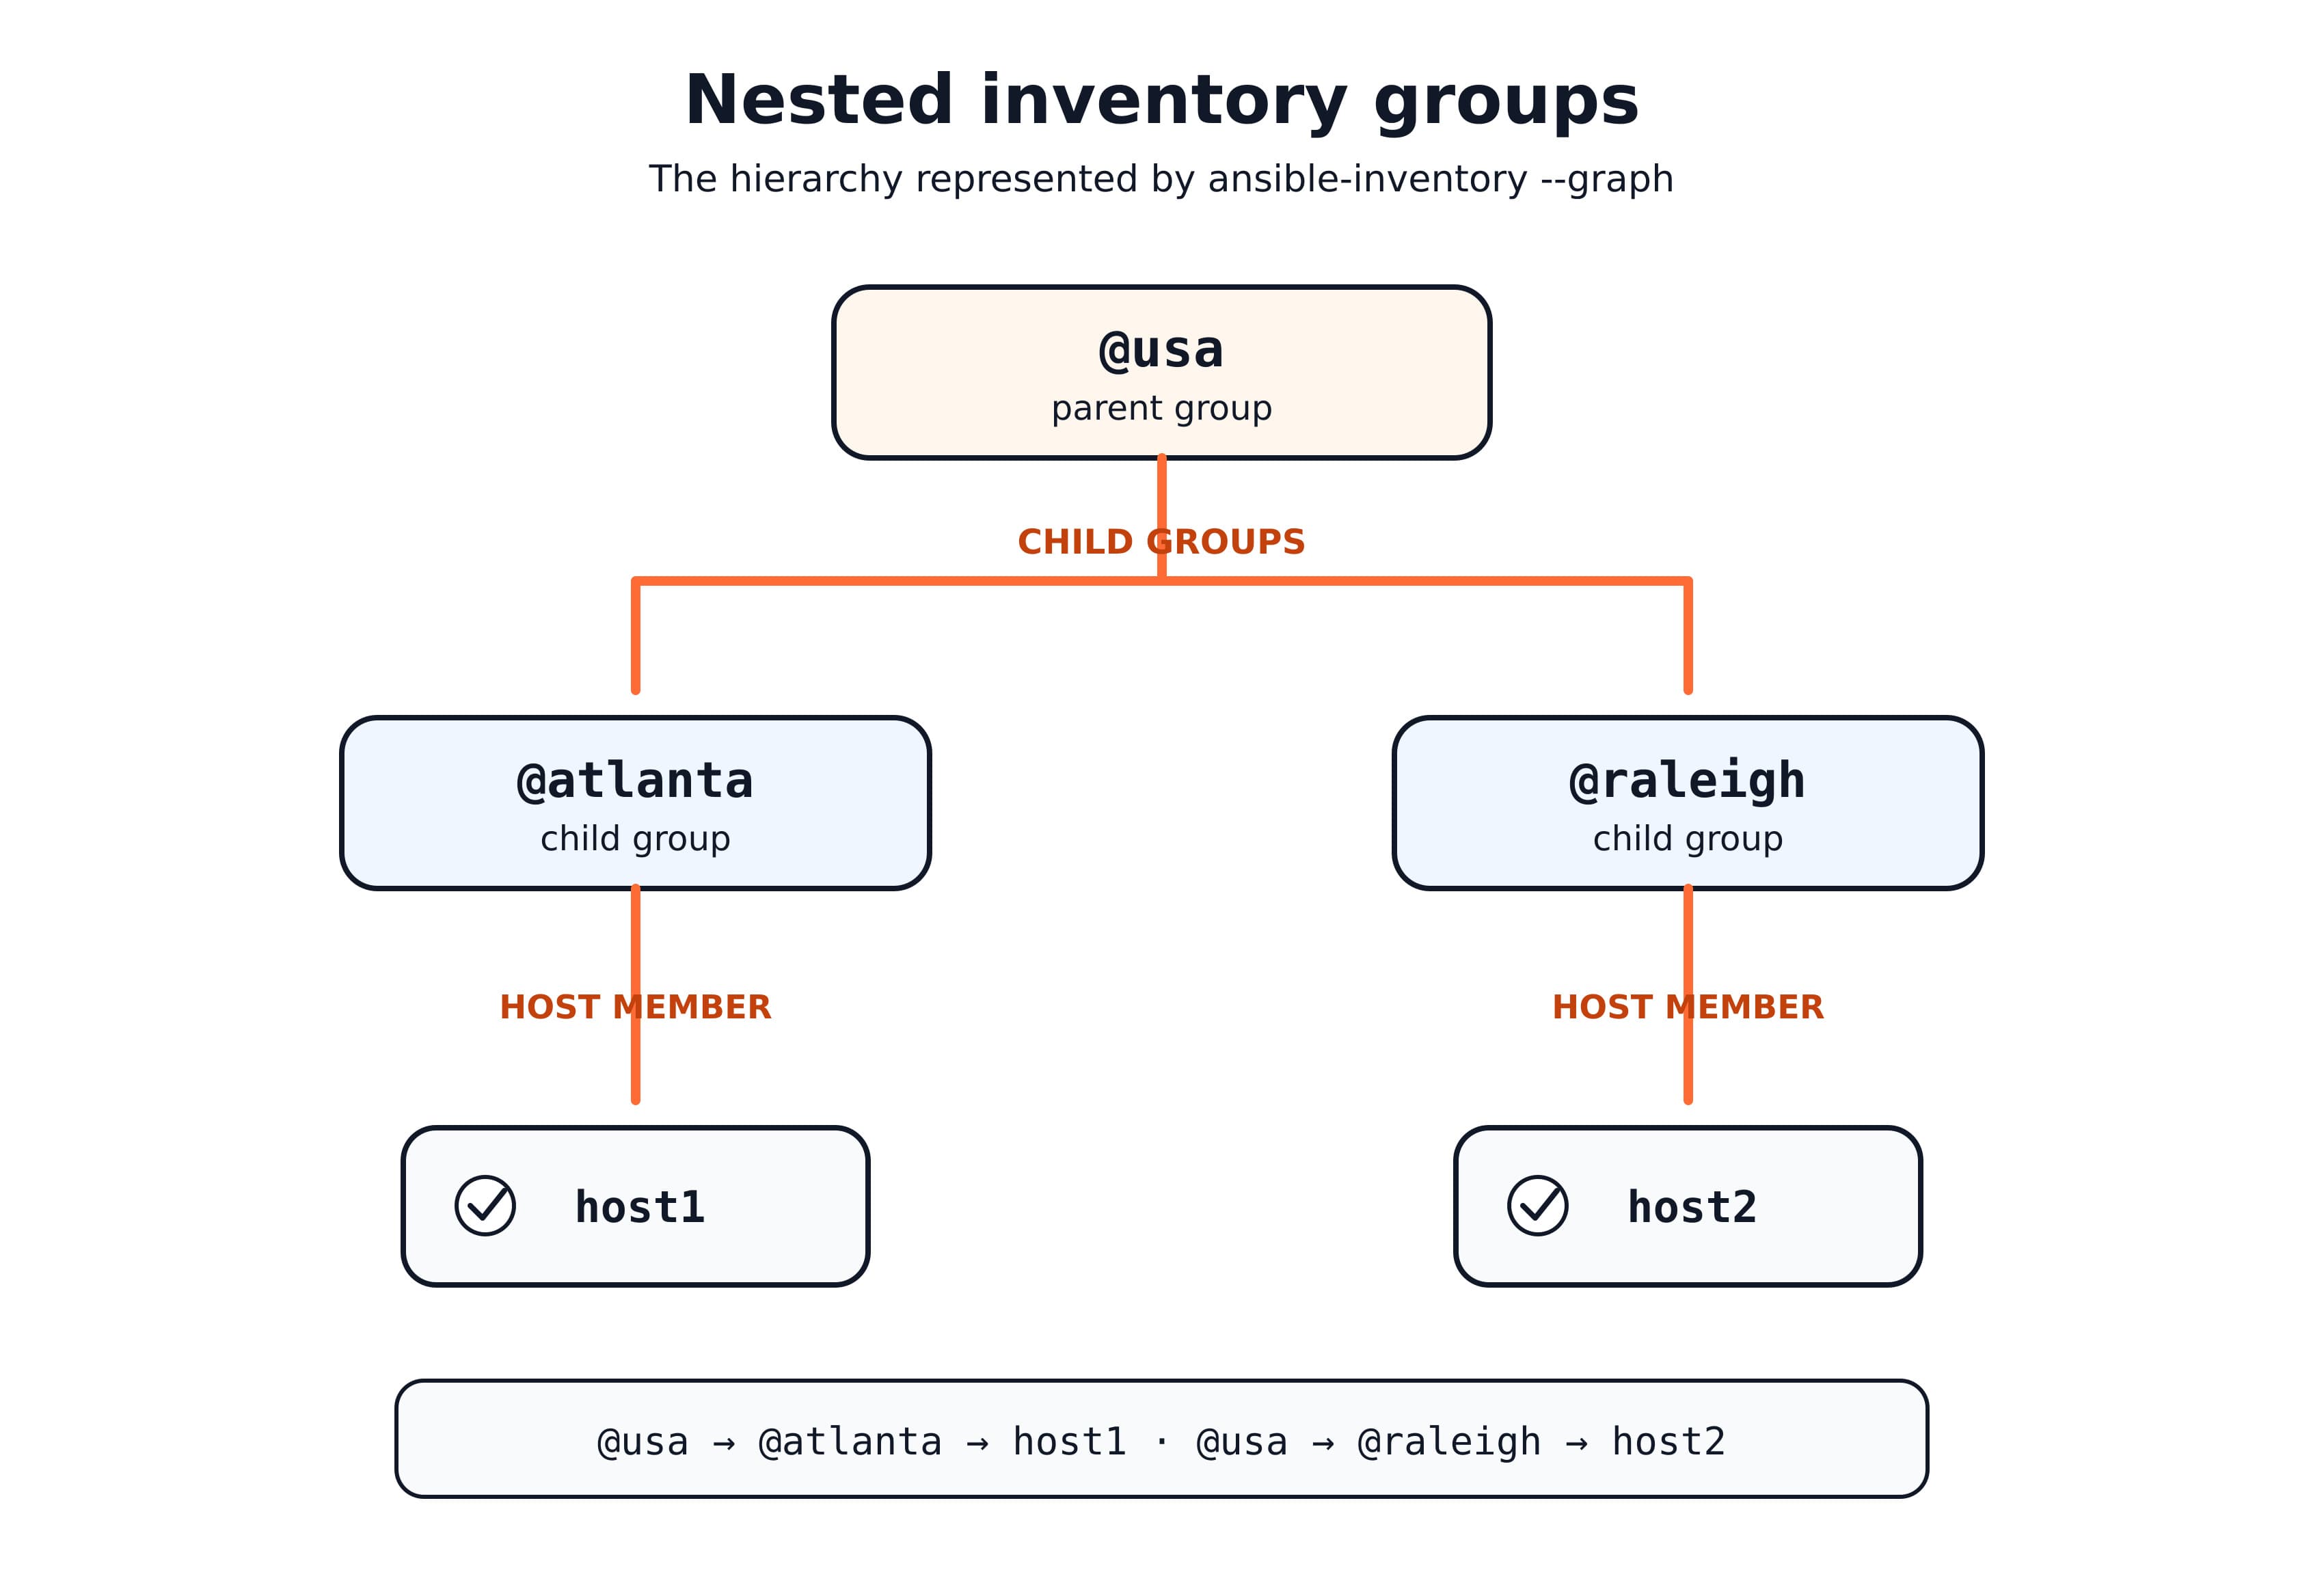
The most readable form is --graph, which shows the group tree:
ansible-inventory -i inventory.ini --graphOutput for the nested example above:
@all:
  |--@ungrouped:
  |--@usa:
  |  |--@atlanta:
  |  |  |--host1.example.com
  |  |--@raleigh:
  |  |  |--host2.example.com
The documented descriptions of the flags worth knowing:
| Flag | What the documentation says it does |
|---|---|
--list | “Output all hosts info, works as inventory script” |
--graph | “create inventory graph, if supplying pattern it must be a valid group name. It will ignore limit” |
--host | “Output specific host info, works as inventory script. It will ignore limit” |
--yaml | “Use YAML format instead of default JSON, ignored for –graph” |
--vars | “Add vars to graph display, ignored unless used with –graph” |
-i | “specify inventory host path or comma separated host list. This argument may be specified multiple times” |
To see the variables attached to each host alongside the tree:
ansible-inventory -i inventory.ini --graph --varsTo dump everything as JSON, including all variables, which is the form to use when you want to grep for a specific value:
ansible-inventory -i inventory.ini --listTwo checks worth running in order before any real work: ansible-inventory --graph proves Ansible parsed the file as you intended, then ansible <group> -m ansible.builtin.ping proves the hosts are reachable. The first needs no network access at all. Running them in that order separates a parsing problem from a connection problem, which are diagnosed completely differently.
Static vs dynamic inventory
A static inventory is a file you write and maintain by hand. A dynamic inventory is generated at runtime from an external source — a cloud provider’s API, a container platform, or another system of record. Static inventories are correct for learning, for fixed sets of servers, and for lab environments. Dynamic inventories exist because in an autoscaling environment, a hand-written host list is out of date before you finish writing it.
Ansible handles this through inventory plugins, which per the documentation “support a range of formats and sources, which makes your inventory flexible and customizable.” A plugin queries the source and returns the host list in the structure Ansible expects, so everything you learn about groups, patterns, and variables applies unchanged.
Dynamic inventory for cloud providers is a substantial topic in its own right and is not covered here. Everything in this guide works identically whichever kind of inventory supplies the hosts.
Ad hoc commands: doing one thing right now
An Ansible ad hoc command runs a single task against one or more managed nodes directly from the command line, without writing a playbook. The official definition: “An Ansible ad hoc command uses the /usr/bin/ansible command-line tool to automate a single task on one or more managed nodes.”
This is the fastest way to confirm your setup works, and it is where you should spend your first hour with Ansible — before any YAML.
What an ad hoc command is, and what it is not
The documentation is blunt about the trade-off: ad hoc commands “are quick and easy, but they are not reusable.”
That sentence is the entire decision rule. An ad hoc command leaves no artifact. Nobody can review it, nothing records that you ran it, and reproducing it next month means remembering the exact flags. For checking whether all your servers are up, or restarting one service once, that is fine and a playbook would be overkill. For anything you will do twice, or that another person needs to understand, the lack of a reviewable artifact is a real cost.
The ad hoc command syntax
The documented syntax is:
ansible [pattern] -m [module] -a "[module options]"Broken into its parts, using a real command:
ansible webservers -i inventory.ini -m ansible.builtin.service -a "name=nginx state=restarted" --become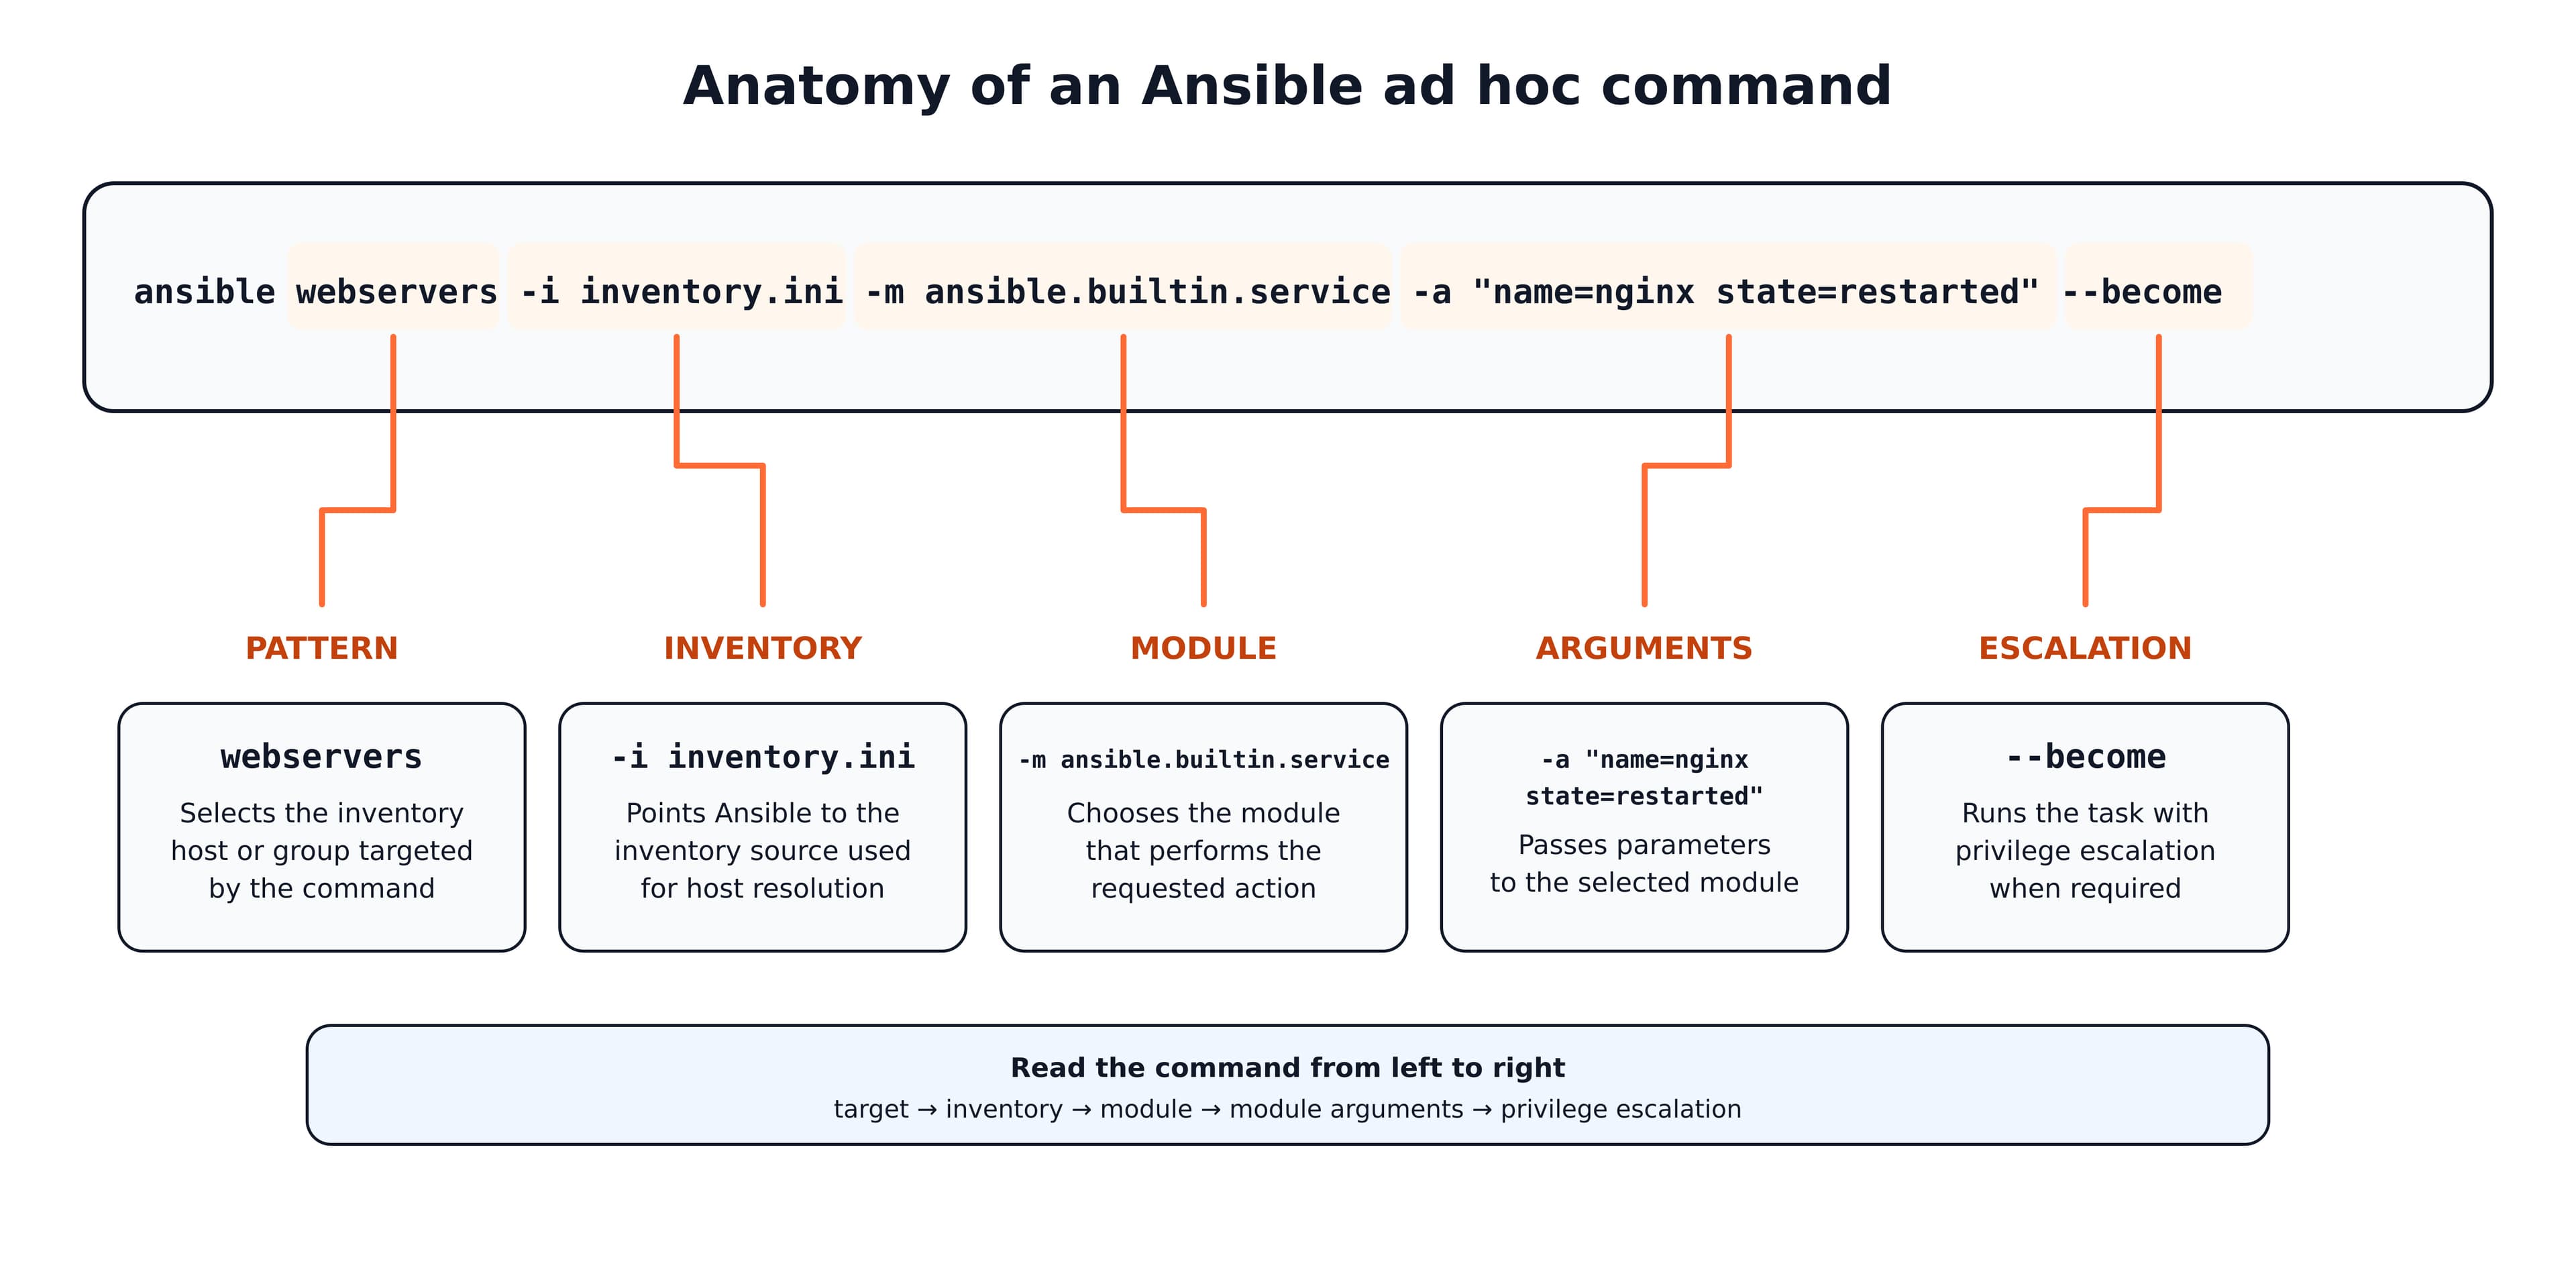
| Part | Meaning |
|---|---|
ansible | The ad hoc command-line tool, as distinct from ansible-playbook |
webservers | The host pattern — which hosts to target |
-i inventory.ini | Which inventory file to read |
-m ansible.builtin.service | The module that does the work |
-a "name=nginx state=restarted" | Arguments passed to the module |
--become | Run with privilege escalation (sudo by default) |
The -a option accepts arguments “either through the key=value syntax or a JSON string starting with { and ending with }”. The key=value form is what you will use almost always; JSON becomes useful when a value contains spaces or needs a structure that key=value cannot express.
Your first command: ping
Run this first, before anything else:
ansible all -i inventory.ini -m ansible.builtin.pingSuccessful output looks like this:
web1.example.com | SUCCESS => {
    "changed": false,
    "ping": "pong"
}
ansible.builtin.ping is not an ICMP ping. The module documentation states it verbatim: “This is NOT ICMP ping, this is just a trivial test module that requires Python on the remote-node.” It “always returns pong on successful contact.”
This distinction matters practically, not pedantically. A successful pong proves considerably more than a network ping would: it proves Ansible resolved the host from your inventory, opened an SSH connection, authenticated, found a working Python interpreter on the managed node, copied a module across, executed it, and read the result back. It exercises the entire path. A machine that answers an ICMP ping can still fail every one of those steps.
For Windows managed nodes, use ansible.windows.win_ping — the ansible.builtin.ping documentation directs Windows targets to that module instead.
A failure looks like this:
web1.example.com | UNREACHABLE! => {
    "changed": false,
    "msg": "Failed to connect to the host via ssh: Permission denied (publickey,password).",
    "unreachable": true
}
UNREACHABLE! and FAILED! mean different things and are fixed in different places. UNREACHABLE! means Ansible could not get to the managed node at all — a networking, hostname, or SSH authentication problem, and the module never ran. FAILED! means Ansible connected successfully and the module ran but reported a problem, which is a problem on the managed node. Checking which word appeared is the first diagnostic step for any failed run.
Targeting hosts with patterns
A host pattern selects which managed nodes a command runs against. It is the first argument to ansible, and the same patterns work with ansible-playbook. The documented patterns:
| Pattern | Targets |
|---|---|
all or * | All hosts in the inventory |
host1 | A single host |
host1:host2 or host1,host2 | Both hosts |
webservers | Every host in one group |
webservers:dbservers | All hosts in webservers plus all hosts in dbservers |
webservers:!atlanta | All hosts in webservers except those in atlanta |
webservers:&staging | Only hosts in webservers that are also in staging |
*.example.com | Wildcard match on hostname or IP |
webservers[0] | The first host in the group |
webservers[0:2] | A slice of the group by position |
~(web|db).*\.example\.com | Regular expression, prefixed with ~ |
The exclusion (:!) and intersection (:&) operators are the two most useful and least known. webservers:&staging — every web server that is also in staging — is exactly the pattern you want when a change should reach staging first. webservers:!atlanta is how you exclude one datacenter from a rollout.
Quote patterns containing ! in your shell. In bash and zsh, an unquoted ! triggers history expansion and the command fails before Ansible ever sees it. Use single quotes:
ansible 'webservers:!atlanta' -i inventory.ini -m ansible.builtin.ping--limit applies a further restriction on top of the pattern, and accepts single hosts, comma-separated lists such as --limit "host1,host2", group names, a negated form such as --limit 'all:!host1', and a file reference in the form --limit @retry_hosts.txt.
Useful ad hoc commands you will actually run
Every command below is complete and runnable. All use apt, matching the Debian and Ubuntu convention used across this guide; the dnf equivalent is shown once at the end.
Check connectivity and gather system facts. Facts are the information Ansible collects about a managed node — OS, IP addresses, memory, disk:
ansible all -i inventory.ini -m ansible.builtin.setupThat returns a large amount of JSON. To look at one thing:
ansible all -i inventory.ini -m ansible.builtin.setup -a "filter=ansible_distribution*"Run an arbitrary shell command. This is the module you will reach for most often:
ansible webservers -i inventory.ini -m ansible.builtin.command -a "uptime"Copy a file to managed nodes:
ansible webservers -i inventory.ini -m ansible.builtin.copy \
  -a "src=/local/path/nginx.conf dest=/etc/nginx/nginx.conf owner=root group=root mode=0644" --become
Install a package:
ansible webservers -i inventory.ini -m ansible.builtin.apt \
  -a "name=nginx state=present update_cache=true" --become
Manage a service:
ansible webservers -i inventory.ini -m ansible.builtin.service \
  -a "name=nginx state=restarted enabled=true" --become
Create a user:
ansible all -i inventory.ini -m ansible.builtin.user \
  -a "name=deploy shell=/bin/bash groups=sudo append=true" --become
Check free disk space:
ansible all -i inventory.ini -m ansible.builtin.command -a "df -h /"On Red Hat, Fedora, Rocky, or Alma, substitute ansible.builtin.dnf for ansible.builtin.apt — the arguments are the same:
ansible webservers -i inventory.ini -m ansible.builtin.dnf -a "name=nginx state=present" --becomeEvery other package example in this guide uses apt.
On command versus shell: ansible.builtin.command does not run through a shell, so pipes, redirects, and environment variable expansion do not work with it. ansible.builtin.shell does run through a shell and supports them. Prefer command when you do not need shell features, because not invoking a shell removes a class of quoting and injection problems. Use shell deliberately when you need a pipe or a redirect.
The flags worth knowing
| Flag | What it does |
|---|---|
-i | Path to the inventory file, or a comma-separated host list |
-m | The module to run. Defaults to ansible.builtin.command |
-a | Module arguments, as key=value pairs or a JSON string |
--become | Escalate privileges on the managed node (sudo by default) |
-K / --ask-become-pass | Prompt for the privilege escalation password |
-u | Connect as a different SSH user |
-f | Number of hosts to act on in parallel, for example -f 10 |
-C / --check | Check mode — report what would change without changing it |
--limit | Restrict the run to a subset of the matched hosts |
-v, -vvv | Increase output detail; -vvv shows the SSH commands |
The default module is ansible.builtin.command. The documentation states: “The default module for the ansible command-line utility is the ansible.builtin.command module.” So -m is optional when running a plain command, and these two are equivalent:
ansible all -i inventory.ini -m ansible.builtin.command -a "uptime"
ansible all -i inventory.ini -a "uptime"
Writing -m explicitly is a recommendation rather than a rule — it makes the command self-explanatory to the next reader, at the cost of a few characters.
-f controls parallelism. Ansible connects to several hosts at once; -f 10 sets that to ten. Raising it speeds up large runs at the cost of more concurrent connections and more load on the control node.
Running safely: check mode and --limit
Three habits prevent almost every “I ran it against the wrong servers” incident. They cost seconds and are worth adopting before you need them.
1. Ping first. Before any command that changes something, run the same pattern with ansible.builtin.ping. It is harmless, and the host list it reports is exactly the list your real command will hit:
ansible 'webservers:&staging' -i inventory.ini -m ansible.builtin.ping2. Use check mode. With -C or --check, “Ansible does not make any changes to remote systems.” It reports what would change:
ansible webservers -i inventory.ini -m ansible.builtin.apt \
  -a "name=nginx state=present" --become --check
The limitation is important and is the reason check mode is not a guarantee. Not every module supports check mode fully, and ansible.builtin.command and ansible.builtin.shell in particular cannot predict what an arbitrary command would do — by default they skip in check mode rather than reporting a change. Check mode is a strong safety net for modules that describe desired state, such as apt, copy, service, and user. It is not a safety net for arbitrary shell commands.
3. Narrow with --limit before widening. Run against one host, confirm the result, then widen:
ansible webservers -i inventory.ini --limit web1.example.com -m ansible.builtin.apt \
  -a "name=nginx state=present" --become
On idempotency. Most Ansible modules are idempotent: they describe a desired end state, and running them repeatedly produces the same result, reporting changed: false when the system already matches. state=present for a package that is already installed changes nothing. This is why re-running an Ansible command is usually safe. The exceptions are ansible.builtin.command and ansible.builtin.shell, which run whatever you give them every time and report changed every time, because Ansible cannot know what an arbitrary command does.
From ad hoc commands to playbooks
Ad hoc commands run one task. A playbook runs many, in order, and can be saved and re-run. This section defines a playbook and shows a minimal one, which is where this guide’s coverage of playbooks ends — writing them well is a large topic with its own guide, linked at the end of this section.
What a playbook is
An Ansible playbook is a YAML file containing one or more plays, where each play maps a group of managed nodes to a list of tasks to run on them. The official definitions: playbooks “contain Plays (which are the basic unit of Ansible execution)”; a play is “the main context for Ansible execution, this playbook object maps managed nodes (hosts) to tasks”; and a task is “the definition of an ‘action’ to be applied to the managed host.”
The nesting, from outside in:
Playbook  (a YAML file)
└── Play           (targets a host pattern)
    └── Task       (one action)
└── Module (the code that performs it)![A playbook, site.yml, contains a play that targets a group of managed hosts with hosts: webservers. The play contains a task, which describes one desired action, and the task contains a module, ansible.builtin.service with name: nginx and state: started, that performs it — each task calls one module. The play's hosts pattern matches the [webservers] group in inventory.ini, which lists web1 and web2. The nesting is playbook, play, task, module.](/_next/image?url=%2Fblog%2Fansible-architecture-inventory%2Fansible-playbook-nesting-inventory.jpg&w=3840&q=75&dpl=dpl_6w6ev3jgfGDsqiLT5V2xBJMMNp8A)
An ad hoc command is effectively a single task with no play around it. A playbook adds the container, the ordering, and the ability to save it.
A minimal playbook
This playbook installs nginx, writes a configuration file, and ensures the service is running. Save it as site.yml:
---
- name: Configure web servers
  hosts: webservers
  become: true

  tasks:
    - name: Install nginx
      ansible.builtin.apt:
        name: nginx
        state: present
        update_cache: true

    - name: Copy the nginx configuration
      ansible.builtin.copy:
        src: files/nginx.conf
        dest: /etc/nginx/nginx.conf
        owner: root
        group: root
        mode: "0644"

    - name: Ensure nginx is running and enabled at boot
      ansible.builtin.service:
        name: nginx
        state: started
        enabled: true
Reading it top down: - name: labels the play for readable output. hosts: webservers is the same host pattern you would pass to an ad hoc command. become: true applies privilege escalation to every task in the play. Each entry under tasks: has a descriptive name and calls one module with its arguments as YAML keys — the same arguments you would pass to -a on the command line, written as structured YAML instead of a quoted string.
Run it:
ansible-playbook -i inventory.ini site.ymlCheck mode and --limit work exactly as they do for ad hoc commands, and are worth using on a first run:
ansible-playbook -i inventory.ini site.yml --check --limit web1.example.comA note on YAML indentation, which causes more beginner failures than any other single thing: use spaces, never tabs — Ansible rejects tabs outright. Keep indentation consistent, two spaces per level as above. The mode: "0644" value is quoted deliberately: unquoted, YAML would interpret 0644 as a number and the file permissions would be wrong.
When to use an ad hoc command and when to write a playbook
| Situation | Use |
|---|---|
| Checking whether hosts are reachable | Ad hoc — ansible.builtin.ping |
| Looking something up across many servers (uptime, disk, package version) | Ad hoc |
| Restarting a service once during an incident | Ad hoc |
| Emergency change you will not repeat | Ad hoc |
| Anything you will run more than once | Playbook |
| Anything with multiple ordered steps | Playbook |
| Anything another person must review or approve | Playbook |
| Anything that must be version-controlled or audited | Playbook |
| Building a server from scratch | Playbook |
The rule that covers the rest
- Will you need to do this again?Yes → playbookNo ↓
- Does anyone else need to review, approve, or audit what you did?Yes → playbookNo ↓
Primary outcome
Write a playbook
Either question answered yes
Saved, re-runnable, reviewable, version-controlled
Otherwise
An ad hoc command is fine
Both questions answered no
Quick and easy, but not reusable
The decision rule that covers nearly every case: if you will need to do it again, or someone needs to see what you did, write a playbook. The documentation’s framing — ad hoc commands are “quick and easy, but they are not reusable” — is the whole trade-off in one sentence.
Where to go next: writing real playbooks
The playbook above is deliberately minimal. It repeats literal values, has no way to behave differently across environments, and restarts nginx whether or not the configuration actually changed. Fixing those three limitations is what playbook authoring is, and it rests on four features this guide does not cover: variables for values that differ between environments, loops for repeating a task over a list, handlers for acting only when something actually changed, and roles for packaging all of it into a reusable unit.
Those four are covered in depth in Ansible playbook tutorial: variables, loops, handlers, and roles — the direct continuation of this guide. Read this one for the model and the mechanics; read that one to write playbooks worth keeping.
Configuration: ansible.cfg
ansible.cfg sets defaults so you do not have to repeat flags on every command — the inventory path, the remote user, privilege escalation settings, and connection behavior.
Ansible searches for a configuration file in a documented order and uses the first one it finds:
ANSIBLE_CONFIG(environment variable if set)ansible.cfg(in the current directory)~/.ansible.cfg(in the home directory)/etc/ansible/ansible.cfg
“Ansible will process the above list and use the first file found, all others are ignored.” They do not merge. A project-level ansible.cfg in your working directory completely replaces your home-directory file rather than adding to it — a surprise that produces confusing behavior when a setting you rely on silently stops applying.
To confirm which file is in effect, the first lines of ansible --version report the configuration file path Ansible loaded.
A minimal project configuration that removes the -i flag from every command in this guide:
[defaults]
inventory = ./inventory.ini
host_key_checking = True
remote_user = deploy

[privilege_escalation]
become = False
become_method = sudo
With inventory set, ansible all -m ansible.builtin.ping works without -i.
The security rule worth knowing before you cd into a shared directory
Ansible will not automatically load ansible.cfg from the current working directory if that directory is world-writable. The documentation explains why: “If Ansible were to load ansible.cfg from a world-writable current working directory, it would create a serious security risk. Another user could place their own config file there, designed to make Ansible run malicious code both locally and remotely, possibly with elevated privileges.”
The practical consequence: if you keep a project in a world-writable directory such as /tmp or a loosely permissioned shared mount, your ansible.cfg is silently ignored and your commands run with different settings than you expect. If a configuration file appears to have no effect, check the directory permissions before anything else.
On host_key_checking. Setting host_key_checking = False is a common suggestion for making first connections to new hosts work without an SSH prompt. It disables verification of the host’s SSH key, which removes protection against a machine-in-the-middle substituting itself for your server. It is a defensible convenience in a disposable local lab. Adding known host keys properly is the correct approach anywhere the machines matter, and that is a recommendation rather than a rule — but the trade-off should be a decision, not an accident inherited from a tutorial.
Common beginner problems
The errors below are the ones that stop first runs, with the exact message and the cause.
UNREACHABLE! ... Failed to connect to the host via ssh: Permission denied (publickey,password).
Ansible could not authenticate over SSH. Test the connection outside Ansible first: ssh deploy@192.0.2.11. If that also fails, the problem is your SSH setup, not Ansible. Confirm your public key is in the target’s ~/.ssh/authorized_keys, and that ansible_user in the inventory matches the account you intend to use.
UNREACHABLE! ... Host key verification failed.
The managed node’s SSH host key is not in your known_hosts file. Connect once manually with ssh and accept the key, or add it with ssh-keyscan. Disabling host_key_checking also silences this, with the security cost described in the configuration section above.
FAILED! ... Missing sudo password
The task needs privilege escalation and sudo on the managed node is asking for a password Ansible was not given. Add -K (or --ask-become-pass) to be prompted for it, or configure passwordless sudo for the account on the managed node.
FAILED! ... /usr/bin/python3: not found or a The module failed to execute correctly error mentioning the interpreter
The managed node has no usable Python, or it is not where Ansible looked. This is the agentless misunderstanding in practice, and it is common on minimal container images. Install Python on the managed node, or set ansible_python_interpreter in the inventory to the correct path.
[WARNING]: Could not match supplied host pattern, ignoring: webservers
Ansible parsed the inventory but found no group by that name. Group names are case sensitive, so check for a capitalization mismatch, then run ansible-inventory -i inventory.ini --graph to see the groups that actually exist. Hosts appearing under ungrouped when you expected a group means the group declaration is not being read as you intended.
[WARNING]: provided hosts list is empty, only localhost is available
Ansible found no inventory at all. Usually the -i flag is missing, the path is wrong, or an ansible.cfg you expected to supply the inventory path is being ignored — which happens in a world-writable directory.
ERROR! Syntax Error while loading YAML in a YAML inventory or playbook
Almost always indentation. Check for tab characters, which Ansible rejects, and confirm consistent spacing. In YAML inventories, confirm each hostname ends with a colon.
An unquoted ! pattern fails in the shell before Ansible runs.ansible webservers:!atlanta ... triggers shell history expansion in bash and zsh. Wrap the pattern in single quotes: ansible 'webservers:!atlanta' ....
Frequently asked questions
Is ansible.builtin.ping an ICMP ping?
No. The ansible.builtin.ping module documentation states: "This is NOT ICMP ping, this is just a trivial test module that requires Python on the remote-node." It connects over SSH, verifies a usable Python interpreter exists on the managed node, and returns pong on success. It therefore tests the full Ansible path, not network reachability. Windows targets use ansible.windows.win_ping instead.
What is the difference between a control node and a managed node in Ansible?
The control node is the machine from which you run the Ansible CLI tools such as ansible-playbook, ansible, and ansible-vault. Managed nodes, also called hosts, are the target devices — servers, network appliances, or any computer — that you manage with Ansible. Ansible is installed only on the control node. Managed nodes need Python and SSH access, but no Ansible installation and no agent.
If Ansible is agentless, why does it need Python on managed nodes?
Ansible is agentless because it installs no permanent software on managed nodes, not because it requires nothing of them. Ansible works by copying small programs called modules to each managed node, executing them, and removing them. Those modules are Python code, so a Python interpreter must already exist on the target. The documented exception is network modules, which do not require Python on the managed device.
What is the difference between ansible and ansible-core?
ansible and ansible-core are two different packages with different version numbers. The Ansible documentation describes ansible-core as "a minimalist language and runtime package containing a set of built-in modules and plugins," and ansible as "a much larger ‘batteries included’ package" that adds a community-curated selection of collections. As of 2026-08-25, the latest ansible-core is 2.21.3 and the latest ansible community package is 14.3.1.
Where is the Ansible inventory file located?
The default inventory location is /etc/ansible/hosts, as stated in the Ansible inventory documentation. That file often does not exist, particularly on installations made with pip into a virtual environment. The more reliable practice is to keep an inventory file in your project directory and pass it explicitly with the -i flag, for example ansible -i inventory.ini all -m ansible.builtin.ping.
What are the all and ungrouped groups in Ansible?
Ansible creates the all and ungrouped groups automatically in every inventory. The documentation states: "Even if you do not define any groups in your inventory, Ansible creates two default groups: all and ungrouped. The all group contains every host. The ungrouped group contains all hosts that do not belong to any other group." This is why ansible all -m ansible.builtin.ping works even when no groups are defined.
Should I write my Ansible inventory in INI or YAML?
Both formats are fully supported and neither is deprecated, so this is a genuine choice. INI is more concise and suits small, flat inventories. YAML nests more clearly, which helps with nested groups and larger variable sets, and matches the format of your playbooks. Learn to read both, because both appear in real repositories.
When should I use an ad hoc command instead of a playbook?
Use an ad hoc command for a single action you will not repeat — checking connectivity, reading uptime across servers, restarting one service during an incident. The Ansible documentation notes ad hoc commands "are quick and easy, but they are not reusable." Write a playbook for anything you will run more than once, anything with multiple ordered steps, and anything another person must review or audit.
What is the default module for an Ansible ad hoc command?
The Ansible documentation states: "The default module for the ansible command-line utility is the ansible.builtin.command module." So ansible all -a "uptime" and ansible all -m ansible.builtin.command -a "uptime" do the same thing. Note that ansible.builtin.command does not run through a shell, so pipes and redirects require ansible.builtin.shell instead.
Can I run Ansible on Windows?
Not directly as a control node. The Ansible installation guide states that "Windows without WSL is not natively supported as a control node." You can run the control node on Windows through Windows Subsystem for Linux. Windows machines are fully supported as managed nodes, using modules from the ansible.windows collection such as ansible.windows.win_ping.
How do I check my Ansible inventory is correct before running anything?
Run ansible-inventory -i inventory.ini --graph to see the group tree exactly as Ansible parsed it, which requires no network access and catches typos and indentation errors. Then run ansible <group> -i inventory.ini -m ansible.builtin.ping to confirm the hosts are reachable. Running them in that order separates a parsing problem from a connection problem.
Which ansible-core version should I be running?
As of 2026-08-25, the latest ansible-core release is 2.21.3, published 2026-08-10, and the latest Ansible community package is 14.3.1, published 2026-08-14. Both were confirmed against the Python Package Index. ansible-core 2.21 requires Python 3.12 to 3.14 on the control node and 3.9 to 3.14 on managed nodes. Check the package registry rather than a documentation summary table, which can lag behind actual releases.
Next steps
You can now describe how Ansible connects to a machine, write and verify an inventory in either format, target exactly the hosts you mean, and run commands without risking the wrong servers. That is the foundation; it is not yet the ability to build something maintainable.
The direct continuation is Ansible playbook tutorial: variables, loops, handlers, and roles, which covers the four features that turn the minimal playbook in this guide into something reusable.
Topics worth learning after that, in roughly the order they become useful: dynamic inventory, for generating host lists from AWS, Azure, or GCP instead of maintaining them by hand; Ansible Vault, for encrypting passwords and keys inside your repository; Ansible collections and Ansible Galaxy, for finding and installing modules beyond ansible.builtin; and Molecule, for testing roles before they reach a real server.
Learn Ansible as part of a full DevOps workflow
Sources
Every technical claim in this guide was checked against primary sources on 2026-08-25.
- Ansible basic concepts — control node, managed nodes, inventory, modules, plugins, collections, plays, tasks
- How to build your inventory — default location,
allandungrouped, groups, ranges, nested groups, inventory variables, inventory plugins - Patterns: targeting hosts and groups — host patterns,
--limit - Introduction to ad hoc commands — definition, syntax, default module, flags
ansible.builtin.pingmodule — the NOT-ICMP statement,win_ping- Installing Ansible —
ansiblevsansible-core, node requirements, WSL - Ansible configuration settings — search order, world-writable directory rule
ansible-inventoryCLI reference — flag descriptions- ansible-core on the Python Package Index — version 2.21.3
- ansible on the Python Package Index — version 14.3.1
Version information verified 2026-08-25 against the Python Package Index JSON API and the ansible/ansible GitHub release tags.