
DevOps
Free DevOps Course: 21 Modules from Fundamentals to Cloud, with a Certificate
A free DevOps course: 21 video modules covering Git, Jenkins, Docker, Kubernetes, Ansible, Terraform and AWS in order. No signup. Certificate on project review.
Free DevOps course
Learn DevOps free — 21 modules, 8 stages, certificate on project review
The full toolchain in the order it depends on each other, from fundamentals to AWS. No signup, no payment.
- 21 modules
- 8 stages
- No signup, no payment
- Certificate on project review
Yes. You can learn DevOps for free using a structured video course that covers the full toolchain — Git, Jenkins, Docker, Kubernetes, Helm, Ansible, Terraform, Prometheus, Grafana, GitHub Actions and AWS — in order, from fundamentals to cloud deployment, without paying or signing up.
This free DevOps course is that sequence: 21 modules grouped into 8 stages, every one of them playable right here on this page. There is no account to create, no card to enter and no trial that expires. The order is the point. Most people learning infrastructure on their own do not fail for lack of material; they fail because they watch a Kubernetes video before they have ever built a container, get lost, and conclude the subject is beyond them. Each stage here assumes only what the stage before it taught.
When you finish the modules, you build one capstone project and email the repository for review. Pass that review and Skillfyme issues you a certificate. There is no fee for it at any stage.
One thing to know before you start, because you would find it out eventually anyway: this free track is self-paced video. There is no mentor, no live doubt-clearing session and no placement support attached to it. What you get is the full curriculum, the correct order, and a project that gives you something to show.
Module Stage 1
Module 1 — What DevOps actually is, and the path through this course
What you’ll learn: What DevOps means in practice, and how the 21 modules fit together.
This module is both the first lesson and the map for everything after it. It covers what DevOps is as a practice, what problem each part of the toolchain solves, and why the stages run in this particular order. Watch it before anything else, even if you already know some of the tools, because the rest of the course assumes its vocabulary.
The curriculum 8 stages · tap any stage to open it
Stage 1: Fundamentals1 moduleDevOps fundamentals
Stage 1 — DevOps fundamentals
What you can do after this stage
- Explain what DevOps is to someone who thinks it is a job title for a sysadmin who knows Python
- Name the phases of a delivery pipeline and say what goes wrong at each one
- Read the remaining 20 modules as one system rather than a tool list
Why this stage is here. Every tool later in this course exists to solve a problem that predates it. Jenkins exists because someone got tired of a build that only worked on one laptop. Kubernetes exists because running forty containers by hand is miserable. If you learn the tools without the problems, you end up able to follow a tutorial and unable to decide anything. Stage 1 gives you the problem set first, which is also what makes the rest of the sequence feel inevitable rather than arbitrary.
DevOps itself is a way of working, not a product you install: development and operations share responsibility for building, releasing and running software, and the handoff between “written” and “in production” gets automated rather than negotiated. The tools in stages 2 through 8 are how that automation gets built. Skillfyme’s write-up on the pillars of DevOps goes deeper on the cultural and process side if you want the theory before the terminal.
Stage 1 is a single module, and it is the one already playing at the top of this page — Module 1, on what DevOps actually is. Watch it before anything else, then come back here for Stage 2.
Stage 2: Git & GitHub3 modulesVersion control with Git and GitHub
Stage 2 — Version control with Git and GitHub
What you can do after this stage
- Initialise a repository, commit, branch, merge, and resolve a conflict without copying files to
backup-final-v2/ - Choose
resetorrevertdeliberately, and say why in one sentence - Shelve half-finished work and switch branches in a hurry without losing it
Why this stage is here. Everything downstream is triggered by a commit. Continuous integration watches a repository. Infrastructure as code lives in a repository. Your capstone is a repository. Git is the substrate, so it comes before the automation that reads from it.
Git is a distributed version control system, released under the GNU General Public License version 2.0 (git-scm.com). Distributed means every clone is a full repository with the whole history, not a thin checkout of a central server — which is why you can commit, branch and inspect history on a plane. GitHub is a separate thing: a hosting and collaboration platform for Git repositories. Git is the tool; GitHub is one place to keep it. Confusing the two is harmless until you try to explain to an interviewer why git push failed.
Three modules here, and the middle one carries the most weight.
git reset versus git revert — the distinction Module 3 exists for. git reset moves your branch pointer backwards, rewriting what the branch’s history looks like; commits after the new position stop being reachable on that branch. git revert does the opposite in spirit: it leaves history untouched and adds a new commit whose content undoes an earlier one. The practical rule follows from that mechanism rather than from taste — on a branch nobody else has pulled, reset is fine and tidier; on a shared branch, revert is the safe choice, because rewriting history other people have already pulled forces them to reconcile a divergence they did not cause. The failure mode is specific and common: someone resets and force-pushes a shared branch, and every teammate’s next git pull produces a mess they have to untangle by hand.
Module Stage 2
Module 2 — Git and GitHub from scratch: repositories, commits, branches
What you’ll learn: Set up Git, make your first commits, and work with branches on GitHub.
The foundation module for the whole course: installing and configuring Git, the commit workflow, branching and merging, and pushing to GitHub. If you have used Git only as “the thing I type three commands into,” this is where the model behind those commands gets filled in.
Module Stage 2
Module 3 — Git reset vs revert: undoing changes without breaking your team
What you’ll learn: When to rewrite history and when to add a commit that undoes it.
Undoing a change is where new Git users do real damage, usually by picking the destructive option on a shared branch. This module works through reset and revert side by side and shows what each one does to the commit graph, so the choice stops being a coin flip.
Module Stage 2
Module 4 — Git stash: saving work in progress
What you’ll learn: Park uncommitted changes, switch context, and get them back intact.
Stashing is the answer to “I’m halfway through something and I need to fix production right now.” This module covers saving, listing, applying and recovering stashed changes, including the part people discover too late: a stash you forget about is a change you will eventually lose.
Stage 3: Jenkins CI2 modulesContinuous integration with Jenkins
Stage 3 — Continuous integration with Jenkins
What you can do after this stage
- Install Jenkins on a cloud instance and get to the first login
- Create a job that builds automatically when a commit lands
- Attach an agent node and route builds to it instead of the controller
- Read a failed build's console output and locate the actual error
Why this stage is here. You now have code in a repository that changes. Continuous integration is the practice of merging and verifying those changes automatically and often, so that breakage is discovered minutes after it is introduced rather than the week before release. Jenkins is where this course teaches it, because it makes the machinery visible — you install the server, you configure the job, you see the agent pick up the work. Managed CI hides all of that, which is friendlier and a worse first teacher.
Jenkins is a self-contained, open source automation server for building, testing and deploying software (Jenkins documentation). It runs on a machine with a Java Runtime Environment, and almost everything beyond the core is added through plugins — which is both why it can integrate with practically anything and why a neglected Jenkins install becomes a plugin-compatibility problem over time. That trade-off is worth knowing before you inherit one.
The second module introduces the master/agent split. The Jenkins controller schedules and coordinates; agents (nodes) execute the builds. You separate them because builds are hungry and untrusted — they compile, download dependencies and run arbitrary test code, none of which you want competing with the controller for memory on the same box. Running everything on the controller works right up until two builds start at once.
Module Stage 3
Module 5 — Jenkins for beginners: install on AWS EC2 and build your first CI pipeline
What you’ll learn: Install Jenkins on a cloud instance and run your first automated build.
Installation through first pipeline, on an EC2 instance rather than a local laptop, so the networking and access parts are real. Covers the initial unlock, plugin setup, and a job that builds on commit.
Module Stage 3
Module 6 — Jenkins master and agent setup: distributing builds across nodes
What you’ll learn: Add an agent node and move build execution off the controller.
How the controller and agents divide work, and the hands-on setup of a node on a second EC2 instance. This is the module that turns Jenkins from a toy on one machine into something shaped like a real build system.
Stage 4: Docker2 modulesContainers with Docker
Stage 4 — Containers with Docker
What you can do after this stage
- Write a Dockerfile and build an image from your own application
- Run, stop, inspect and remove containers, and read
docker logswhen something exits immediately - Use a volume so data survives the container that wrote it
- Explain why a container is not a small virtual machine
Why this stage is here. Continuous integration produces a build artefact, and the next question is what you ship. Shipping “the app plus a list of things to install” is how “works on my machine” survives into production. Containers answer that by shipping the application together with its dependencies as one unit.
Docker is an open platform for developing, shipping and running applications (Docker documentation). It packages and runs an application in what its documentation calls a loosely isolated environment — a container — that is lightweight and contains everything needed to run the application. Loosely isolated is a deliberate word and worth holding onto: containers share the host operating system’s kernel rather than each booting their own. That sharing is what makes them lightweight, and it is also why container isolation is not the same security boundary a virtual machine gives you.
The Docker/Kubernetes boundary, resolved here so Stage 5 makes sense. Docker packages and runs one container. Kubernetes orchestrates many of them across many machines — scheduling, restarting, networking and scaling. They are not competitors and not alternatives; Kubernetes runs the kind of thing Docker builds. Beginners routinely try to learn them as two options and end up understanding neither.
Module 8 handles the thing that bites everyone once: containers are ephemeral. Delete a container and anything written inside it goes too. Volumes are Docker’s mechanism for keeping data outside the container’s own lifecycle, which is why databases in containers need them and why an unvolumed test database looks fine until the first restart.
Module Stage 4
Module 7 — Docker for beginners: images, containers and the commands you will use daily
What you’ll learn: Build images, run containers, and learn the Docker commands that matter.
The container model from the ground up: images versus containers, writing a Dockerfile, building, running, and the handful of commands that make up most day-to-day use. Rebuild the example with your own application afterwards — the Dockerfile for your own code is where the concepts land.
Module Stage 4
Module 8 — Docker volumes: persistent storage for containers
What you’ll learn: Keep data alive when the container that created it is gone.
Why anything written inside a container disappears with it, and how volumes decouple data from the container lifecycle. Covers creating and mounting volumes and where the data actually lives on the host.
Stage 5: Kubernetes & Helm4 modulesContainer orchestration with Kubernetes and Helm
Stage 5 — Container orchestration with Kubernetes and Helm
What you can do after this stage
- Describe the control plane and node components and what each is responsible for
- Deploy a Pod and a Deployment from YAML with
kubectl, and debug one stuck inPendingorCrashLoopBackOff - Request and attach persistent storage through a PVC
- Install and template a Helm chart instead of hand-editing manifests per environment
Why this stage is here. One container on one machine is a solved problem by the end of Stage 4. Production is dozens of containers across several machines, where individual containers die, hosts reboot, traffic has to reach whatever is currently healthy, and releases happen without downtime. Doing that by hand does not scale past a whiteboard.
Kubernetes is a portable, extensible, open source platform for managing containerized workloads and services, supporting both declarative configuration and automation. Google open sourced the project in 2014 (Kubernetes documentation). Declarative is the word that changes how you work: you describe the state you want in YAML — three replicas of this image, reachable on this port — and the cluster’s job is to make reality match and keep it matching. You stop issuing commands and start submitting desired states.
This is also the stage where most self-taught learners stall, and it is worth saying so plainly. Four modules, four distinct mental models, and the abstractions only click once you have deployed something that breaks. If you need to slow down anywhere, slow down here. Skillfyme’s guide to Kubernetes architecture covers the control plane and node components in more depth than a single module can.
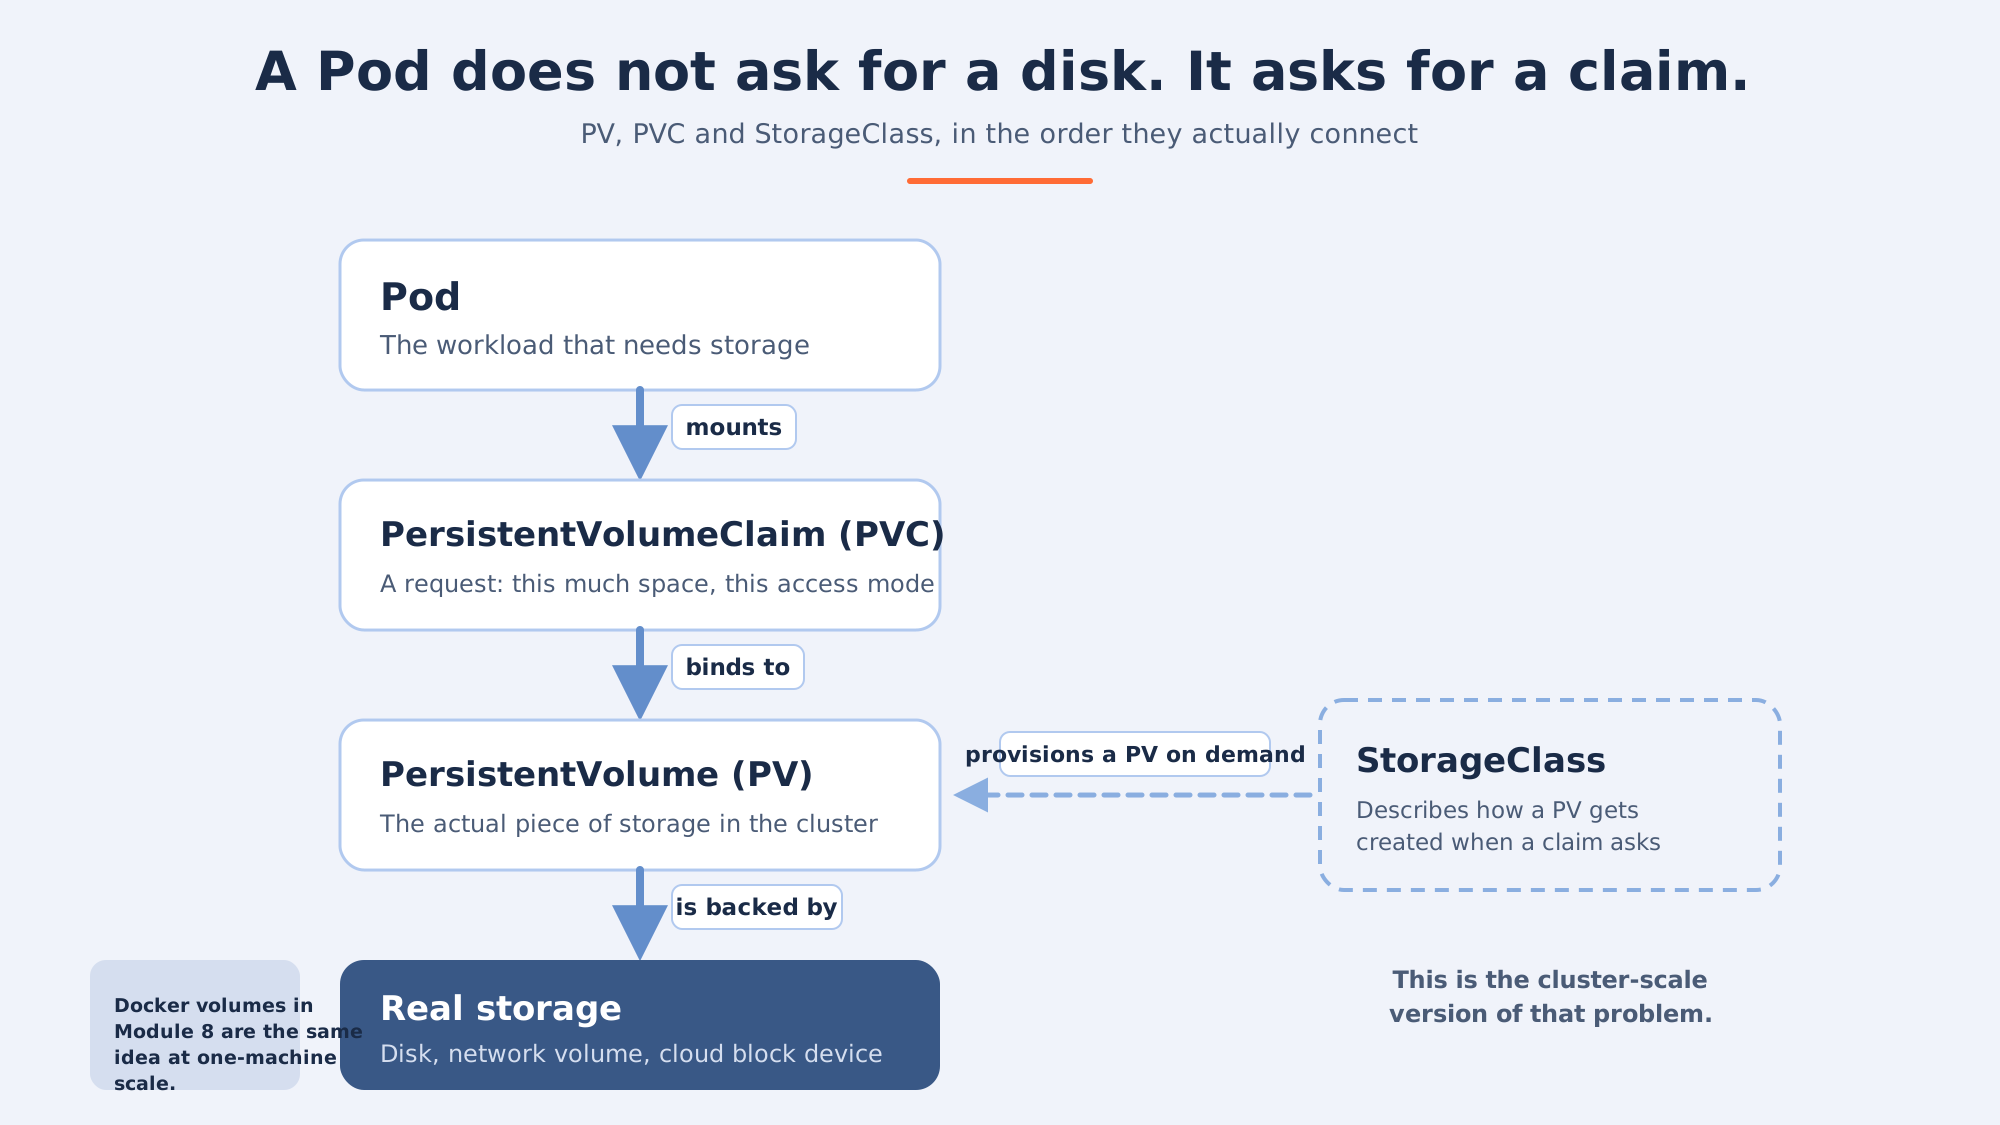
Storage in Kubernetes — the triple Module 11 exists to untangle. A PersistentVolume (PV) is the actual piece of storage in the cluster. A PersistentVolumeClaim (PVC) is a workload’s request for storage with particular properties — this much space, this access mode. A StorageClass describes how storage of a given kind gets provisioned when a claim asks for it, so the cluster can create volumes on demand instead of an administrator pre-creating them. Pod asks via PVC, PVC binds to a PV, StorageClass decides how that PV came into existence. Get that chain straight and the rest of Kubernetes storage is detail.
Helm, and why it comes last in this stage. Helm is the package manager for Kubernetes, and a CNCF graduated project (Helm project site). By Module 12 you will have written enough YAML by hand to feel the problem it solves: the same manifests copied per environment, differing in four values, drifting apart over time. A Helm chart makes that a template plus a values file. Learning Helm before writing raw manifests hides the thing it is abstracting, which is why it is Module 12 and not Module 9.
Module Stage 5
Module 9 — Kubernetes for beginners: architecture explained
What you’ll learn: How a cluster is built: control plane, nodes, and what runs where.
The architecture before the commands. Covers the control plane components, what runs on worker nodes, and how a desired state in YAML becomes running containers. Every kubectl command in later modules is easier once you know which component is receiving it.
Module Stage 5
Module 10 — Deploy Kubernetes Pods using YAML: hands-on with kubectl
What you’ll learn: Write a manifest and deploy it to a cluster with kubectl.
Writing Pod manifests by hand and applying them with kubectl, then inspecting what the cluster did with them. Includes reading the status of a Pod that has not started, which is the single most useful Kubernetes debugging skill.
Module Stage 5
Module 11 — Kubernetes persistent volumes: PV, PVC and StorageClasses
What you’ll learn: Give your workloads storage that outlives the Pod.
The storage chain end to end: what a PersistentVolume is, how a PersistentVolumeClaim requests one, and what a StorageClass automates. Docker volumes in Module 8 are the intuition; this is the cluster-scale version of the same problem.
Module Stage 5
Module 12 — Helm charts: packaging Kubernetes applications
What you’ll learn: Turn a pile of manifests into one versioned, parameterised release.
Helm as the package manager for Kubernetes: chart structure, values files, templating and installing a release. The payoff is deploying the same application to two environments from one chart and a changed value.
Stage 6: Ansible & Terraform4 modulesConfiguration management and Infrastructure as Code
Stage 6 — Configuration management and Infrastructure as Code
What you can do after this stage
- Write an Ansible inventory and a playbook that configures a fresh host reproducibly
- Run an ad-hoc Ansible command against a group of machines for a one-off task
- Provision AWS infrastructure with Terraform through
init,planandapply, and read a plan before approving it - Explain, in one sentence each, which tool provisions and which configures
Why this stage is here. Stages 3 through 5 all assumed a machine or a cluster already existed, and somebody had already installed the software on it. Stage 6 is where that somebody stops being you-with-a-terminal and becomes a file in version control.
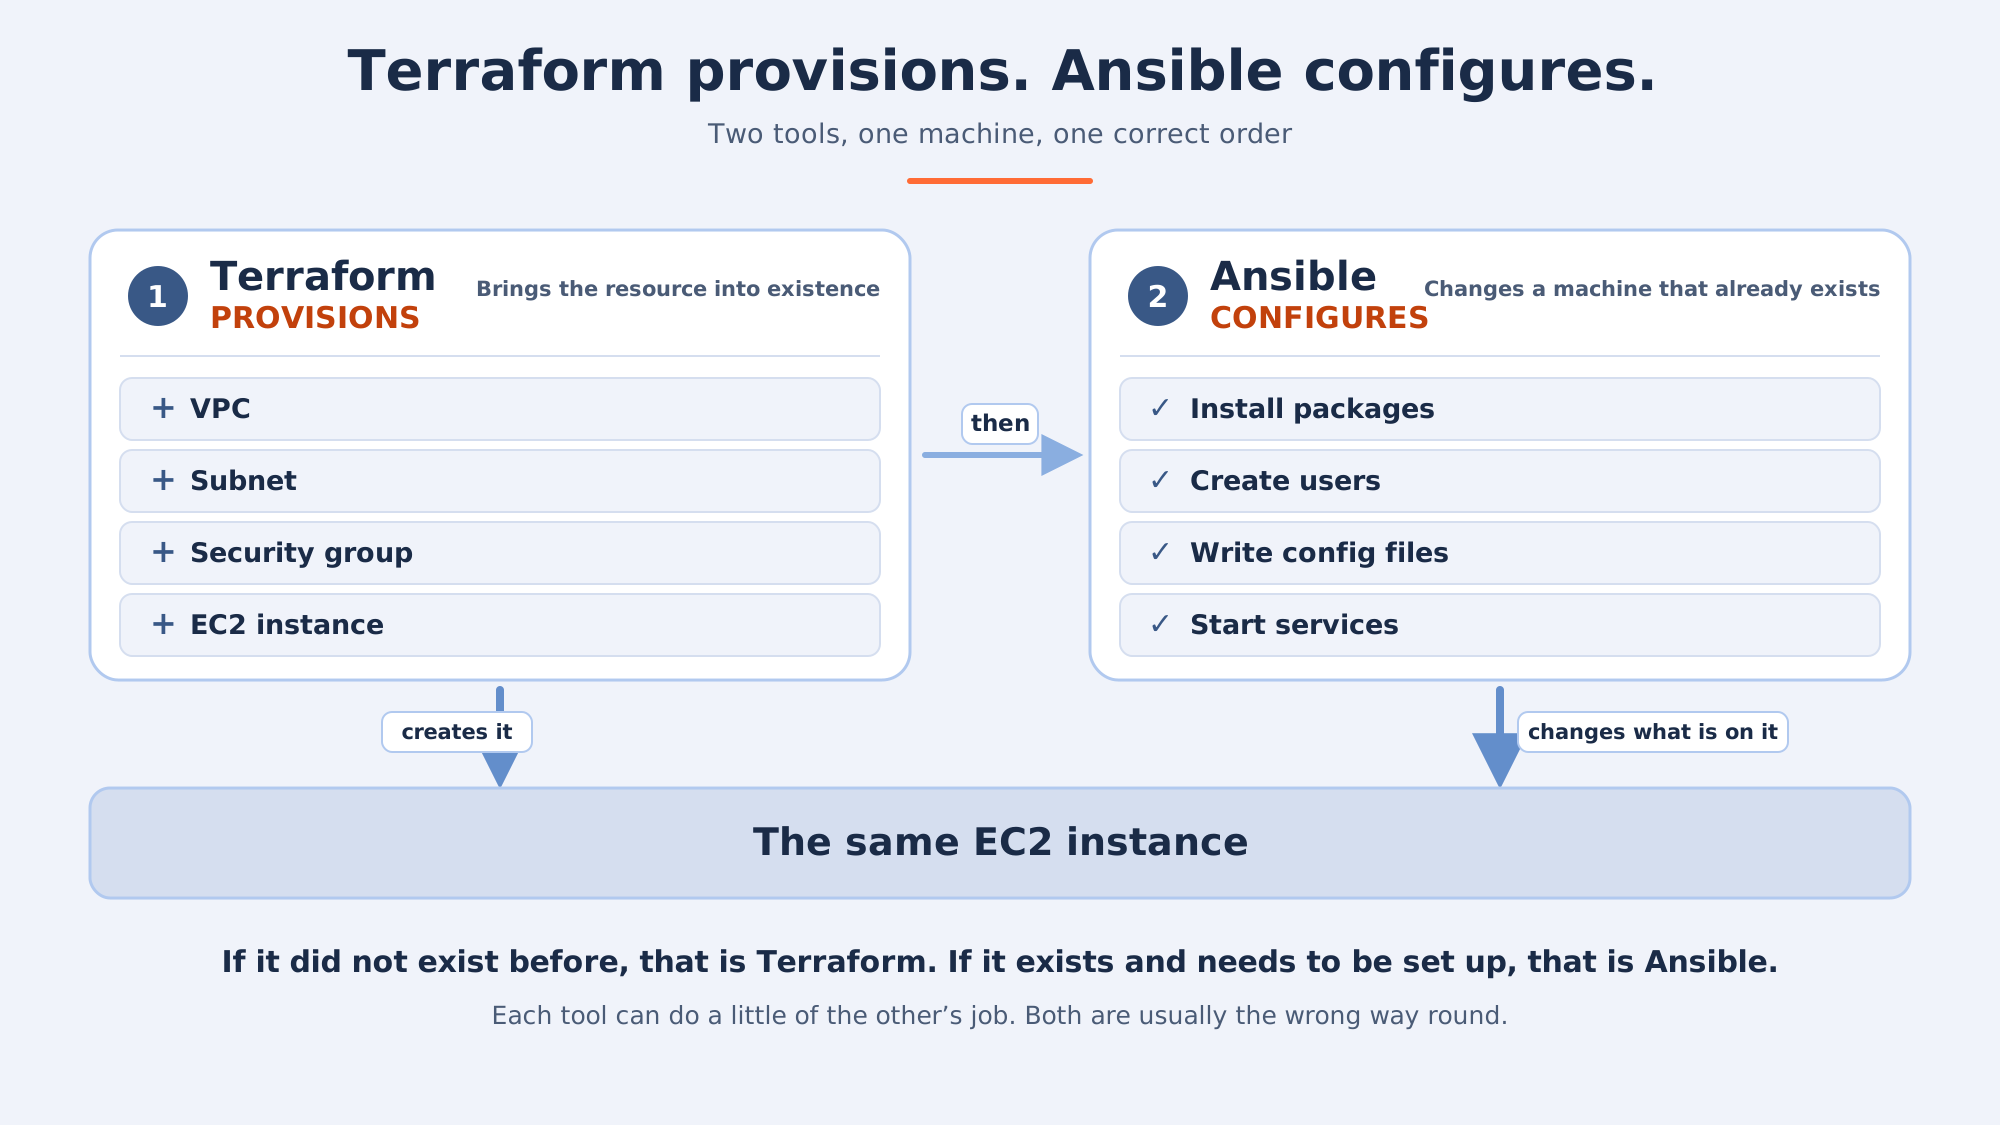
Terraform provisions, Ansible configures. This is the highest-value distinction in the whole course.
Terraform is an infrastructure as code tool, from HashiCorp, that lets you build, change and version cloud and on-prem resources safely and efficiently. It is the tool that brings resources into existence: the VPC, the subnet, the EC2 instance, the security group. You declare the infrastructure you want in configuration files, and Terraform works out the difference between that and what exists, then makes the changes. Its workflow is three commands you will run thousands of times — init to set up the working directory and providers, plan to show what would change, apply to make it so. The state file is what makes the comparison possible: it records what Terraform believes it created. Treat it as production data, because a lost or corrupted state file means Terraform no longer knows what it owns.
Ansible starts where Terraform stops: the machine exists, and now it needs packages, users, config files and running services. Ansible is decentralized, using SSH with existing OS credentials to access remote machines, which means there is no agent to install on the targets first — a meaningful practical advantage when you are configuring machines you just created. Its playbooks use YAML syntax and describe the state each managed host should be in. Written properly, a playbook is idempotent: running it twice leaves the host in the same state as running it once, so re-running to fix drift is safe rather than frightening.
The boundary blurs at the edges, and honest practice reflects that — Terraform can run a provisioner, Ansible can create cloud resources through modules. Both are usually the wrong way round. Provision with Terraform, configure with Ansible, and you will rarely be arguing with either tool.
Two Skillfyme deep-dives extend this stage: Ansible architecture and inventory on how inventories and the control node fit together, and the Ansible playbook tutorial for playbook structure. If you are wondering where Kubernetes manifests sit in the IaC picture — a fair question, since they are also declarative files describing desired state — is Kubernetes infrastructure as code? takes that boundary apart.
Module Stage 6
Module 13 — Ansible fundamentals: architecture, inventory, playbooks and ad-hoc commands
What you’ll learn: How Ansible reaches your machines, and the four pieces you need to use it.
The full picture before the hands-on: how the control node reaches managed hosts over SSH, how inventories group them, what a playbook contains, and when an ad-hoc command is the right tool instead.
Module Stage 6
Module 14 — Build your first Ansible playbook from scratch
What you’ll learn: Write a playbook that configures a server end to end.
A playbook built from an empty file: tasks, modules, variables and handlers, applied to a real host. Run it twice — a correctly written playbook reports no changes the second time, and seeing that is what teaches idempotence.
Module Stage 6
Module 15 — Terraform for beginners: EC2, init, plan, apply and the state file
What you’ll learn: Declare infrastructure in code and create it with the core Terraform workflow.
Provisioning an EC2 instance from configuration, and the init / plan / apply cycle around it. Pay attention to the state file section — most Terraform problems people hit later are state problems wearing a different costume.
Module Stage 6
Module 16 — Terraform on AWS: provisioning EC2, VPC and a Jenkins CI/CD setup
What you’ll learn: Build networked infrastructure in code and stand up CI on top of it.
A multi-resource build — VPC and networking as well as instances — ending with Jenkins running on infrastructure that was defined entirely in code. This is the module where Stage 3 and Stage 6 join up.
Stage 7: Prometheus & Grafana2 modulesMonitoring with Prometheus and Grafana
Stage 7 — Monitoring with Prometheus and Grafana
What you can do after this stage
- Stand up Prometheus and point it at targets to scrape
- Install Node Exporter and confirm host metrics are arriving
- Connect Grafana to Prometheus as a data source and build a dashboard that answers a real question
- Monitor a Kubernetes cluster's workloads rather than just its hosts
Why this stage is here. By Stage 6 you can build and deploy the whole stack from code, which means you can now break it at a scale that is hard to see. Monitoring is how running systems tell you what they are doing. Deploying without it is guessing, and the guess usually arrives as a user complaint.
Prometheus and Grafana are two separate products from two separate organisations that are commonly deployed together. They are not one tool with two names, and keeping them straight matters when you configure them. Prometheus is an open-source systems monitoring and alerting toolkit originally built at SoundCloud; it joined the Cloud Native Computing Foundation in 2016 as the second hosted project, after Kubernetes (Prometheus documentation). It collects and stores metrics. Grafana is a separate visualization tool that consumes the Prometheus API to visualize the collected data. Prometheus is where the numbers live; Grafana is how you look at them.
Node Exporter is the third piece in these modules, and it is the one that makes the model concrete. Prometheus does not magically know your server’s CPU usage. Something on the machine has to expose those numbers in a format Prometheus can scrape, and Node Exporter is that something for host-level metrics. Once you have seen that chain — exporter exposes, Prometheus scrapes and stores, Grafana queries and draws — every other monitoring setup you meet is a variation on it.
Module 18 applies the same stack to a Kubernetes cluster, installed with Helm. That is deliberate: it is the first time in the course where a tool from an earlier stage is used as ordinary infrastructure rather than as the subject of the lesson.
Module Stage 7
Module 17 — Prometheus and Grafana: setup, Node Exporter and your first dashboard
What you’ll learn: Collect host metrics with Prometheus and visualise them in Grafana.
Installing and configuring both tools, adding Node Exporter so there are real metrics to collect, and wiring Grafana to Prometheus as a data source. Build one dashboard panel yourself rather than importing a ready-made dashboard — importing teaches nothing about the query language.
Module Stage 7
Module 18 — Kubernetes monitoring with Prometheus and Grafana via Helm
What you’ll learn: Monitor a cluster: install the stack with Helm and read the dashboards.
The same monitoring stack deployed into Kubernetes with Helm, collecting metrics from cluster workloads. Uses Stage 5’s Helm skills as a means rather than an end, which is what they look like in real work.
Stage 8: GitHub Actions & AWS3 modulesAutomation and cloud
Stage 8 — Automation and cloud
What you can do after this stage
- Write a GitHub Actions workflow that builds and tests on push, and explain what triggered it
- Choose between self-hosted and repository-hosted CI on the actual constraints
- Place a workload correctly across IaaS, PaaS and SaaS
- Name what EC2, VPC, IAM, EBS and S3 each do, and which one your Terraform configuration was creating
Why this stage is here. Stage 8 closes two loops. It returns to CI/CD with a second implementation, and it puts the whole toolchain on the cloud services the earlier modules have been quietly borrowing.
Why this free DevOps course teaches both Jenkins and GitHub Actions. They solve the same problem from opposite directions, and knowing one does not prepare you for the other. Jenkins is a self-contained automation server you host, operate and upgrade yourself, which buys you complete control and costs you the maintenance. GitHub Actions is a continuous integration and continuous delivery platform that allows you to automate your build, test and deployment pipeline, running alongside the repository with no server for you to run. Its workflows are YAML files in the repository’s .github/workflows directory, triggered by repository events, manually, or on a schedule. Teams pick between them on constraints — existing infrastructure, compliance requirements, what the code already lives on — not on which is better. You will meet both.
Modules 20 and 21 cover the cloud layer underneath everything. Module 20 separates IaaS, PaaS and SaaS, which is the vocabulary every cloud conversation assumes you have: infrastructure as a service gives you the machine and leaves the rest to you; platform as a service gives you somewhere to run code without managing the machine; software as a service gives you the finished application. Module 21 goes service by service through the AWS pieces this course has already been using — EC2 for compute, VPC for networking, IAM for permissions, EBS for block storage, S3 for object storage — so the names you have been typing into Terraform become things you understand rather than things you copied.
A word on cost, since this stage touches real cloud accounts. Free tiers exist, but their limits and eligibility vary by region and change, so check the provider’s own pricing pages for your account. Destroy what you create when you finish a module. An instance left running over a weekend is the most common surprise bill in self-directed learning.
Module Stage 8
Module 19 — GitHub Actions: build your first CI/CD workflow
What you’ll learn: Automate build and deploy from a YAML file in your own repository.
Workflow syntax, events, jobs and runners, building up to a pipeline that runs on every push. Compare it directly against what you built in Stage 3 — same outcome, very different operational burden.
Module Stage 8
Module 20 — Cloud computing fundamentals: IaaS, PaaS and SaaS
What you’ll learn: The three service models, and how to tell which one you are buying.
What the cloud service models actually divide up — who is responsible for the hardware, the operating system, the runtime and the application — with examples across providers. The shared-responsibility idea introduced here is also the foundation of cloud security thinking.
Module Stage 8
Module 21 — Core AWS services for DevOps: EC2, VPC, IAM, EBS and S3
What you’ll learn: The five AWS services this course has been using, explained properly.
Compute, networking, permissions, block storage and object storage, each in the context of how the earlier modules used them. IAM is the one to watch: permissions are where most self-taught cloud work quietly goes wrong, in both directions.
What this free DevOps course includes — and what it doesn’t
Here is the complete list, both sides, before you invest any time.
Included, at no cost:
- All 21 video modules, embedded on this page, playable without an account
- Every tool in the DevOps toolchain the curriculum names: Git and GitHub, Jenkins, Docker, Kubernetes, Helm, Ansible, Terraform, Prometheus, Grafana, GitHub Actions, and core AWS services
- The stage-by-stage sequence, with prerequisites and a self-check at each stage
- The capstone project brief
- A Skillfyme certificate, issued on review of your capstone project. No fee at any point
Not included, stated plainly:
- No mentorship. Nobody is assigned to you.
- No live doubt-clearing. If you get stuck at 2am, you get stuck with the internet, same as everyone else self-teaching.
- No placement support. This course makes no hiring, job or salary claim of any kind, and you should be suspicious of any free course that does.
- No accreditation. The certificate is issued by Skillfyme. It is not a university credential and not a vendor certification.
- No graded quizzes or auto-assessment. The single assessment is the capstone, reviewed by a person.
That second list is the honest version of what “free” costs. You are trading structured human support for zero price. For a self-directed learner with time and stubbornness, that trade is often fine. For someone who knows they stall without accountability, it usually is not, and no amount of good video fixes it.
If you read that list and thought “the second half is exactly what I need,” the paid Skillfyme programme covers it — live mentorship, structured doubt-clearing and placement support — and it is a separate product, not a better version of this page. For a broader comparison of what a full DevOps syllabus contains, what a DevOps course includes breaks the curriculum down independently of any one course.
How to use this free DevOps course
Watch the stages in order. That sentence is the whole method, and it is the part most self-taught learners skip.
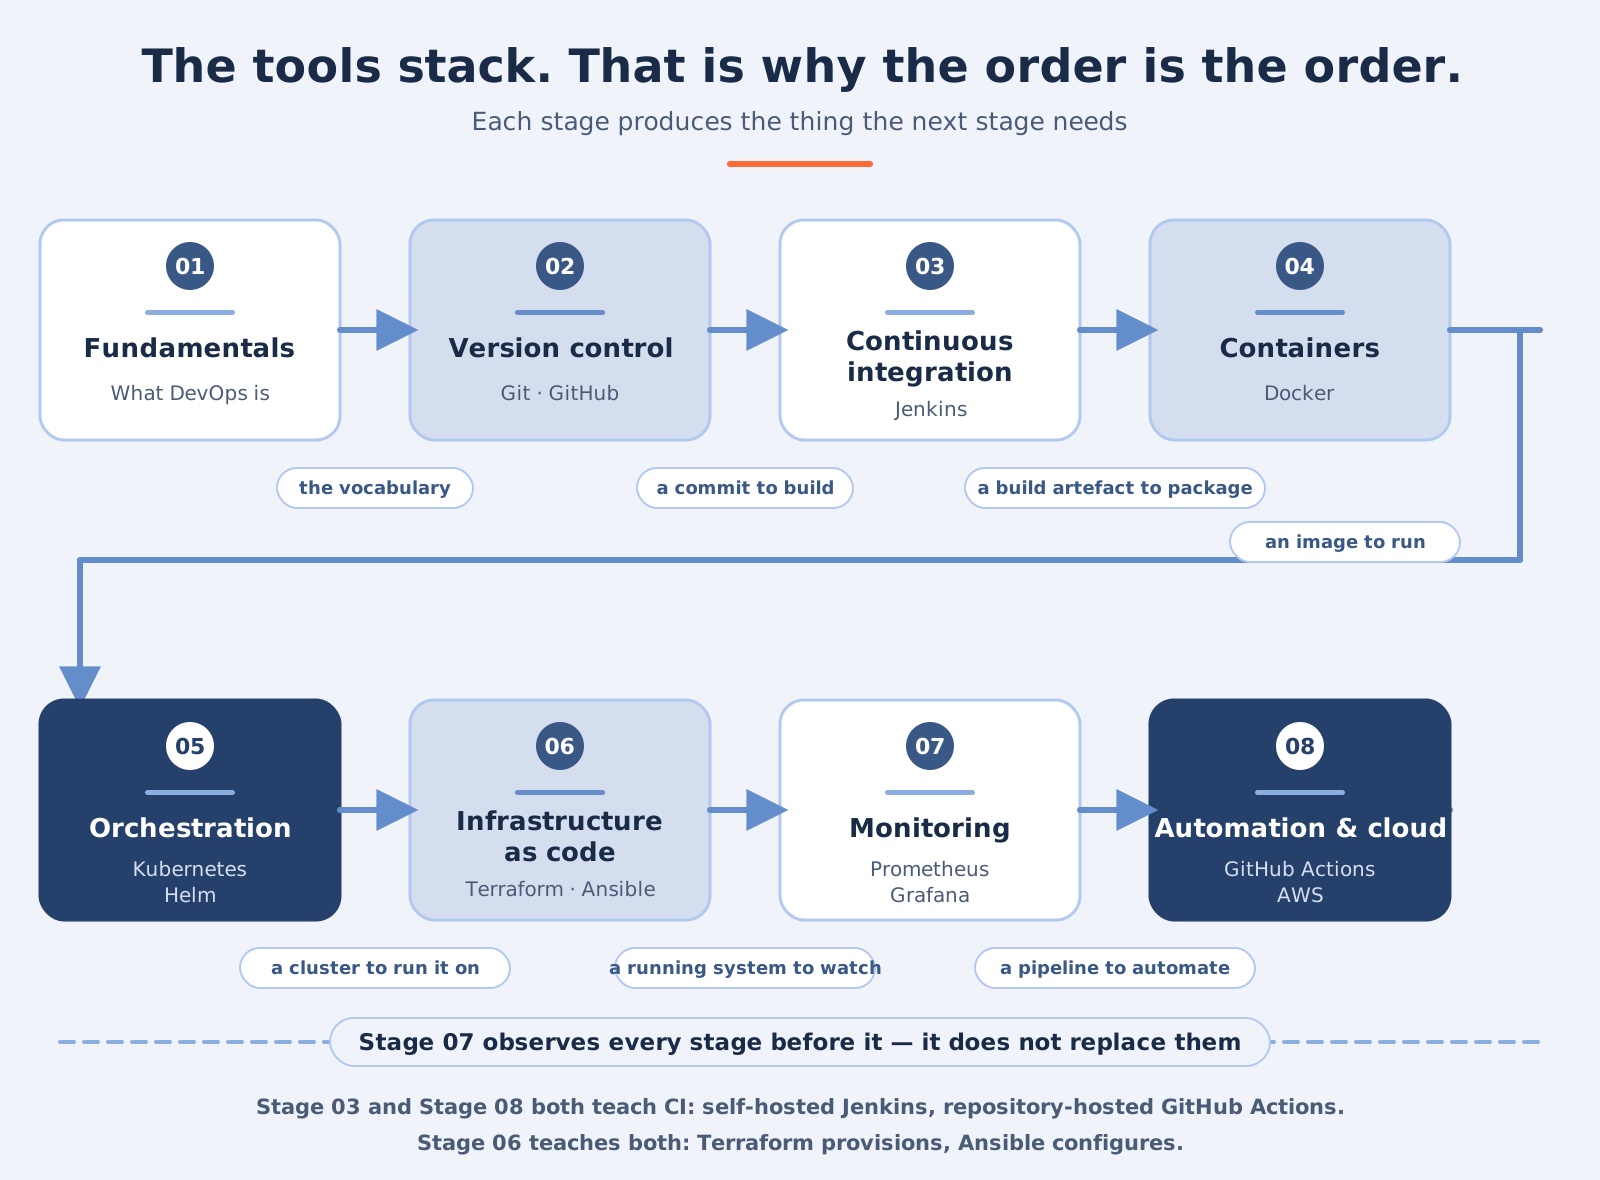
The tools in this curriculum are not a menu of alternatives. They stack. Git versions your code, so Jenkins and GitHub Actions have something to build. Docker packages the built application, so Kubernetes has something to run. Helm packages the Kubernetes manifests, so a deployment becomes repeatable. Ansible configures the machines and Terraform provisions the infrastructure those machines run on. Prometheus and Grafana then tell you whether any of it is actually working. Learn them out of order and every stage feels harder than it is, because you are missing the thing it was built on top of.
Practical rhythm: watch a module, then rebuild what it showed on your own machine before moving on. Reading a terraform apply is not the same as running one and watching it fail on a permissions error. The failures are the learning.
What order should I learn DevOps tools in?
The dependency chain sets the order. Git comes first because Jenkins and GitHub Actions both act on a repository; Docker comes before Kubernetes, because orchestration presupposes something to orchestrate; Ansible and Terraform follow the containers they configure and provision for; and monitoring comes last, because you need a running system before there is anything to observe.
Prerequisites — what you need before Module 1
You need less than you probably think, but not nothing.
- A computer you can install software on. Most modules involve running something locally.
- Basic command-line comfort. You should be able to move between directories, edit a file, and read an error message without panic. You do not need to be a Linux administrator. If
cd,ls,catand a text editor are familiar, you have enough to start, and Stage 1 fills in the conceptual gaps. - A cloud account for some modules. Several modules provision AWS resources. Cloud providers offer free tiers, but the terms, limits and eligibility differ by region and change over time, so check AWS’s own pricing and free tier pages for what applies to your account rather than trusting any course page’s summary — including this one. Some resources fall outside any free tier, so set a billing alert on day one.
- Willingness to break things. Every module has a version where you follow along and a version where you rebuild it yourself afterwards. Only the second one teaches.
How long the whole course takes depends on how much of the above you already have and how many hours a week you can give it. We deliberately publish no total figure, because the honest answer varies so widely between a working sysadmin and a first-year student that any single number would mislead one of them.
Curriculum at a glance
Eight stages, 21 modules, in dependency order.
| Stage | Focus | Modules | What you can do after it |
|---|---|---|---|
| 1 | DevOps fundamentals | 1 | Explain what DevOps is and read the rest of the curriculum as a system |
| 2 | Version control with Git and GitHub | 2–4 | Branch, merge, undo safely, and shelve work in progress |
| 3 | Continuous integration with Jenkins | 5–6 | Stand up Jenkins and run a build automatically on every commit |
| 4 | Containers with Docker | 7–8 | Build an image, run a container, and keep data alive between runs |
| 5 | Orchestration with Kubernetes and Helm | 9–12 | Deploy to a cluster, attach real storage, and package a release |
| 6 | Configuration management and Infrastructure as Code | 13–16 | Provision infrastructure with Terraform and configure it with Ansible |
| 7 | Monitoring with Prometheus and Grafana | 17–18 | Collect metrics from hosts and a cluster, and build a dashboard |
| 8 | Automation and cloud | 19–21 | Ship with GitHub Actions and place the toolchain on real cloud services |
- Stage Module 1
DevOps fundamentals
Explain what DevOps is and read the rest of the curriculum as a system
Go to Stage 1 - Stage Modules 2–4
Version control with Git and GitHub
Branch, merge, undo safely, and shelve work in progress
Go to Stage 2 - Stage Modules 5–6
Continuous integration with Jenkins
Stand up Jenkins and run a build automatically on every commit
Go to Stage 3 - Stage Modules 7–8
Containers with Docker
Build an image, run a container, and keep data alive between runs
Go to Stage 4 - Stage Modules 9–12
Orchestration with Kubernetes and Helm
Deploy to a cluster, attach real storage, and package a release
Go to Stage 5 - Stage Modules 13–16
Configuration management and Infrastructure as Code
Provision infrastructure with Terraform and configure it with Ansible
Go to Stage 6 - Stage Modules 17–18
Monitoring with Prometheus and Grafana
Collect metrics from hosts and a cluster, and build a dashboard
Go to Stage 7 - Stage Modules 19–21
Automation and cloud
Ship with GitHub Actions and place the toolchain on real cloud services
Go to Stage 8
The capstone project
The capstone is one project that connects the stages instead of demonstrating them separately. Twenty-one modules of following along produce knowledge you cannot yet prove; a capstone produces a repository someone can open.
A strong DevOps capstone typically shows an application moving from source control to a running, observable deployment without manual steps in between. In practice that tends to mean most of these elements:
- Version control — the whole thing lives in a Git repository, with a history that shows the work rather than one commit called “final”
- Continuous integration — a pipeline that builds and tests automatically when you push, built with Jenkins, GitHub Actions or both
- Containerisation — the application packaged as an image from your own Dockerfile
- Deployment — the container running somewhere real, on a Kubernetes cluster or a provisioned instance
- Infrastructure as code — the infrastructure defined in Terraform and, where machines need configuring, an Ansible playbook, so the whole environment can be destroyed and rebuilt from the repository
- Monitoring — Prometheus collecting metrics and a Grafana dashboard you designed
- A README that explains itself — what it does, how to run it, what you would change with more time
Project shapes that work well, if you would rather not invent one:
- A web application with a full delivery pipeline. Any small app you can write. Commit triggers build, image gets published, deployment updates, dashboard shows it serving traffic.
- A reproducible environment build. Terraform provisions the network and instances, Ansible configures them, a playbook installs and starts the stack. Success looks like
destroythenapplyproducing the same working environment. - A monitoring-first project. A deliberately imperfect service instrumented properly, where the dashboard makes a failure obvious within moments. Include a short note on what you would alert on and why.
Scope it small enough to finish. A tiny application with a genuinely complete pipeline demonstrates far more than an ambitious application with a half-written Terraform module — and it is the pipeline being reviewed, not the app’s feature list.
What is not defined here, stated openly: there is no published rubric, point score or pass mark for the capstone. Submissions are reviewed by a person against whether the project demonstrates the course’s skills end to end. If you are unsure whether your scope is appropriate, send a short description with your submission explaining what you built and why.
How to get your free DevOps certificate
Complete the 21 modules, build a capstone project, push it to a public repository, and email the link to support@skillfyme.in. A reviewer looks at the project, and if it demonstrates the course’s skills end to end, Skillfyme issues your certificate. There is no fee at any point.
The steps in order:
- Work through all 21 modules. Self-paced, in any timeframe you like.
- Build the capstone project, using the guidance above.
- Push it to a public repository — GitHub or any host where a reviewer can read it without an account. Include the README.
- Email the repository link to support@skillfyme.in. Add a line or two on what you built and which parts of the course it uses.
- A person reviews it. Not a script, not a quiz score.
- The certificate is issued if the project demonstrates the skills the course teaches.
We do not promise a review turnaround. Reviews are done by people, and quoting a window we might miss would be a worse answer than not quoting one.
What this certificate is — and what it is not
It is: a Skillfyme certificate of completion, issued after a human has reviewed a real project you built. Nothing is automatic about it. You cannot get it by clicking through videos, because nobody is tracking your video progress — the project is the assessment.
It is not:
- Not accredited. No university, government or accreditation body stands behind it.
- Not a vendor certification. It is not equivalent to the certification programmes run by AWS, the CNCF and others, which are separately administered and carry their own fees, exam requirements and renewal terms. Check each programme’s own site for what it involves. If one of those is your goal, this course is preparation, not a substitute.
- Not a hiring credential. It makes no claim about employment outcomes, and neither do we.
Here is the honest way to think about it: the certificate documents that you completed reviewed work, and the capstone repository is the stronger artefact of the two. A repository someone can clone, read and run is evidence of skill in a way no certificate is. Build the project for the repository; treat the certificate as the receipt.
Where to go after the 21 modules
Finishing the course leaves you at a real but early level: you can build the pipeline, and you have not yet run one that other people depend on. Four directions from here, and they are not mutually exclusive.
Go deeper into primary documentation. The single biggest jump in capability after a course is learning to read the source. The Kubernetes, Terraform, Docker, Ansible and Prometheus documentation are all excellent and all free. Pick the tool you liked most and read its docs properly rather than watching more introductions to tools you already know.
Build a second project, unsupervised. The capstone follows a suggested shape. The next one should not. Choose a problem nobody has written a tutorial for and work out the infrastructure yourself. That is where the transferable skill forms.
Consider a vendor certification. AWS, the CNCF and others run their own independently administered certification programmes. They cost money and require separate preparation, and they carry a recognition that no course-completion certificate does. This course covers a good deal of the underlying ground for several of them, so check the exam guide published by whichever programme interests you and work out the gap from there.
Think about the career shape, not just the tools. Which part of this did you actually enjoy — building pipelines, running clusters, or making systems observable? Those diverge into different roles. Skillfyme’s DevOps career roadmap maps the paths and what they demand.
The one thing this free track cannot give you is a person who reviews your work weekly, answers a question the moment you are stuck, and pushes you through the point where you would otherwise stop. If that is the thing you are missing, it is worth being honest with yourself about it rather than starting a fourth free course. Skillfyme’s paid DevOps with AI Masters Program provides mentorship, live doubt-clearing and placement support — a different product, not this page with more videos.
Frequently asked questions
Is this DevOps course really free?
Yes. All 21 modules are free to watch on this page with no payment, no card details and no account. The certificate has no fee either — it requires a capstone project instead of money. There is no upsell inside the curriculum and no part of it is locked.
Do I need to sign up or create an account?
No. There is no registration, no email gate and no login. Every module plays directly on the page. You only contact Skillfyme when you are ready to submit your capstone project for certificate review.
Does this free DevOps course include a certificate?
Yes. After completing the 21 modules you build a capstone project, push it to a public repository and email the link to support@skillfyme.in. A reviewer assesses whether it demonstrates the course’s skills end to end, and Skillfyme issues the certificate if it does. There is no fee.
Is the certificate accredited or industry-recognised?
No. It is a Skillfyme certificate of completion issued after a person reviews your capstone project. It is not accredited by any university or accreditation body, and it is not a vendor certification like the separately administered programmes run by AWS or the CNCF. Your capstone repository is the stronger portfolio artefact of the two.
What order should I learn DevOps tools in?
Learn DevOps tools in the order they depend on each other: DevOps fundamentals first, then Git and GitHub for version control, then Jenkins for continuous integration, Docker for containers, Kubernetes and Helm for orchestration, Ansible and Terraform for configuration and infrastructure as code, Prometheus and Grafana for monitoring, and finally GitHub Actions and cloud services.
Do I need to know Linux before starting this DevOps course?
You need basic command-line comfort, not Linux administration experience. If you can change directories, edit a file and read an error message, you can start Module 1. Deeper Linux knowledge helps and tends to build naturally as you work through the container, configuration management and cloud stages.
Do I need a paid AWS account for this course?
Several modules provision AWS resources such as EC2 instances. Cloud providers offer free tiers, but the limits, eligibility and terms differ by region and change over time, so check AWS’s own pricing and free tier pages for what applies to your account. Set a billing alert and destroy resources when you finish a module.
How long does it take to complete this free DevOps course?
This free DevOps course is self-paced, and no fixed timeframe is published. How long it takes depends on your starting point — prior Linux, networking and scripting exposure makes a large difference — and on how many hours a week you can give it. Working through a module and then rebuilding it yourself takes longer than watching, and is the part that produces the skill.
What should I build for the capstone project?
Build one project that carries an application from source control to a running, monitored deployment: a Git repository, an automated build, a container image, a deployment, infrastructure defined in Terraform, and a Grafana dashboard over Prometheus metrics. A small application with a complete pipeline demonstrates more than a large application with an incomplete one.
How do I submit my capstone project?
Push the project to a public repository that a reviewer can read without an account, include a README explaining what it does and how to run it, then email the repository link to support@skillfyme.in with a short note on what you built and which parts of the course it uses.
How is this different from the paid DevOps with AI Masters Program?
This free DevOps course is self-paced video with no mentorship, no live doubt-clearing and no placement support. The paid DevOps with AI Masters Program is a different product that includes those things. The free curriculum is not a trimmed preview of the paid one and the paid one is not this page with more videos — they are built for different needs.
Can I get a job after completing this free DevOps course?
No course can promise that, and this page makes no hiring, placement or salary claim. What the course gives you is the full toolchain in a sensible order and a capstone repository that shows working code and infrastructure. Hiring outcomes depend on your overall experience, portfolio, interview performance and local market.