
DevOps
Kubernetes Architecture Explained: How a Cluster Actually Works
Kubernetes architecture explained: control plane and worker node components, what each does, and a step-by-step trace of what happens on kubectl apply.
Kubernetes architecture splits a cluster into two halves: a control plane that decides what should run, and worker nodes that actually run it. The control plane holds kube-apiserver, etcd, kube-scheduler and kube-controller-manager. Each worker node runs a kubelet, a container runtime, and usually kube-proxy. Together they continuously reconcile actual state with desired state.
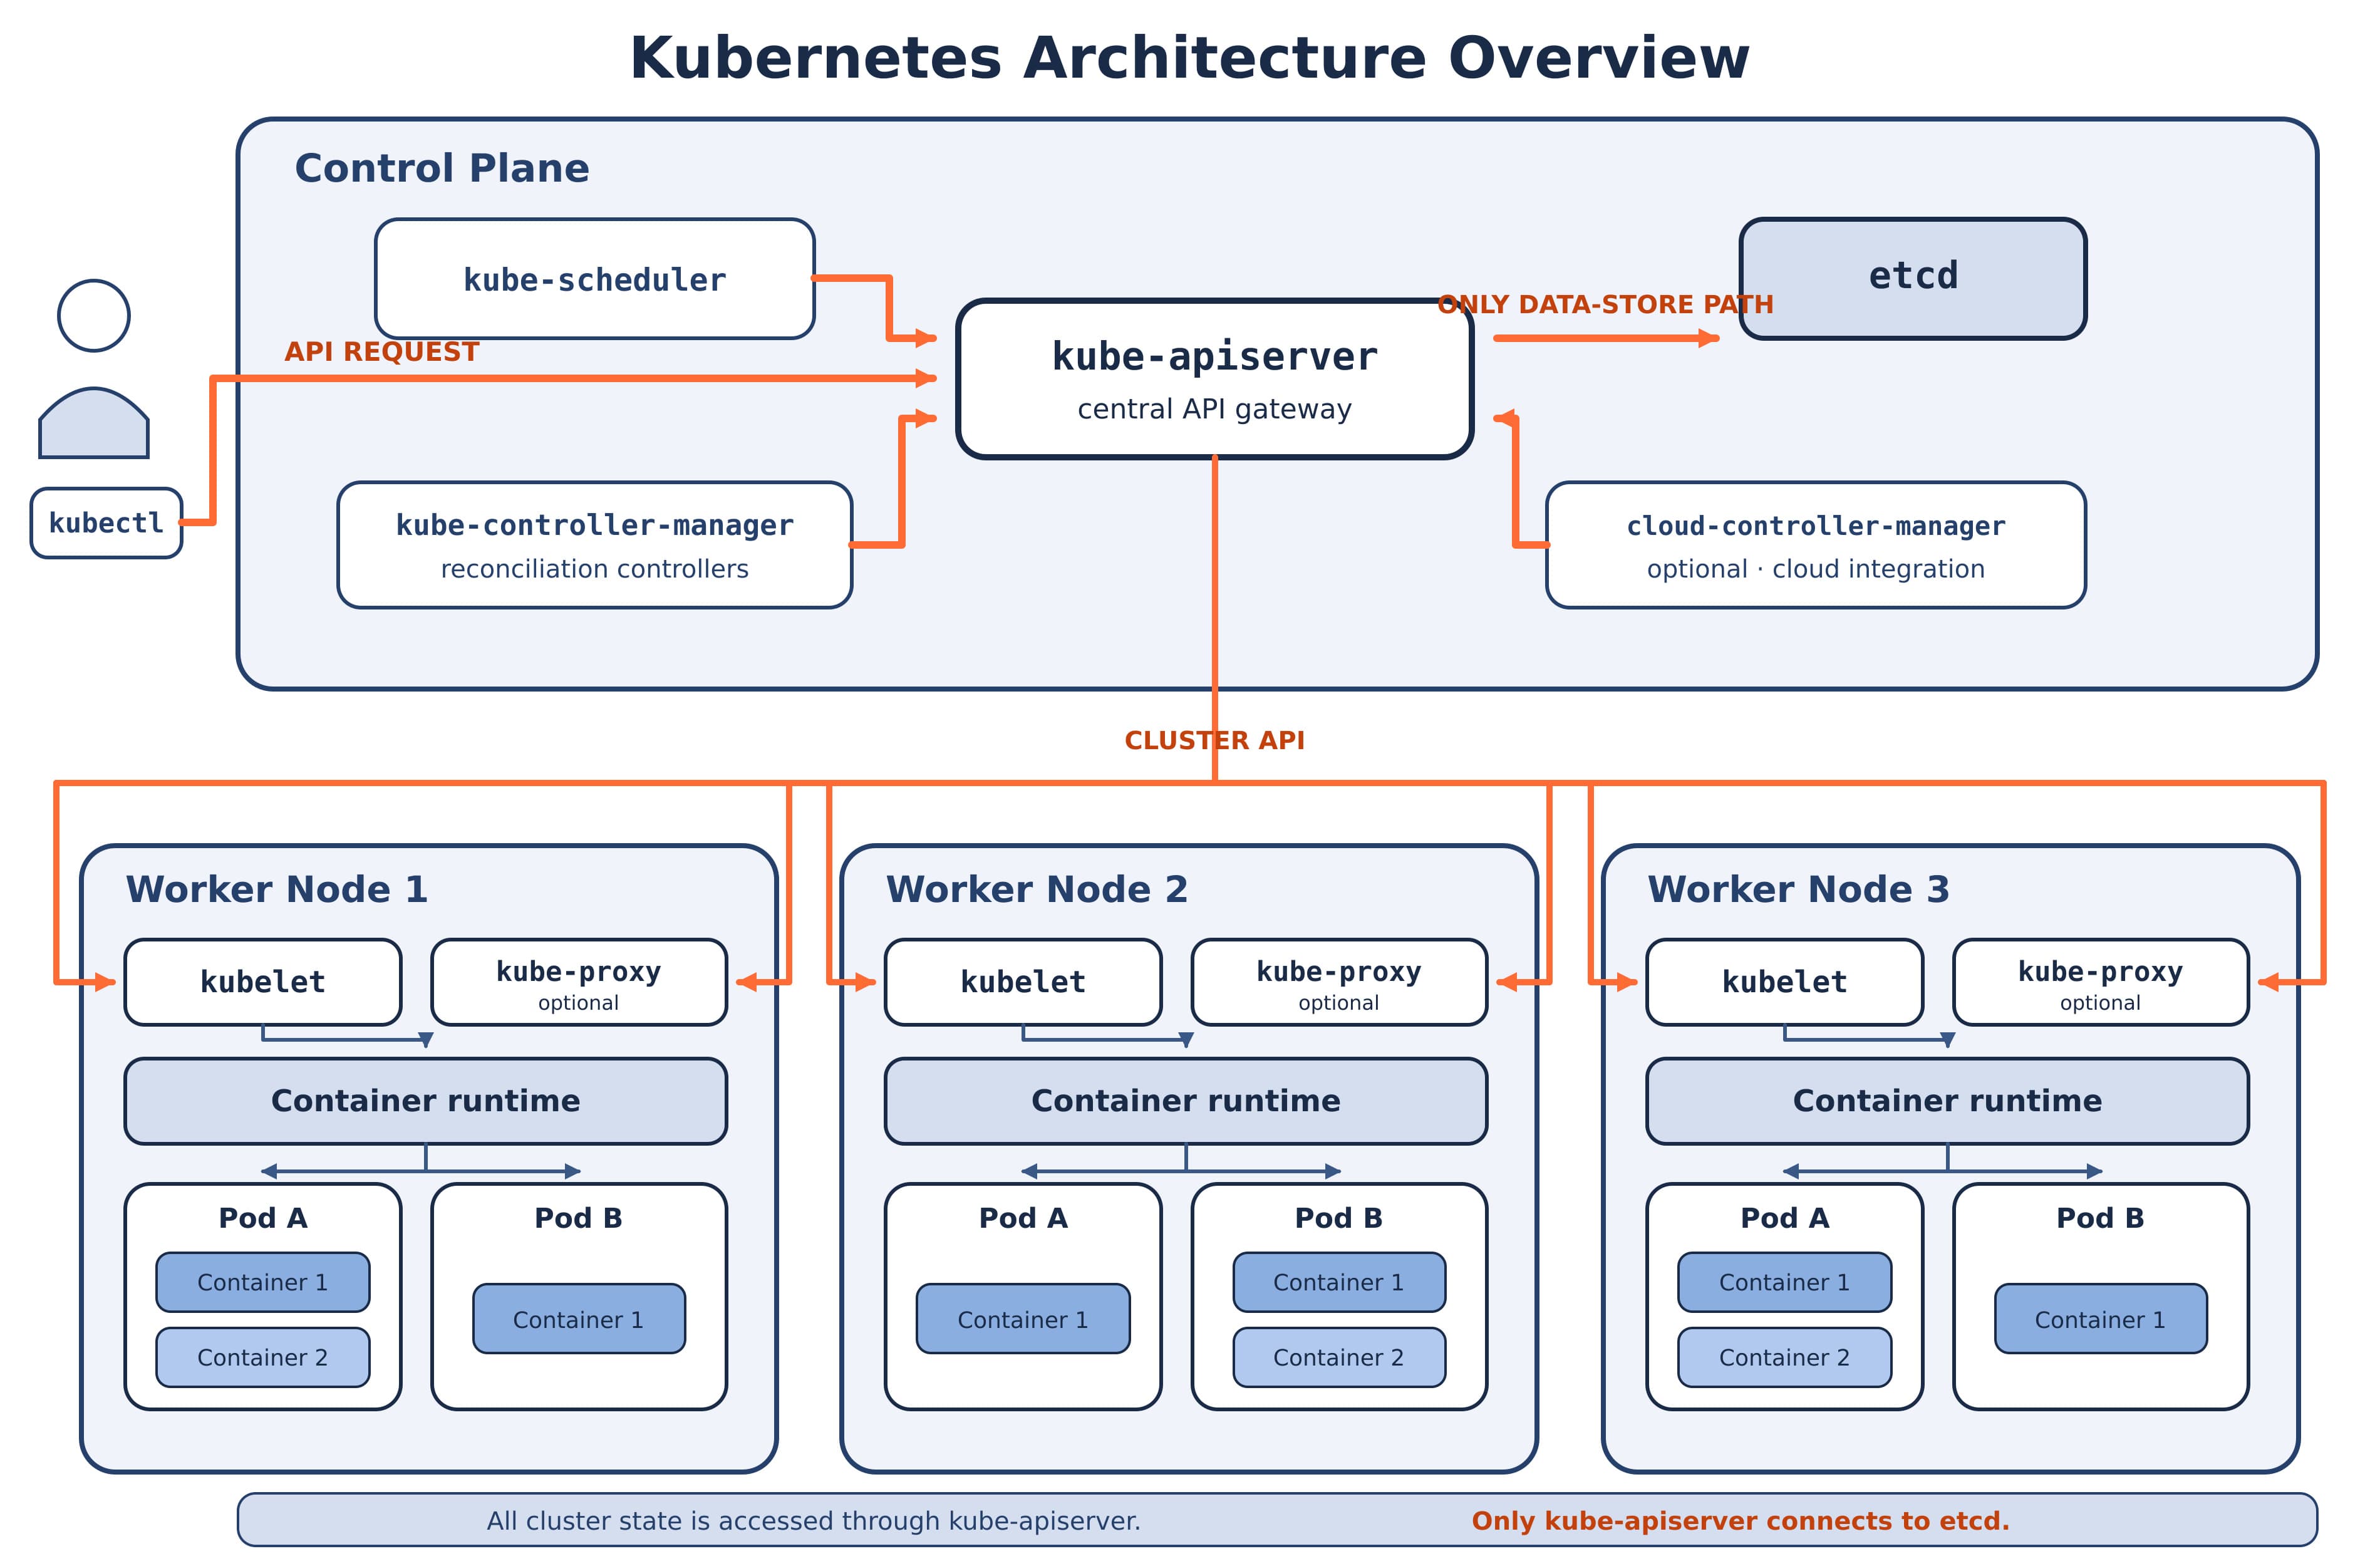
That paragraph is the whole model in five sentences. The rest of this article makes it mean something — what each component actually does, what happens end-to-end when you run kubectl apply, what breaks when a piece dies, and where Docker fits now that Kubernetes no longer ships dockershim.
Two notes on scope before starting. This article describes Kubernetes 1.36, the current stable minor series as of August 2026, and names the version inline wherever behavior depends on it. And it assumes you have met containers before but does not assume you can define one — the next section handles that, briefly, because the argument for Kubernetes does not work without it.
What is Kubernetes architecture?
Kubernetes architecture is the arrangement of components that turns a group of machines into a single cluster that runs containerized applications. A Kubernetes cluster consists of a control plane and one or more worker nodes. The control plane makes global decisions — scheduling, responding to events — and the worker nodes host the Pods that make up your application workload. Every cluster needs at least one worker node to run Pods.
The word “architecture” is doing real work in that sentence. Kubernetes is not one program. It is a set of independent processes, each with a narrow job, that coordinate exclusively through a shared API and a shared record of intent. Understanding Kubernetes means understanding that coordination pattern, not memorizing seven component names.
A note on vocabulary you will meet in older material: the control plane was formerly called the master node. Current Kubernetes cluster architecture documentation says “control plane,” and this article uses that term throughout. If a tutorial says “master,” it means the same machines.
The one idea that explains everything: desired state vs current state
Kubernetes is built on a single mechanism repeated everywhere, and it is worth learning before any component name. You declare the state you want. Kubernetes continuously compares that against the state that exists, and acts to close the gap.
The Kubernetes documentation uses a thermostat for this. Setting the temperature tells the thermostat your desired state. The actual room temperature is the current state. The thermostat turns equipment on or off to bring current closer to desired. It never finishes — it runs forever, correcting.
In Kubernetes, objects carry a spec field representing desired state. Controllers are control loops that watch cluster state and make or request changes to move current state toward desired state. You do not tell Kubernetes “start three copies of my app.” You tell it “three copies of my app should exist,” and a controller keeps making that true — including at 03:00 when a node fails and nobody is awake.
This is what “declarative” means in practice, and it is the reason the architecture looks the way it does. Once you accept that every component is a loop watching for drift and correcting it, the rest of the design follows.
Containers first: what Kubernetes is actually orchestrating
Kubernetes schedules and runs containers, so the architecture only makes sense if a container is a concrete thing to you rather than a word.
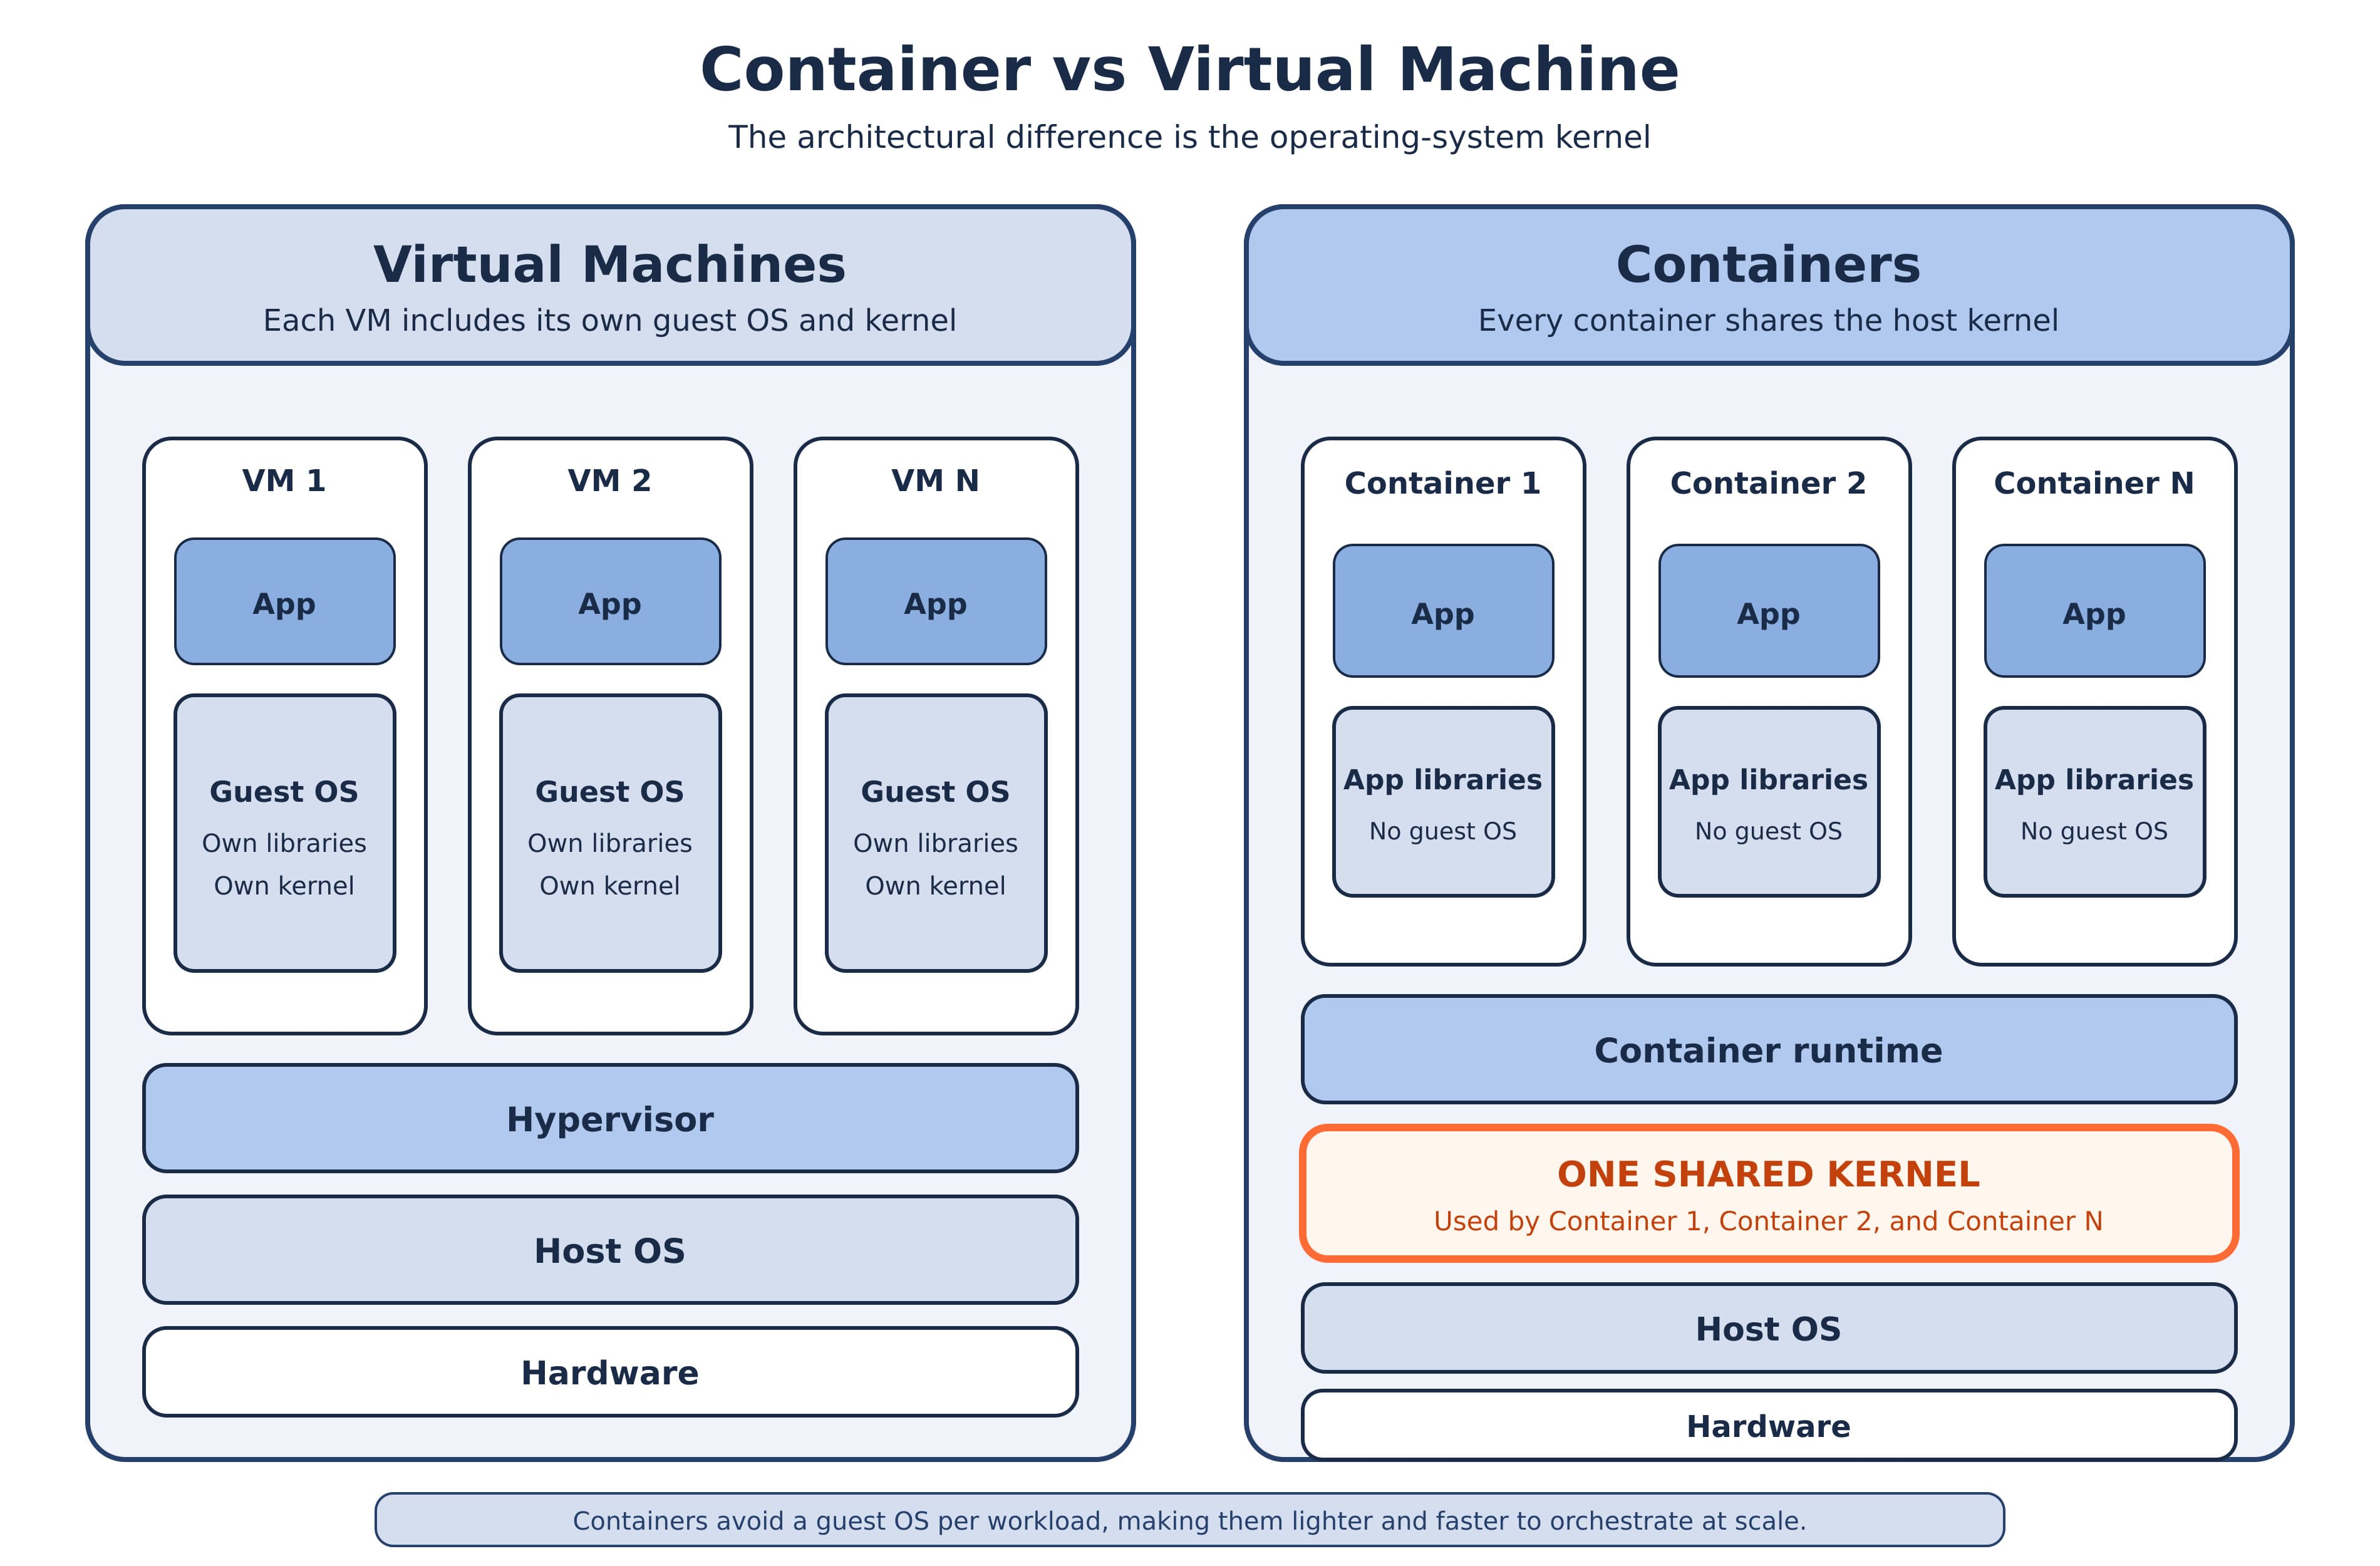
A container is a process running on a normal Linux kernel, isolated so it behaves as if it had the machine to itself. That isolation comes from Linux kernel features — chiefly namespaces, which control what a process can see (its own process tree, network interfaces, filesystem mounts), and cgroups, which control what it can consume (CPU, memory). No emulated hardware, no guest operating system. A container is your process, plus a restricted view of the system.
A container image is the packaged filesystem and metadata that a container starts from — application, dependencies, and runtime configuration, bundled so the same artifact runs identically on any machine with a compatible runtime. Images follow OCI (Open Container Initiative) standards, which is why an image is portable across tools rather than locked to the one that built it. That portability detail matters later, when the question of Docker comes up.
That is the entire container grounding this article needs. Docker popularized this pattern and remains a common way to build images, but Docker is not the subject here.
Why containers alone aren’t enough
Run containers on one machine and you have a deployment. Run them for a service people depend on and you will hit the following, in roughly this order.
The machine reboots. Every container on it stops, and nothing starts them again. You add a second machine, and now you have to decide by hand which containers go where — and remember that decision, and redo it whenever anything changes. Traffic doubles, so you need four copies of one container instead of one, and something has to distribute requests across them and notice when one stops answering. A container develops a memory leak and needs restarting; you find out from a user, not from your infrastructure. You deploy a bad version and need every copy rolled back at once.
Each of those is a scheduling, health, or networking problem, and each one is solvable manually exactly once. An orchestrator exists to solve them as a permanent, automated policy rather than a series of interventions: it decides which machine each container runs on, restarts what dies, replaces what becomes unhealthy, scales copies up and down, and gives a stable network address to a set of containers whose individual members keep changing.
That is Kubernetes’ job description. Everything in the architecture below is a mechanism for one of those responsibilities.
The two halves of a cluster: control plane and worker nodes
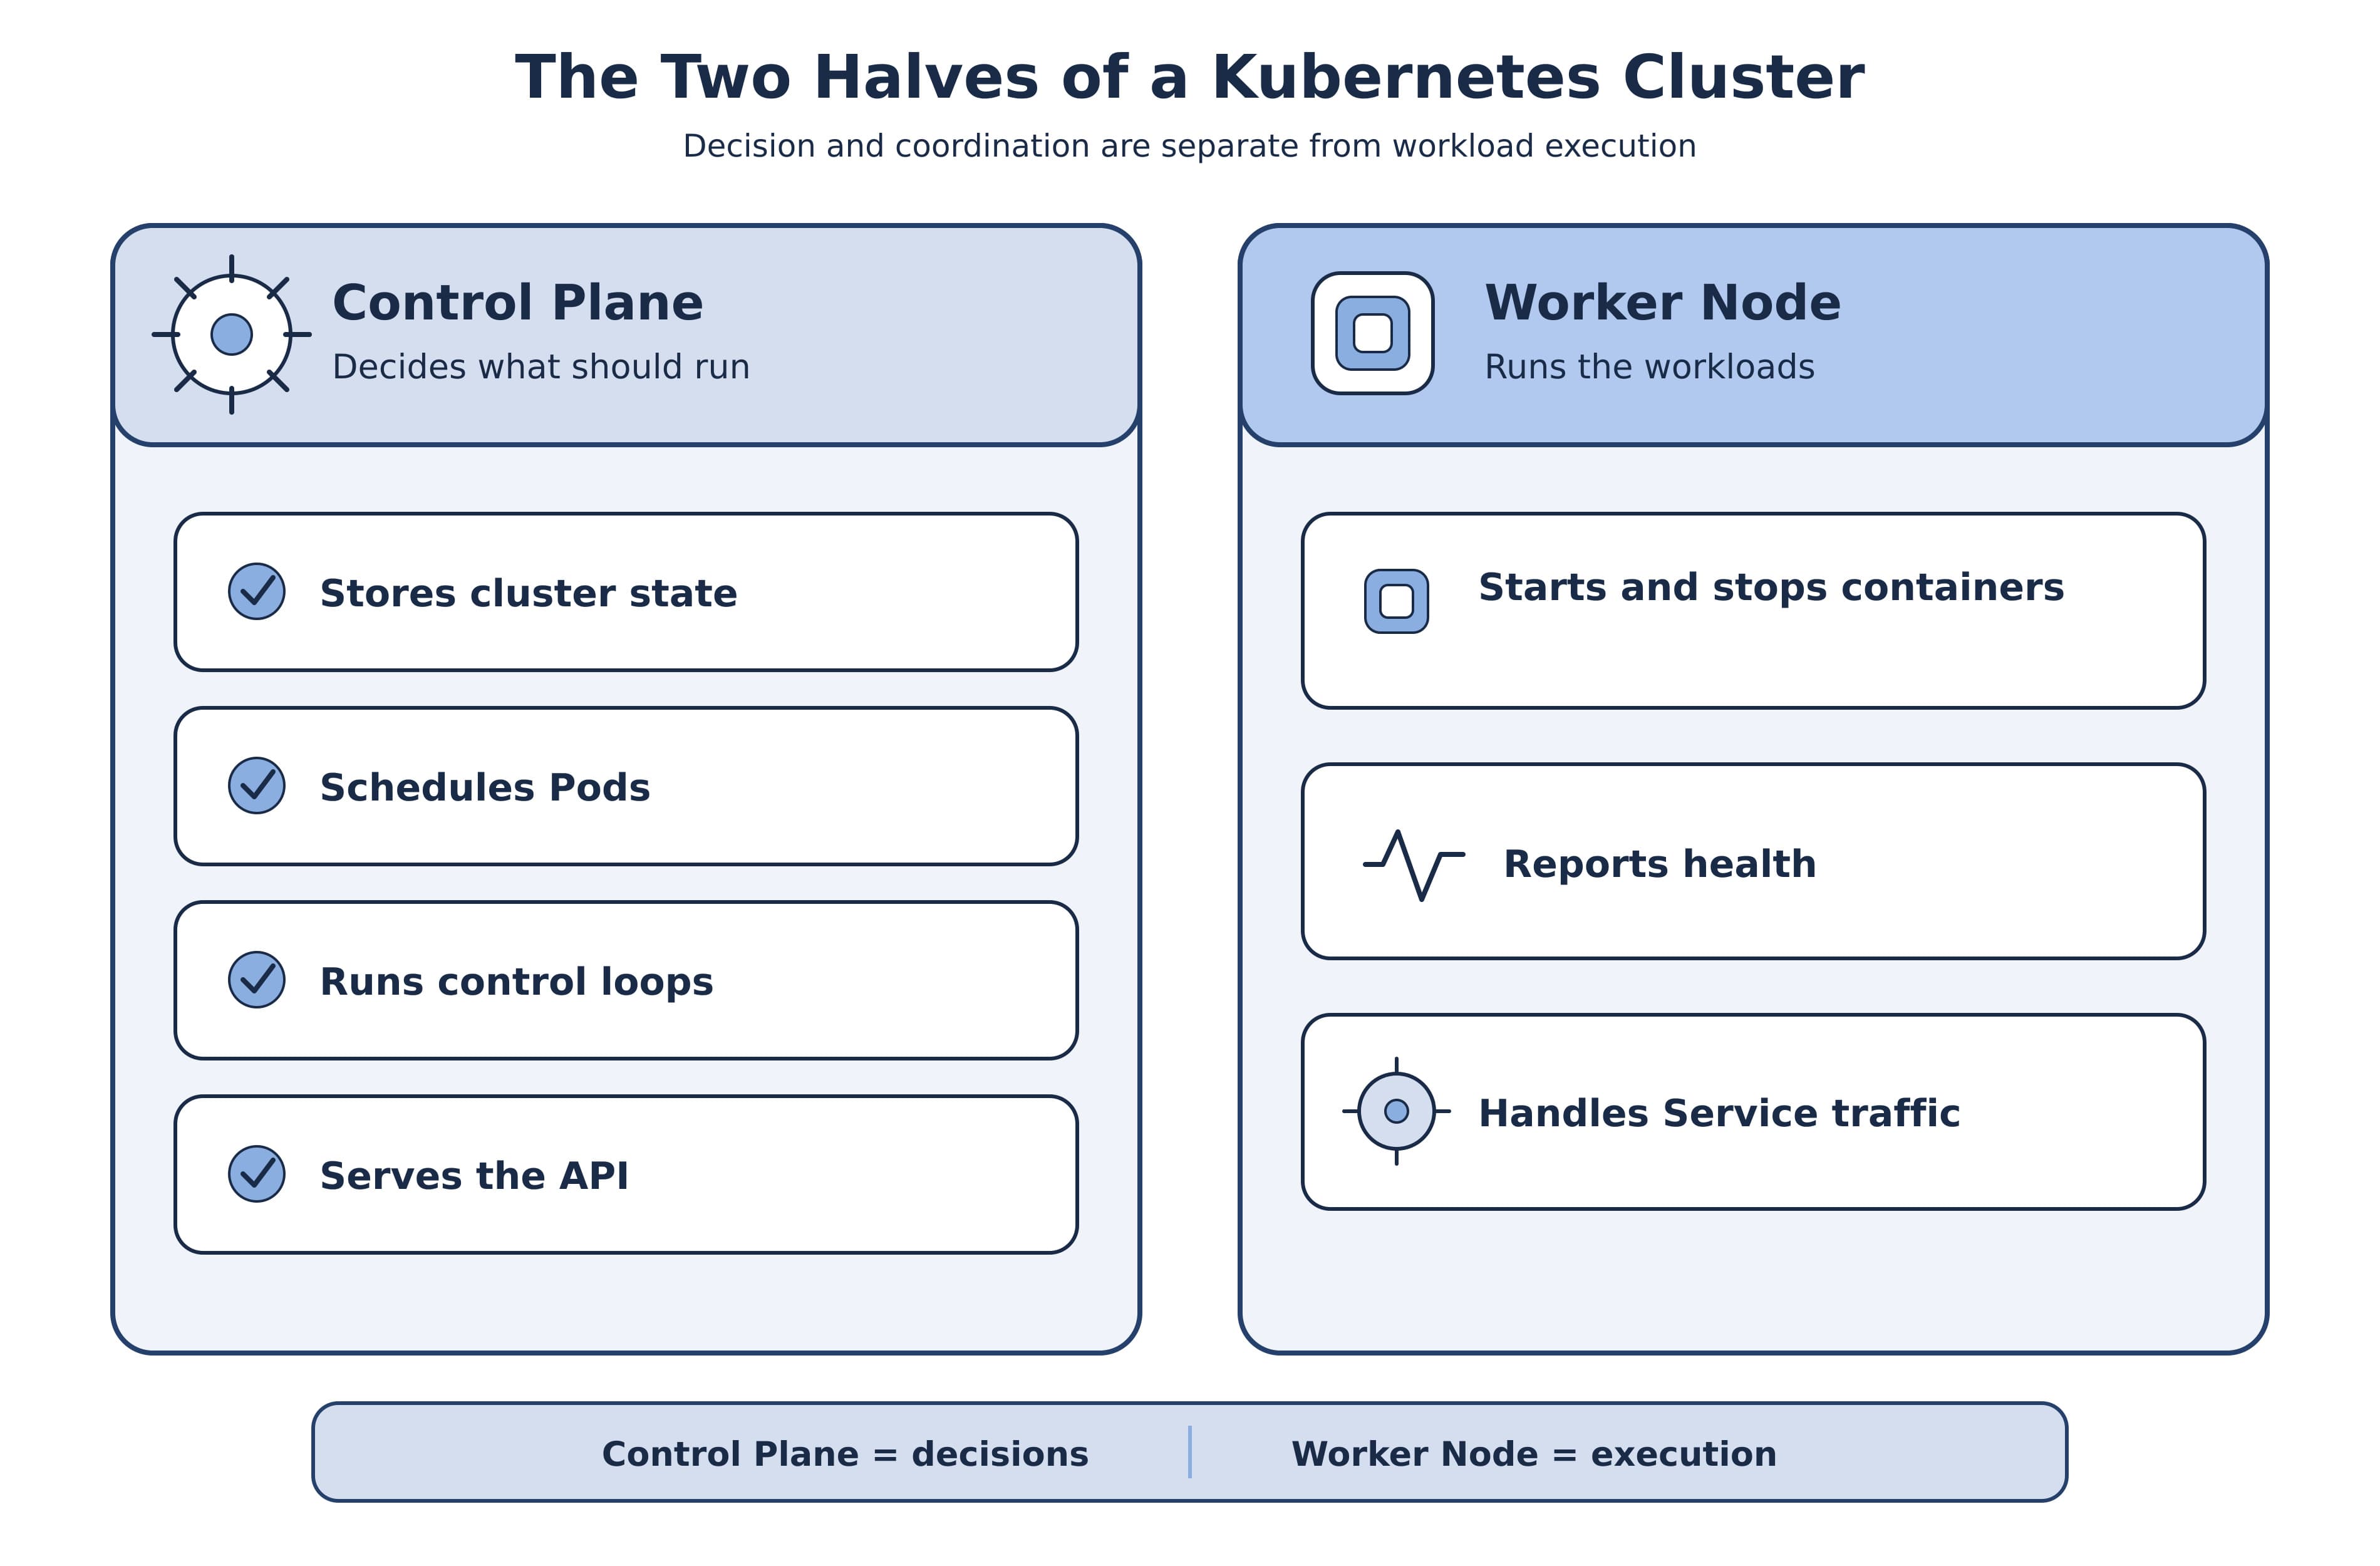
A Kubernetes cluster divides into a control plane, which decides what should run, and worker nodes, which run it. The control plane manages the worker nodes and the Pods in the cluster. The worker nodes host the Pods that are the components of your application workload.
The useful mental shorthand is decision versus execution. The control plane holds the cluster’s intent and all its state, and it computes what ought to happen. Worker nodes hold compute capacity and run what they are told to run. A worker node makes no global decisions; it does not know or care what the rest of the cluster is doing.
Two practical points that beginner material tends to skip.
Control plane components can run on any machine in the cluster, including one that also runs your workloads. Nothing physically prevents it. In production, the control plane usually runs across multiple computers for fault tolerance and high availability, and clusters are typically configured to keep application workloads off those machines so a busy application cannot starve the components managing the cluster. That is a configuration choice, not an architectural law.
A cluster can have exactly one node. A learning or resource-limited environment may have only one node running both control plane and workloads — which is precisely what tools like minikube and kind give you. A single-node cluster is a real cluster, not a simulation. It teaches the architecture accurately; it just cannot survive that node failing.
Control plane components
The control plane’s components make global decisions about the cluster — scheduling, for example — and detect and respond to cluster events. Kubernetes 1.36 lists five, one of which is explicitly optional.
| Component | Its one job | Required? |
|---|---|---|
kube-apiserver | Exposes the Kubernetes HTTP API; the front door to everything | Yes |
etcd | Consistent, highly available key-value store for all API server data | Yes |
kube-scheduler | Assigns Pods that have no node yet to a suitable node | Yes |
kube-controller-manager | Runs the controllers that implement Kubernetes API behavior | Yes |
cloud-controller-manager | Integrates with the underlying cloud provider | Optional |
kube-apiserver — the front door
kube-apiserver is the control plane component that exposes the Kubernetes HTTP API, and it is the only component that talks to the cluster datastore. Every other component — the scheduler, the controllers, every kubelet on every node, and your kubectl — reads and writes cluster state by calling this API. Nothing reads or writes etcd directly.
That single constraint is the most important structural fact in Kubernetes, and the most commonly misdrawn detail in architecture diagrams. It is what makes the system coherent: one place where authentication happens, one place where authorization is enforced, one place where changes can be validated and rejected, and one consistent view of state that every component agrees on.
Requests arriving at kube-apiserver pass through three stages in order:
- Authentication — who is making this request? A user, a service account, a node.
- Authorization — is this identity allowed to perform this action on this resource? Typically evaluated by RBAC rules.
- Admission control — should this request be modified or rejected even though it is authorized? Admission controllers can mutate an object (adding defaults, injecting sidecars) or validate it against policy and refuse it.
Only after all three does the object get persisted. When a kubectl apply fails with a policy error rather than a permissions error, admission control is usually what rejected it.
Components do not poll the API server on a timer. They open watches — long-lived connections over which the API server pushes changes as they happen. This is why a Kubernetes cluster reacts in seconds and why the architecture scales: components are notified, not asking.
etcd — the cluster’s single source of truth
etcd is a consistent and highly available key-value store used as Kubernetes’ backing store for all cluster data. Every object — every Pod, Deployment, Service, Secret, ConfigMap, and the entire record of what should be running — lives in etcd. Nothing else in the cluster is durable. If you have a current etcd backup, you can rebuild a cluster; without one, you cannot.
Two operational facts from the Kubernetes documentation on operating etcd that follow directly from how it works:
- Run
etcdas a cluster with an odd number of members.etcdis a leader-based distributed system that needs a majority of members to agree before committing a write. Odd membership is what makes a majority well-defined — three members tolerate one failure, five tolerate two. Adding a fourth member to a three-member cluster buys no additional fault tolerance. - Have a backup plan. The Kubernetes documentation states this directly, and it is the recommendation that separates clusters that survive an incident from clusters that are rebuilt from memory.
- Restrict access to
kube-apiserveronly. The Kubernetes documentation puts the security stake plainly: access toetcdis equivalent to root permission in the cluster, so ideally only the API server should have access to it. This is why “everything goes through the API server” is a security boundary and not just a design preference — every Secret in your cluster is inetcd.
The failure behavior is worth memorizing because it explains a great deal about the architecture. If a majority of etcd members permanently fail, the etcd cluster is considered failed, and Kubernetes cannot make any changes to its current state. Already-scheduled Pods might continue to run, but no new Pods can be scheduled. Your application does not necessarily go down. Your ability to change anything does.
etcd requires a majority and an odd member count is what changes your decisions; the internals do not.kube-scheduler — deciding where Pods run
kube-scheduler is the control plane component that watches for newly created Pods with no node assigned, and selects a node for each one to run on. It does not start containers. It makes a decision and records it.
Scheduling is a two-step operation:
- Filtering finds the set of nodes where it is feasible to schedule the Pod. The
PodFitsResourcesfilter, for example, checks whether a candidate node has enough available resources to meet the Pod’s resource requests. Nodes that survive filtering are called feasible nodes. Node selectors, taints and tolerations, and affinity rules also narrow this set. - Scoring ranks the remaining feasible nodes against the active scoring rules, and the scheduler assigns the Pod to the node with the highest score. If several nodes tie,
kube-schedulerpicks one of them at random.
The scheduler then notifies the API server of its decision, in a process called binding.
Two consequences that explain errors you will actually see. If the list of feasible nodes is empty, the Pod is not schedulable and remains unscheduled until the scheduler can place it — this is a Pod stuck in Pending, and the usual cause is that no node has enough unreserved CPU or memory to satisfy its requests. And kube-scheduler is the default scheduler, not the only possible one: Kubernetes is designed so you can run your own scheduler instead of or alongside it.
kube-controller-manager — where the control loops live
kube-controller-manager runs the controller processes that implement Kubernetes API behavior. Each controller watches one or more resource types and works to move current state toward the desired state in each object’s spec. Logically these are separate control loops; they are compiled into a single binary and run in a single process to reduce complexity.
The mechanism that beginners most often get wrong is what a controller actually does when it detects a gap. Built-in controllers manage state by interacting with the API server — they generally do not act on the cluster directly. The Kubernetes documentation gives the Job controller as its example: it does not run any Pods or containers itself. It tells the API server to create or remove Pods, and other components react to that.
So when a Deployment scales from three replicas to five, the controller does not contact any node. It creates two Pod objects through the API server. The scheduler notices two unassigned Pods and binds them to nodes. The kubelet on each of those nodes notices a Pod assigned to it and starts containers. No component in that chain gave an order to the next one. Each watched the API server, saw a state it was responsible for, and acted. Removing any one of them stalls the chain at that point rather than breaking the others.
cloud-controller-manager (optional) — the cloud seam
cloud-controller-manager embeds cloud-provider-specific control logic, letting you link your cluster into a cloud provider’s API while keeping cloud-independent components separate. It runs only the controllers that are specific to your cloud provider — the ones that know how to create a load balancer, attach a disk, or ask whether a virtual machine still exists.
This component is optional and is genuinely absent from many clusters. If you run Kubernetes on bare metal, on your laptop, or in a learning environment, there is no cloud-controller-manager and nothing is missing. That is why the split exists at all: cloud-specific behavior lives in a separate component so that Kubernetes itself does not have to know about any particular provider.
Worker node components
A node is a worker machine — virtual or physical — managed by the control plane, and every node runs the components needed to host Pods. A cluster typically runs several; a learning cluster may run one.
Nodes join a cluster in one of two ways: the kubelet on the node self-registers with the control plane, which is the common case, or a human (or another process) manually adds a Node object. Registration is not a manual step in any normal setup.
| Component | Its one job | Required? |
|---|---|---|
kubelet | Ensures that the containers described in Pods are running and healthy on this node | Yes |
| Container runtime | The software that actually runs containers | Yes |
kube-proxy | Maintains the network rules that implement Kubernetes Services | Optional — see below |
kubelet — the node’s agent
The kubelet is an agent that runs on every node and ensures that the containers described in a Pod’s specification are running and healthy. It is the only component that acts on the node itself, and the point where the cluster’s intent becomes a running process.
Its loop: watch the API server for Pods assigned to this node, compare that list against what is actually running locally, and reconcile the difference — start what should exist, restart what has failed its health checks, stop what should no longer be there. It then reports Pod and node status back to the API server, which is how the control plane knows the node is alive and what condition its workloads are in.
Two boundaries worth stating explicitly. The kubelet does not run containers itself — it calls a container runtime, over the interface described next. And the kubelet only manages containers created by Kubernetes; other containers on the same machine are outside its remit.
Container runtime — where containers really run
The container runtime is the software responsible for actually running containers on a node, and you must install one on every node for Pods to run there. It pulls images, unpacks them, sets up the namespaces and cgroups that isolate the process, and starts and stops it.
The kubelet talks to whichever runtime is installed through the Container Runtime Interface (CRI) — the main gRPC protocol for communication between the kubelet and the container runtime. CRI is a plugin interface: it lets the kubelet use a variety of container runtimes without needing to recompile cluster components. The kubelet acts as the client, and its endpoint is configured with the --container-runtime-endpoint flag.
Runtimes documented for Kubernetes 1.36 are containerd, CRI-O, Docker Engine, and Mirantis Container Runtime. containerd and CRI-O are both commonly used in clusters today.
The version-dependent rule that causes real outages: for Kubernetes v1.26 and later, the kubelet requires that the container runtime supports the v1 CRI API. If a runtime does not support the v1 API, the kubelet will not register the node. The node does not join in a degraded state — it does not join at all. If you upgrade a node’s Kubernetes version and it silently disappears from kubectl get nodes, an unsupported runtime API version is a prime suspect.
kube-proxy (optional) — making Services reachable
kube-proxy is a network proxy that runs on each node and maintains the network rules that allow Kubernetes Services to be reached. A Service gives a stable virtual IP address to a set of Pods whose individual members change constantly; kube-proxy is what makes traffic to that address arrive at a real Pod.
The Kubernetes documentation now lists kube-proxy as optional, and the reason is specific rather than theoretical: some network plugins provide their own third-party implementation of proxying, and when you use that kind of plugin the node does not need to run kube-proxy. Something must implement Service routing on every node — but it does not have to be this component.
The modes are version-sensitive, and this is where a lot of published material is out of date:
| Mode | Platform | Status as of Kubernetes 1.36 |
|---|---|---|
iptables | Linux | The default mode |
nftables | Linux | Stable and enabled by default since v1.33; requires kernel 5.13 or later |
ipvs | Linux | Deprecated in v1.35 |
kernelspace | Windows | The only mode available on Windows |
The Kubernetes documentation describes the nftables mode as essentially a replacement for both the iptables and ipvs modes, with better performance than either, and recommends it as a replacement for ipvs. For systems too old to run nftables mode, the documentation suggests considering iptables mode rather than ipvs, since iptables performance has improved substantially since ipvs mode was introduced.
One correction while you are here, because it changes what you expect from a Service: in iptables mode, the rules installed for each endpoint select a backend Pod at random by default. The same is true in nftables mode. This is random distribution, not intelligent load balancing — no awareness of load, latency, or connection count. Weighted and connection-aware balancing strategies are what ipvs mode offered, and if you need that behavior today it belongs in an ingress controller or service mesh rather than in kube-proxy.
Pods: the unit Kubernetes actually schedules
A Pod is the smallest deployable unit of computing that you can create and manage in Kubernetes. Kubernetes does not schedule containers. It schedules Pods, and containers ride along inside them. Every scheduling decision, every scaling operation, and every health check in this article operates on Pods.
A Pod is a group of one or more containers with shared storage and network resources, and a specification for how to run them. A Pod’s contents are always co-located and co-scheduled — they run on the same node, and they start and stop as a unit.
The definition connects directly back to the container grounding earlier in this article. A Pod’s shared context is a set of Linux namespaces, cgroups, and potentially other facets of isolation — the same things that isolate a container. A Pod models an application-specific logical host: containers inside one Pod share a network namespace, so they reach each other on localhost and share a single IP address, and they can share storage volumes. Containers in different Pods cannot do either, even on the same node.
The mistake to avoid: the most common Pod model is one container per Pod, where the Pod is simply a wrapper around a single container. Multi-container Pods are described in the Kubernetes documentation as a relatively advanced use case, reserved for containers that are tightly coupled and need to share resources — a sidecar that ships logs, for instance. You do not use multiple containers in a Pod to run multiple copies of your application. Replication is achieved by running multiple Pods, which is what a Deployment manages for you.
Does Kubernetes still use Docker?
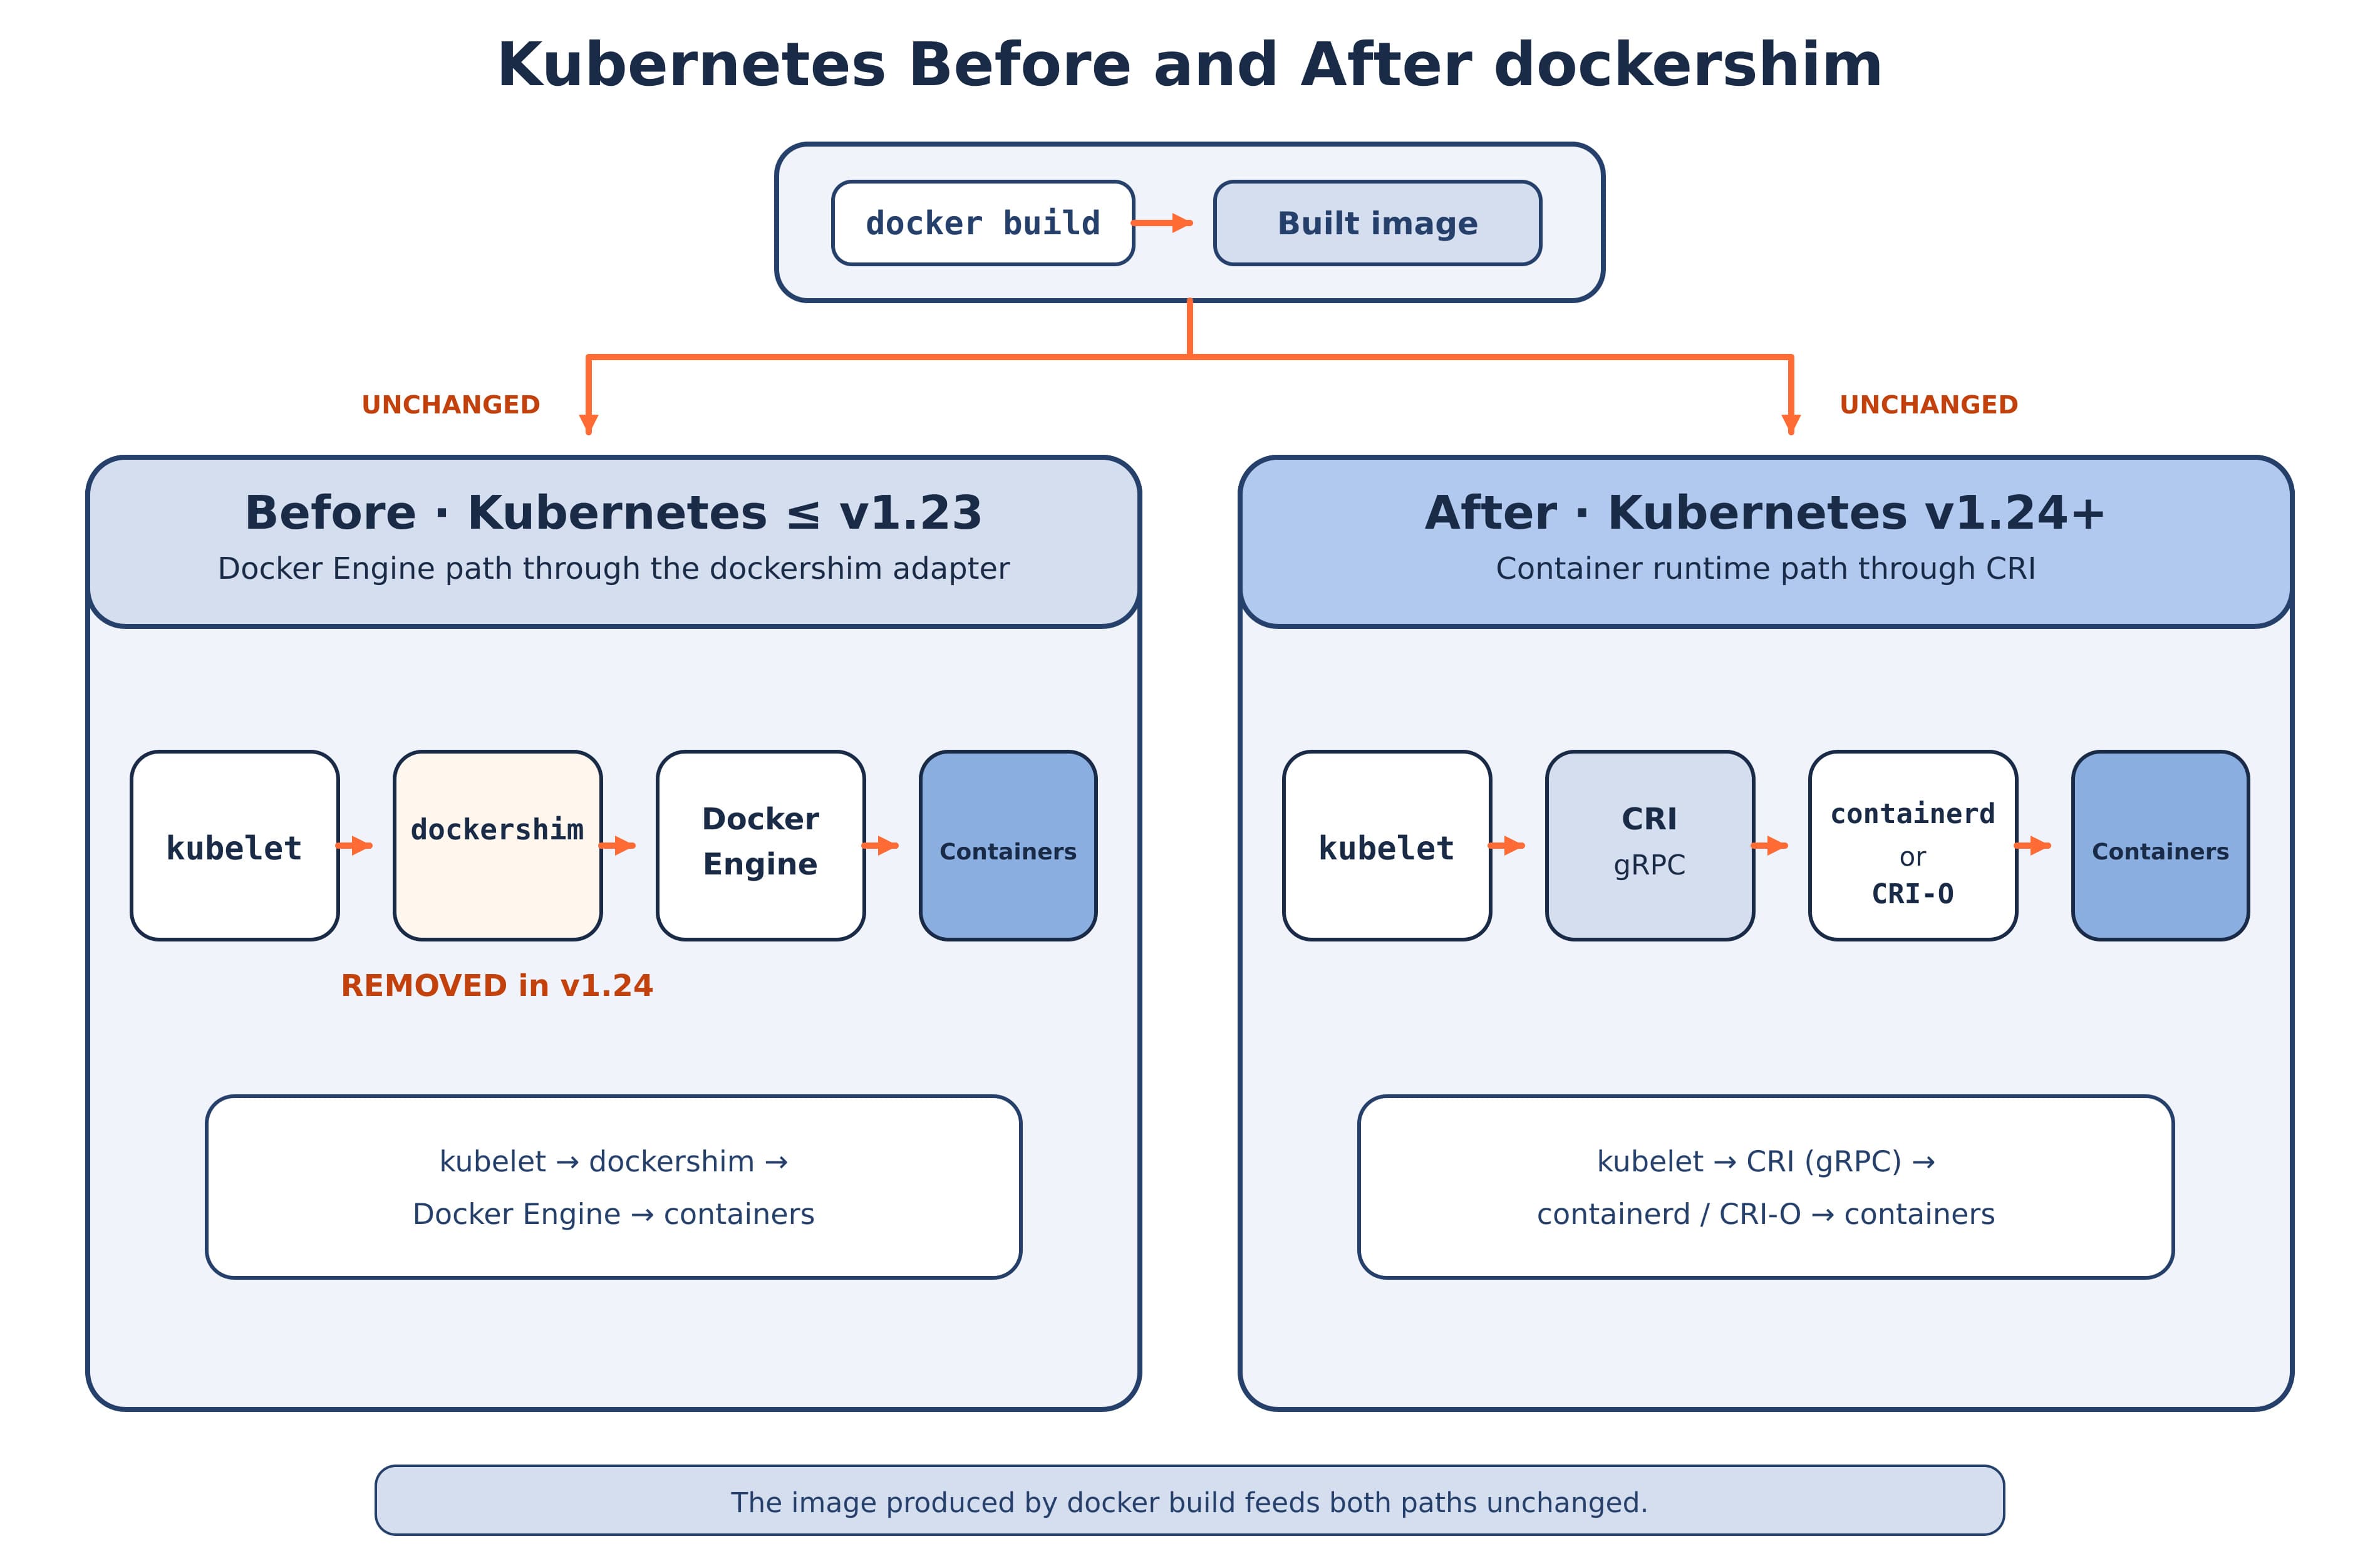
Yes and no — and the distinction matters. Kubernetes removed dockershim, the built-in adapter that let the kubelet drive Docker Engine directly, in v1.24. Kubernetes did not remove support for containers or for images built with Docker. Container images produced by docker build work with all CRI implementations, and existing images continue to work exactly the same.
This is the question that produces the most confusion for people learning Kubernetes, so here is the full sequence.
What was actually removed. Kubernetes releases before v1.24 shipped a component called dockershim — an adapter inside the kubelet that translated between Kubernetes and Docker Engine. Its removal was announced in the v1.20 release, where the only user-visible change was a warning logged at kubelet startup. The actual removal happened in v1.24.
Why it was removed. The Kubernetes dockershim removal FAQ is direct about the reasoning. The dockershim code was always intended to be a temporary solution — hence the name, shim — and maintaining it had become a heavy burden on the Kubernetes maintainers. The underlying cause is structural: Kubernetes talks to container runtimes through CRI, and Docker Engine does not implement CRI. Every other supported runtime does. Kubernetes was carrying bespoke code for one runtime and generic code for all the others. There was also a forward-looking reason: features largely incompatible with dockershim — such as cgroups v2 and user namespaces — are implemented in newer CRI runtimes, so removing the shim unblocked work in those areas.
What this means for your images — the part that actually matters to a learner. Nothing changes. Docker builds OCI-compliant images, and so does every other modern image build tool. CRI is the interface between the kubelet and the runtime; it has nothing to do with the image format. An image you built with docker build in 2020 runs on Kubernetes 1.36 today, unmodified. If you have been learning Docker to prepare for Kubernetes, none of that time was wasted.
What this means for a cluster. Clusters need a CRI-conformant runtime — Kubernetes 1.36 requires that you use a runtime conforming to CRI. In practice, most people install containerd or CRI-O, which speak CRI natively and require no adapter. Docker Engine can still be used as a Kubernetes runtime, but it needs a separate CRI adapter to do so, since Docker Engine itself does not implement the interface.
A last piece of vocabulary that resolves the confusion at its root: Docker and containers are not the same thing. Docker popularized the Linux container pattern and was instrumental in developing the underlying technology, but containers on Linux existed long before Docker, and the ecosystem is now much broader than any one tool. Standards like OCI (for image and runtime formats) and CRI (for the Kubernetes-to-runtime interface) are what let many tools interoperate. “Kubernetes dropped Docker” is a headline. “Kubernetes dropped a Docker-specific adapter it never wanted to maintain, and standardized on the interface everything else already used” is what happened.
How it all fits together: what happens when you run kubectl apply
Running kubectl apply starts a chain that passes through kube-apiserver, etcd, a controller, kube-scheduler, a kubelet, and a container runtime — in that order, and without any component ever issuing a command to the next. Most explanations introduce those components in isolation and stop there. Tracing one deployment through all of them is what turns a list of names into an architecture.
Assume deployment.yaml describes a Deployment with three replicas, and you run:
kubectl apply -f deployment.yaml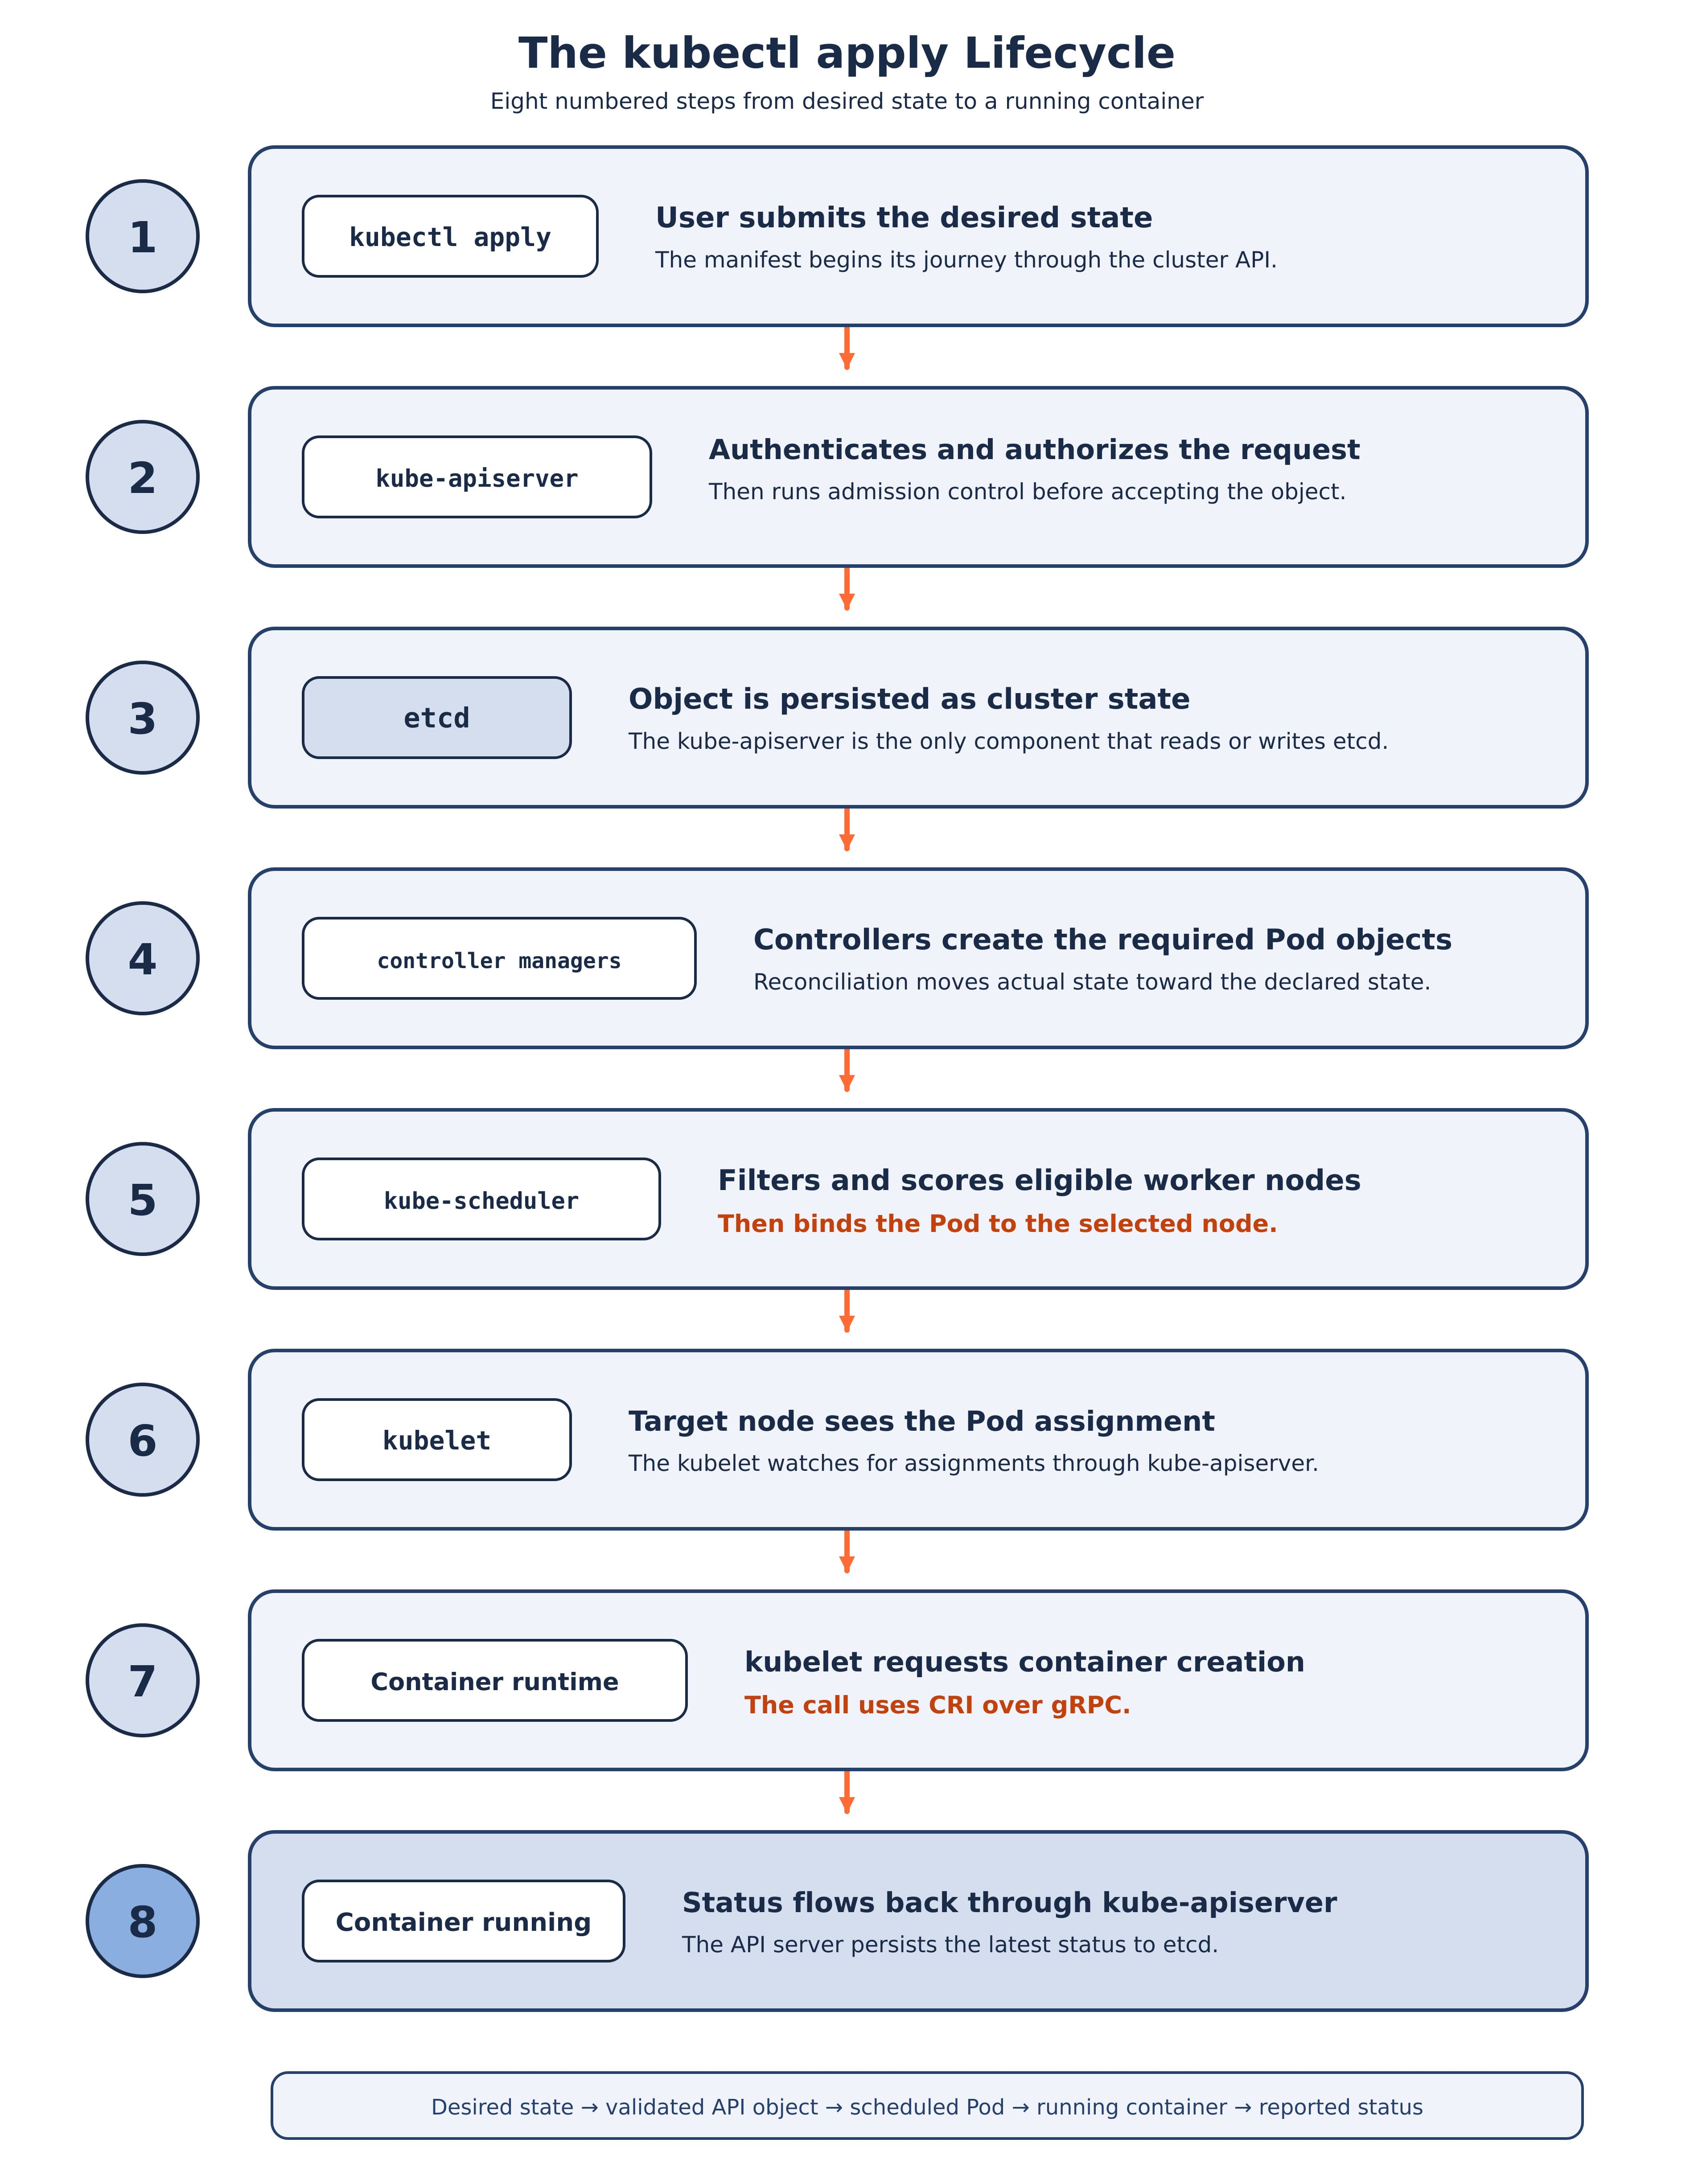
1. kubectl sends an HTTP request. kubectl reads your YAML, converts it to JSON, finds the cluster address and your credentials in your kubeconfig file, and sends an HTTP request to kube-apiserver. kubectl is a client, and it has no special powers — anything it does, any authorized client can do over the same API.
2. kube-apiserver authenticates, authorizes, and admits. The API server establishes who you are, checks whether that identity is permitted to create a Deployment in that namespace, then runs the object through admission controllers, which may modify it (applying defaults) or reject it (violating policy). A rejection ends the story here, and this is where most “why won’t this deploy” errors originate.
3. The object is persisted to etcd. Only after passing all three stages is the Deployment written to etcd by the API server. This is the moment kubectl apply returns success — and it is worth being precise about what that success means. It confirms your desired state has been recorded. It does not mean anything is running yet. Every remaining step happens asynchronously, after your command has already exited.
4. Controllers react. The Deployment controller, watching the API server, sees a Deployment with three desired replicas and no corresponding ReplicaSet. It creates a ReplicaSet through the API server. The ReplicaSet controller sees a ReplicaSet wanting three Pods and zero existing, and creates three Pod objects through the API server. Each Pod is written to etcd with no node assigned.
5. kube-scheduler places each Pod. The scheduler, watching for Pods with no node assigned, sees three. For each one it filters the nodes down to those that can feasibly run it, scores the survivors, picks the highest, and binds the Pod by telling the API server which node it chose. The Pod object in etcd now has a node name. Still nothing is running — the scheduler updated a record.
6. The kubelet on the target node notices. Each kubelet watches the API server for Pods bound to its own node. The kubelet on the chosen node sees a Pod assigned to it that is not running locally, and reconciles that difference. Note the direction: the scheduler never contacted the node, and the API server did not push work to it. The node pulled its own assignment.
7. The kubelet calls the container runtime over CRI. The kubelet issues gRPC calls over the Container Runtime Interface to the installed runtime — containerd or CRI-O, typically — asking it to pull the image if needed, create the Pod sandbox, and start the containers with the specified configuration.
8. Containers start, and status flows back. The runtime starts the containers. The kubelet monitors them, runs any configured probes, and reports status back to kube-apiserver, which persists it to etcd. When you run kubectl get pods and see Running, you are reading the state that traveled back along this path.
What the trace reveals. Read step by step, one property stands out: no component in this chain issues a command to the next one. The controller did not tell the scheduler to schedule. The scheduler did not tell the kubelet to start anything. Each component watches the API server for state it cares about, acts within its own narrow responsibility, and writes the result back. The API server and etcd are the only shared dependency.
That is why the failure behavior in the next section looks the way it does, and why this design scales: components can be restarted, upgraded, or replaced independently, because none of them holds a conversation with any other.
What breaks when a component fails
Component failure is the fastest way to check whether you actually understand the architecture, because the answers are frequently counterintuitive and follow directly from the watch-and-reconcile design above.
If etcd or the API server goes down
Your running applications keep serving traffic. Your ability to change anything stops.
This surprises people, and it falls straight out of the design. Containers are already running on nodes, supervised by each node’s kubelet. Service routing rules are already installed on each node by kube-proxy. None of that requires the control plane to be reachable moment to moment. A user hitting your application does not touch the control plane at all.
What you lose immediately is every operation that requires reading or changing cluster state:
kubectlstops working entirely — it only talks tokube-apiserver.- No new Pods can be scheduled. The Kubernetes documentation is explicit for the
etcdcase: if a majority ofetcdmembers permanently fail, theetcdcluster is considered failed, Kubernetes cannot make changes to its current state, already-scheduled Pods might continue to run, but no new Pods can be scheduled. - Deployments, scaling, and rollouts do not progress.
- Failed Pods are not replaced on other nodes, because that requires scheduling. A container that crashes on a node whose
kubeletis healthy is still restarted locally according to the Pod’srestartPolicy, with exponential backoff between repeated attempts — the behavior that surfaces asCrashLoopBackOff. Local restart is handled by the node’s ownkubeletand does not depend on the control plane being reachable.
So the cluster degrades into a frozen snapshot: whatever was running keeps running, and nothing can adapt. That is survivable for minutes and dangerous for hours, because the first node failure during the outage removes capacity that cannot be replaced.
This is also the concrete argument for the two recommendations in the etcd section. An odd number of etcd members means losing one does not cost you the majority. A current backup means a lost etcd cluster is a restore rather than a rebuild.
If a worker node goes down
The Pods on that node are lost, and the control plane replaces them on other nodes — provided the control plane is healthy and other nodes have capacity.
The sequence uses the same machinery as a normal deployment. The node stops reporting status to kube-apiserver. The node controller sets the node’s Ready condition to Unknown, and if the node stays unreachable it triggers eviction for the Pods on it. The controllers that own those Pods notice that current state no longer matches desired state — a ReplicaSet wanting three Pods can now see only two — and create replacement Pod objects. Those replacements have no node assigned, so kube-scheduler places them on healthy nodes, and the kubelet on each target node starts them.
Three qualifications worth carrying:
- Replacement is much slower than people expect. By default the node controller checks each node every 5 seconds, but waits 5 minutes between marking a node
Unknownand submitting the first eviction request. Only then do replacement Pods get created, scheduled, pull images if not cached, and start. These are configurable defaults, not fixed behavior — but if you have ever wondered why a dead node’s Pods seem to linger, this is why. - Capacity must exist. If the remaining nodes cannot satisfy the replacement Pods’ resource requests, those Pods sit in
Pendinguntil capacity appears. A cluster running at full utilization has no room to self-heal. - Stateful workloads are harder. A replacement Pod is a new Pod. Anything written to the failed node’s local disk is gone unless it was on networked storage that can be reattached elsewhere.
A single-node cluster has no recovery path for this, since there is nowhere else to place anything — which is the one architectural thing a learning cluster cannot teach you.
Beyond the core: addons every real cluster adds
The core Kubernetes components make a cluster that can run Pods, but not a cluster you would deploy an application to — cluster DNS and a network plugin are both addons rather than core components, and both are effectively mandatory in practice. Addons extend Kubernetes functionality using Kubernetes resources, and two of them are needed before most workloads function at all.
Cluster DNS is the one people forget until it breaks. A DNS addon serves DNS records for Kubernetes Services, so containers can resolve a Service by name instead of hard-coding an IP address. Almost every cluster requires cluster DNS, and almost every tutorial assumes it silently — when a Pod cannot resolve another Service by name, cluster DNS is where to look first.
A network plugin is what makes Pod networking exist at all. Kubernetes defines a networking model — every Pod gets its own IP, and Pods can reach each other across nodes without NAT — but it does not implement it. A CNI (Container Network Interface) plugin does, and you choose which one. Without a network plugin installed, Pods start and then fail to communicate, which presents as a mysteriously broken cluster rather than a missing component. Some CNI plugins also provide their own proxying, which is exactly the case where kube-proxy becomes unnecessary.
Other common addons include a web UI (Dashboard) for managing the cluster through a browser, container resource monitoring for collecting and storing metrics, and cluster-level logging for saving container logs to a central store.
The architectural point is that this is deliberate. Kubernetes specifies interfaces — CRI for runtimes, CNI for networking, CSI for storage — and lets you choose implementations. That is why “Kubernetes architecture” describes a shape that every cluster shares while no two clusters run quite the same software.
Common misconceptions about Kubernetes architecture
“Kubernetes replaced Docker.” Kubernetes removed dockershim in v1.24 — a Docker-specific adapter — not container support. Images built with docker build run on Kubernetes unchanged, because they are OCI images and CRI governs the runtime interface, not the image format.
“The master node is where my apps run.” The current term is control plane, and its job is deciding what runs, not running it. Workloads run on worker nodes. Control plane machines can run workloads and in single-node learning clusters they do, but production clusters normally keep application workloads off them.
“Components talk to each other.” They talk to kube-apiserver. The scheduler never contacts a kubelet; controllers do not contact nodes. Every component watches the API server and acts on what it sees, which is why a component can be restarted without coordinating with any other.
“etcd is a database my application can use.” etcd stores cluster state and is written to only by kube-apiserver. It is not application storage, and writing to it directly is a way to corrupt a cluster.
“If the control plane goes down, my applications go down.” Running Pods keep running and keep serving traffic. What stops is change: scheduling, scaling, rollouts, and kubectl.
“kube-proxy load-balances intelligently.” In iptables and nftables modes it selects a backend Pod at random by default. It provides distribution, not load-aware balancing.
“Every cluster has the same components.” Both kube-proxy and cloud-controller-manager are documented as optional. A bare-metal cluster has no cloud-controller-manager, and a cluster whose CNI plugin implements its own proxying may run no kube-proxy.
Frequently asked questions
What are the main components of Kubernetes architecture?
Kubernetes architecture has two groups of components. The control plane contains kube-apiserver, etcd, kube-scheduler, kube-controller-manager, and optionally cloud-controller-manager. Every worker node runs a kubelet, a container runtime, and optionally kube-proxy. The control plane decides what should run; worker nodes run it.
What is the difference between the control plane and a worker node?
The control plane decides what should run in a Kubernetes cluster and stores all cluster state; worker nodes run the actual application workloads. The control plane manages the nodes and the Pods. Worker nodes host Pods and make no global decisions. Control plane components can technically run on the same machine as workloads, though production clusters normally separate them.
Does Kubernetes still use Docker?
Kubernetes removed dockershim — the built-in adapter for Docker Engine — in v1.24, so Kubernetes does not use Docker Engine as a runtime by default. Container images built with docker build still work on Kubernetes exactly as before, because they are OCI images. Most clusters run containerd or CRI-O as the runtime instead.
What is a Pod in Kubernetes?
A Pod is the smallest deployable unit you can create and manage in Kubernetes. It is a group of one or more containers with shared storage and network resources, always co-located and co-scheduled on one node. Containers in a Pod share a network namespace and reach each other on localhost. One container per Pod is the most common model.
What happens when you run kubectl apply?
Running kubectl apply sends your manifest to kube-apiserver, which authenticates the request, authorizes it, runs admission control, and persists the object to etcd. The command returns at that point. Controllers then create Pod objects, kube-scheduler binds each Pod to a node, and that node’s kubelet calls its container runtime over CRI to start the containers.
What is etcd used for in Kubernetes?
etcd is a consistent, highly available key-value store that serves as Kubernetes’ backing store for all cluster data — every Pod, Deployment, Service, Secret, and ConfigMap. Only kube-apiserver reads from and writes to it. Run etcd with an odd number of members and maintain a backup plan, because losing it means losing the cluster’s entire record of state.
Is kube-proxy required?
kube-proxy is listed as optional in current Kubernetes documentation. Something must implement Service networking on each node, but some network plugins provide their own proxying implementation, and clusters using such a plugin do not need to run kube-proxy. Where it does run, its default mode is iptables, and nftables mode has been stable and enabled by default since v1.33.
What is CRI in Kubernetes?
The Container Runtime Interface (CRI) is the main gRPC protocol for communication between the kubelet and a container runtime. It is a plugin interface that lets the kubelet use different container runtimes without recompiling cluster components. From Kubernetes v1.26 onward, the kubelet requires a runtime supporting the v1 CRI API; without it, the node will not register.
What happens if the control plane goes down?
If the Kubernetes control plane goes down, already-running Pods keep running and keep serving traffic, because nodes operate independently once workloads are placed. What stops is change: kubectl fails, no new Pods can be scheduled, deployments and scaling do not progress, and failed Pods are not replaced on other nodes. A kubelet still restarts crashed containers locally.
How many nodes does a Kubernetes cluster need?
A Kubernetes cluster needs at least one worker node to run Pods, and a learning or resource-limited environment may run everything on a single node. Production clusters run multiple worker nodes, and typically run the control plane across multiple machines, because a single node cannot survive its own failure — there is nowhere to reschedule its Pods.
What is Kubernetes cluster architecture?
Kubernetes cluster architecture is the arrangement of machines and components that make up one Kubernetes cluster. A cluster has a control plane — kube-apiserver, etcd, kube-scheduler and kube-controller-manager — that stores the desired state and makes scheduling decisions, and a set of worker nodes, each running a kubelet, a container runtime and usually kube-proxy, that run the Pods. The scheduler, controllers, kubelet and kube-proxy all coordinate through kube-apiserver, and only kube-apiserver reads and writes etcd.
What is K8s architecture?
K8s is shorthand for Kubernetes — the 8 stands for the eight letters between the K and the s — so K8s architecture means exactly the same thing as Kubernetes architecture: a control plane that decides what should run and stores cluster state in etcd, and worker nodes whose kubelet and container runtime run the Pods. The two names are used interchangeably in documentation, job descriptions and certification syllabi such as the CKA.
What does a Kubernetes architecture diagram show?
A Kubernetes architecture diagram shows two groups of components. On one side is the control plane: kube-apiserver at the centre, etcd connected only to kube-apiserver, and kube-scheduler, kube-controller-manager and the optional cloud-controller-manager all connected through kube-apiserver. On the other side are the worker nodes, each running a kubelet, a container runtime, optionally kube-proxy, and the Pods themselves. The key detail a correct diagram shows is that the scheduler, controllers, kubelet and kube-proxy all connect to kube-apiserver rather than to each other, and nothing except kube-apiserver connects to etcd. The one direct link on a node is between the kubelet and the container runtime, over the Container Runtime Interface (CRI).
Next steps: from understanding the architecture to running a cluster
You can now name every component, explain what each one does, trace a deployment from kubectl apply to a running container, describe what breaks when the control plane fails, and answer the Docker question accurately. That is the conceptual half.
The other half is operational, and it is learned by doing: standing up a cluster, writing manifests, watching a Pod sit in Pending and working out why, breaking a node deliberately to watch rescheduling happen. A sensible order from here is a local single-node cluster (minikube or kind), then Pods and Deployments, then Services and networking, then storage.
If you are mapping out a broader DevOps skill set, configuration management is the neighboring discipline — it manages what is installed and configured on machines, where Kubernetes manages which containers run where. Our Ansible playbook tutorial covers that side.
Primary sources for the technical claims in this article — all verified on 2026-08-26: Kubernetes cluster architecture · Kubernetes components · Container Runtime Interface (CRI) · Controllers · kube-scheduler · Pods · Pod lifecycle · Nodes · Virtual IPs and Service proxies · Operating etcd clusters · Container runtimes · Dockershim removal FAQ